

How to properly configure the BIOS to install Windows 10

When we install the win10 operating system, we must set up the computer's BIOS. Because each of us has a different computer brand and model, so the shortcut key to enter the BIOS can be searched online first, and then restart to enter the BIOS. Make relevant settings on the interface. Let the editor tell you the specific steps ~ I hope it can help you.

How to install win10bios and set it up
1. Because each of us has a different computer brand and model, the shortcut key to enter the BIOS can be found online first. Search for it and then reboot into the BIOS interface.
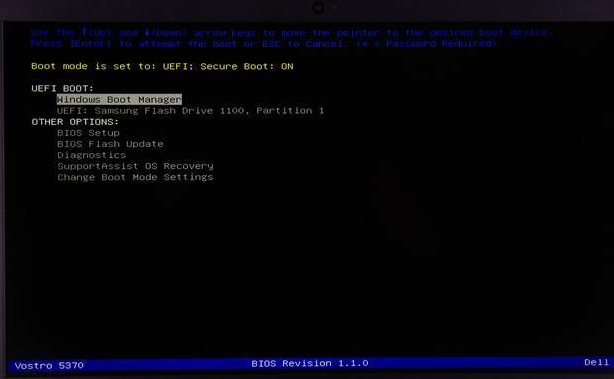
2. Find the third one in the first category, Boot Sequence (startup sequence, which can also be understood as the boot sequence).
Check whether UEFI is turned on, if not, remember to turn it on.
3. Then find sata operation (hard disk mode selection) in the first line of the second category.

Change the original RAID On to AHCI, ( It needs to be set whether a solid state is added or not)
PS: Why should we modify AHCI? The performance of AHCI hard disk mode is not only an improvement in speed. Compared with the earlier RAID On hard disk mode, AHCI provides more new features. feature support.
These new functions are the key to improving hard disk read and write performance.
Simply put, AHCI is a new hard disk algorithm. This hard disk algorithm can effectively improve the performance of mechanical hard disks and support some special functions.
Never enter the bios directly to make adjustments, otherwise you will not be able to enter the system. You can only make these adjustments when reinstalling the system.
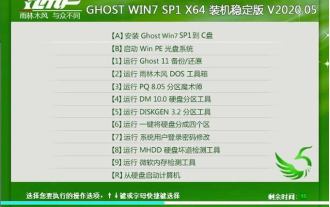
F10 saves these modified options. Start the computer and press F12 to select the inserted system USB disk and press Enter.
#4. Enter the installation page. There is no need to change the first page. Click Next. Click Install Now. Follow the prompts to install it later.
During the installation process, you will see a lot of partitions, delete them all! Leave nothing behind! Be quick, be steady, be accurate, be ruthless!
At this glance, we can see that the pre-installed Windows system is so messy, how can the computer not be stuck?
5. After deleting, do not create a new partition on this page. Click Next. If there is a solid state, the installation speed will be faster. If there is no solid state, the installation will be slower. It will take 10-20 minutes. Wait patiently
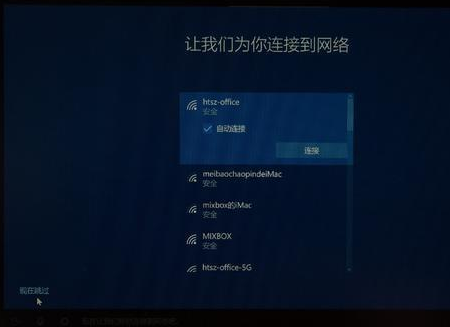
6. Do not connect to the Internet here. Remember to skip this step and wait until you enter the system to connect to the Internet. Otherwise, the system will ask you to log in to your Microsoft account. If you have one, just connect to the Internet.
7. Enter the computer name and the installation is complete~
The above is the detailed content of How to properly configure the BIOS to install Windows 10. For more information, please follow other related articles on the PHP Chinese website!

Hot AI Tools

Undresser.AI Undress
AI-powered app for creating realistic nude photos

AI Clothes Remover
Online AI tool for removing clothes from photos.

Undress AI Tool
Undress images for free

Clothoff.io
AI clothes remover

Video Face Swap
Swap faces in any video effortlessly with our completely free AI face swap tool!

Hot Article
Hot Tools

Notepad++7.3.1
Easy-to-use and free code editor

SublimeText3 Chinese version
Chinese version, very easy to use

Zend Studio 13.0.1
Powerful PHP integrated development environment

Dreamweaver CS6
Visual web development tools

SublimeText3 Mac version
God-level code editing software (SublimeText3)
Hot Topics
 1386
1386
 52
52

 win7 enterprise edition activation key
Jul 15, 2023 pm 11:01 PM
win7 enterprise edition activation key
Jul 15, 2023 pm 11:01 PM
After installing the official Win7 Enterprise Edition system, many users will be prompted to use the Win7 Enterprise Edition activation key. Otherwise, they cannot use it normally. Then they need to use the Win7 Enterprise Edition permanent activation key to activate. For this reason, the editor will organize it for you. The most complete and latest Win7 Enterprise Edition activation key and Win7 Enterprise Edition permanent activation code universal serial number are provided for your reference, and the Win7 Enterprise Edition key does not distinguish between 32-bit or 64-bit. 1. Win7 Enterprise Edition activation key permanently activates Windows7AllVolumeEditionsVolume:MAKEnterprise;EnterpriseN;EnterpriseE;Professional;Profess
 How to use Win11 cross-device sharing
Jun 29, 2023 pm 03:24 PM
How to use Win11 cross-device sharing
Jun 29, 2023 pm 03:24 PM
How to use cross-device sharing in Win11? With the launch of Win11 system, many users have downloaded and experienced it. However, during use, they will inevitably encounter situations where they are not clear about how to operate. Some users want to use the cross-device sharing function, so how should they operate? ? The editor has compiled the Win11 cross-device sharing operation tutorial below. If you are interested, follow the editor and read on! 1. First, press the Windows logo key on the keyboard, or click the Start icon at the bottom of the taskbar. 2. Open the Start menu window, find and click Settings under Pinned Apps. 3. In the Windows Settings window, click Applications on the left and Applications and Features (Installed Applications, Application Execution Aliases) on the right. 4. When
 How to use the built-in virtual machine function of win11
Jan 09, 2024 am 10:21 AM
How to use the built-in virtual machine function of win11
Jan 09, 2024 am 10:21 AM
In the win11 system, if we want to use the built-in Android emulator, we need to open the built-in virtual machine before we can use it. However, many users don’t know how to open the virtual machine that comes with win11. In fact, we only need to open it in the more functions of win11. How to use the virtual machine that comes with win11: 1. Professional version of win111. First, enter "Settings" through the start menu. 2. Click the "Application" option on the left in the settings. 3. Then open "Optional Features" 4. Open "More Windows Features" in the relevant settings at the bottom 5. Check to turn on "Hyper-V" and click OK to save. 2. Home version of win111, right-click a blank space on the desktop and select New
 Win11 Tianxuanji open tutorial
Jan 07, 2024 am 12:00 AM
Win11 Tianxuanji open tutorial
Jan 07, 2024 am 12:00 AM
ASUS's Tianxuan series notebooks support the use of the virtual desktop favorite - Tianxuan Ji. However, how to bring up Tianxuan Ji in win11? In fact, we need to download it manually, and it can be used after the installation is completed. How to get out of Win11 Tianxuan Ji: 1. First, we open the "ASUS Download Center" through Baidu 2. After entering, select our product model on the left. 3. After the selection is completed, click "Drivers and Tool Software" on the right 4. After entering, select the product model or CPU model, and then select "win11" 5. Then find "Tianxuan Ji" under the list and click "Download" 6. After the download and installation is completed, open the software to let the Chosen Girl come out. If you select the wrong model, the downloaded software will become unavailable.
 YuLinMuFeng win7 streamlined version 64-bit ultra-small iso image download
Jul 23, 2023 am 10:41 AM
YuLinMuFeng win7 streamlined version 64-bit ultra-small iso image download
Jul 23, 2023 am 10:41 AM
Many friends are accustomed to using win7 system, but they don't like the redundant functions in win7 system. They want to know where to download the win7 streamlined version system. Here, the editor will introduce to you a YuLinMuFeng win7 streamlined version system. The following is an introduction to downloading the 64-bit ultra-small ISO image of the YuLinMuFeng win7 streamlined version. YuLinMuFeng Win7 Extreme Lite 64-bit integrates the latest Windows system drivers. After the system is installed, it automatically installs the drivers for the first time and automatically clears residual files. The system runs smoothly, is virus-free, and has no plug-ins. The installation speed is fast, and it is the preferred system for batch installation. The download of win7 extreme streamlined low memory version has unique features such as being pure, non-toxic, and free of activation. You can download the 64-bit extremely streamlined version of win7 with one click
 Step-by-step tutorial on how to set up scheduled shutdown in Windows 7
Jul 15, 2023 pm 04:02 PM
Step-by-step tutorial on how to set up scheduled shutdown in Windows 7
Jul 15, 2023 pm 04:02 PM
As office workers, there are always some busy people. Some employees are so busy before and after running. It is inevitable that the win7 system computer will not be shut down before leaving work. In this way, the win7 system computer will remain on until going to work the next day. , very low-carbon, so in order to avoid this situation, we can set a scheduled shutdown. Let’s take a look at the step-by-step tutorial on how to set the scheduled shutdown in win7. Let’s take a look. 1. Click "Start", select "Accessories - System Tools - Task Scheduler" in all programs, click "Task Scheduler" 2. After opening the "Task Scheduler" window, click "Create Basic Task" 3 . Enter "Schedule Shutdown" in the "Name" and "Description" options in the "Create Basic Task Wizard" dialog box.
 Detailed introduction on whether Intel 5th generation can install win11
Jan 08, 2024 am 08:06 AM
Detailed introduction on whether Intel 5th generation can install win11
Jan 08, 2024 am 08:06 AM
Although it is already 2021, there are still many old computer users using fifth-generation processors. Especially when win11 is about to be released recently, many users of fifth-generation processors want to know whether they can install win11 system. Although it cannot be installed according to Microsoft's list, it can actually be installed. Can win11 be installed on the fifth generation of Intel? Answer: Win11 can be installed on the fifth generation of Intel. Although it can be installed, detection must be skipped. 1. The fifth generation CPU can install win11, but because it is not on Microsoft's list, it cannot pass the win11 system detection. 2. In addition, we'd better meet other hardware configuration requirements of win11, because failure to meet them may cause lags after installation.
 Step-by-step tutorial on reinstalling win10 on Lenovo Xiaoxin 15
Jul 13, 2023 pm 02:37 PM
Step-by-step tutorial on reinstalling win10 on Lenovo Xiaoxin 15
Jul 13, 2023 pm 02:37 PM
How to reinstall win10 on Lenovo Xiaoxin Air15? The Xiaoxin Air15 laptop is a 15.6-inch laptop, but the Savior is much smaller than the Xiaoxin Air15 of the same size! Now let’s talk about the step-by-step tutorial on reinstalling win10 on Lenovo Xiaoxin 15. Come and learn it. 1. First, back up the files on the computer's C drive, then open the browser to download and install the Magic Pig System Reinstallation Master software and open it. 2. Then you can choose the win10 system. 3. Then wait for the download of the win10 system image. 4. After the download is completed, deploy the environment to the computer. 5. Restart the computer and enter the Windows startup manager interface. We choose the second one to enter the computer system. 6. Enter the electricity
