

[Must-learn for iOS16/15 update] How to completely back up iPhone data?

With the continuous improvements and updates of iOS16/15, we can enjoy new features and a smarter experience. More and more Apple fans have also chosen to upgrade to iOS16/15. However, system updates often encounter various problems, such as lags during the upgrade process or update failures, etc.
To ensure that your data will not be lost before updating to the latest version of iOS16/15, we recommend that you back up your iPhone before updating. In this tutorial, we will show you three methods to completely backup your iPhone. This will ensure that your data is safe and can be easily restored to its previous state after updating. The first method is to use iCloud for backup. You can find iCloud in settings and enable backup. Then you just have to wait for the backup to complete. Please make sure your iPhone is connected to a Wi-Fi network and has sufficient battery power. The second method is to use iTunes for backup. Connect your iPhone to your computer and open iTunes. In the device menu, select your iPhone and find the "Backup" option in the Summary tab. Click "Backup" and iTunes will automatically start backing up your iPhone data. The third method is to use a third-party backup tool such as iMazing or AnyTrans. These tools can provide more backup options and features, such as selecting specific data types to back up or setting up regular automatic backups. No matter which method you choose, backups are very important. This will ensure that your data is not lost during the update process and can be easily restored to its previous state. Remember to back up your iPhone before updating, and make sure the backup is complete before updating. That way, even if something unexpected happens, you can update with confidence, knowing your data is safe.
Method 1: Use iCloud to back up
- 1. Connect your device to the Internet. It is recommended to choose a reliable and stable WiFi environment.
- 2. Open the Settings application, find the iCloud option in the list, and click to enter.
- 3. After logging in and opening iCloud, open the apps in the list. Next, use the same Apple ID account on the new iPhone to log in to the iCloud service, and also open the applications in the list. In this way, you can import the address book on the old iPhone to the new phone. The backed up application data can be turned on/off as needed.

Method 2: iTunes Backup Data
First, open iTunes and make sure your iOS device is connected to the computer.
When using iOS devices, it is very simple to perform backup operations. First, you need to find and click on the icon of your iOS device. Once you click on the device icon, next you need to click on the [Back Up Now] button. In this way, you can start backing up your iOS device. Backup operations are very important to keep your data safe and ensure that your important files and information are not lost. So, don’t forget to perform backup operations regularly!
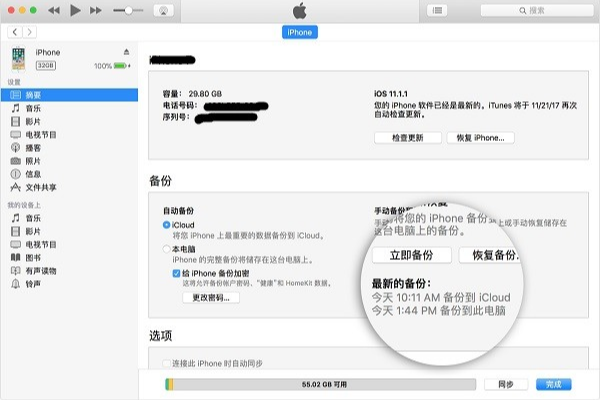
3. Wait for the iTunes backup to complete. Please wait patiently until the iTunes backup is completed. This process may take some time, depending on how much data you have on your device that needs to be backed up. Please do not interrupt this process before the backup is completed to avoid backup failure or data loss. You can continue with subsequent operations after the backup is complete.
Please follow the steps below to check whether the backup is successful: 1. Open the Edit menu. 2. Select a preference option. 3. In the device options, confirm whether the backup time and device name are accurate.
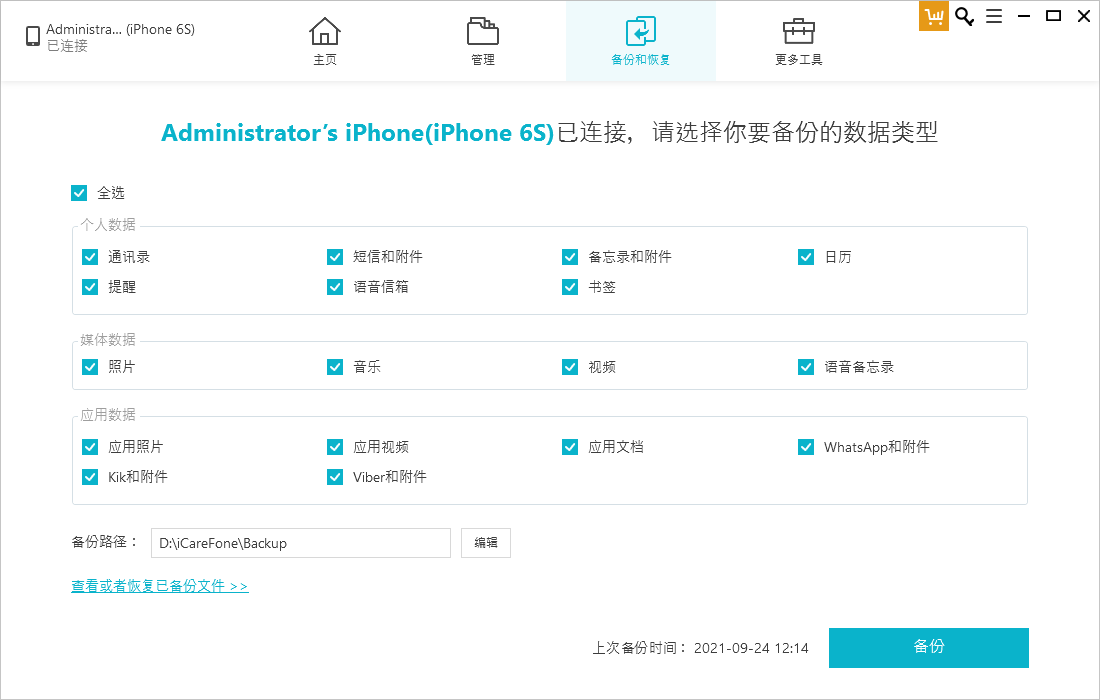
Method 3: Use Apple data management tools to back up for free
In addition to using iTunes, there is another way to back up iPhone data. This is the Apple Data Full Backup Tool, a professional software that can help us back up photos, contacts, text messages and other data for free with one click. Moreover, it also supports selective backup. After the backup is completed, we can preview and export the data online, which is very simple and convenient.
To back up the data on your iPhone, just download and open the Apple data management tool on your computer. Then, use the data cable to connect the iPhone to the computer. Next, click the "Backup and Restore" option in Apple's data management tool, and then click "Go to Backup Device." Finally, click "Backup" and wait for the full machine backup to complete. In this way, the data on your iPhone will be successfully backed up to the computer.
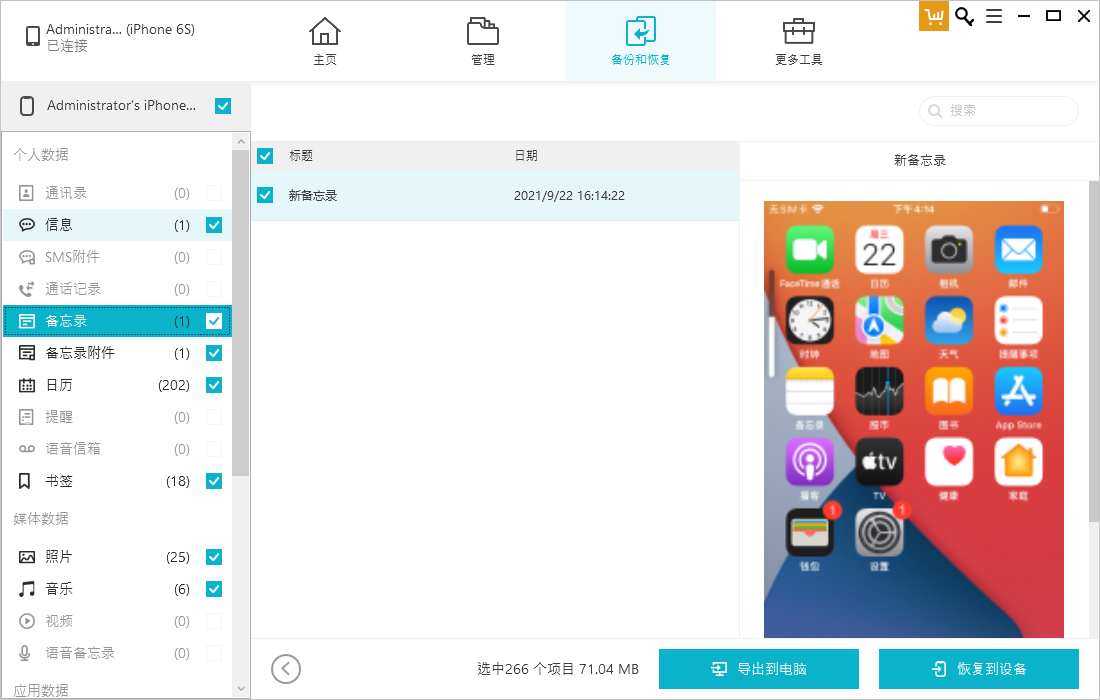
#The steps for backup are as follows: First, after completing the backup, click on the "View" option. Here, we can directly view the backed up data. Of course, you can also choose to check the data and select "Export to Computer" in the lower right corner to export the data to your computer for local storage. In this way, we can easily save the backed up data to the computer.
The above are three methods for iPhone data backup. If unfortunately you encounter data loss after upgrading to iOS16/15, don’t worry, because you can use backup to restore the data to ensure that the data will not be lost!
If your iPhone data is lost and you didn’t back it up in advance, don’t worry, because there are data recovery tools provided by Apple that can help you recover your data!
The above is the detailed content of [Must-learn for iOS16/15 update] How to completely back up iPhone data?. For more information, please follow other related articles on the PHP Chinese website!

Hot AI Tools

Undresser.AI Undress
AI-powered app for creating realistic nude photos

AI Clothes Remover
Online AI tool for removing clothes from photos.

Undress AI Tool
Undress images for free

Clothoff.io
AI clothes remover

Video Face Swap
Swap faces in any video effortlessly with our completely free AI face swap tool!

Hot Article
Hot Tools

Notepad++7.3.1
Easy-to-use and free code editor

SublimeText3 Chinese version
Chinese version, very easy to use

Zend Studio 13.0.1
Powerful PHP integrated development environment

Dreamweaver CS6
Visual web development tools

SublimeText3 Mac version
God-level code editing software (SublimeText3)
Hot Topics


 Google Assistant Will No Longer Work With Waze on iPhone
Apr 03, 2025 am 03:54 AM
Google Assistant Will No Longer Work With Waze on iPhone
Apr 03, 2025 am 03:54 AM
Google is sunsetting Google Assistant integration in Waze for iPhones, a feature that has been malfunctioning for over a year. This decision, announced on the Waze community forum, comes as Google prepares to fully replace Google Assistant with its
 Which iPhone version is the best?
Apr 02, 2025 pm 04:53 PM
Which iPhone version is the best?
Apr 02, 2025 pm 04:53 PM
The best iPhone version depends on your individual needs. 1. iPhone12 is suitable for users who need 5G. 2. iPhone 13 is suitable for users who need long battery life. 3. iPhone 14 and 15ProMax are suitable for users who need powerful photography functions, especially 15ProMax also supports AR applications.
 Is the iPhone 16 Pro Max waterproof?
Apr 05, 2025 am 12:02 AM
Is the iPhone 16 Pro Max waterproof?
Apr 05, 2025 am 12:02 AM
The iPhone 16 ProMax is waterproof and has a waterproof rating of IP68 and can be soaked in 6 meters deep water for 30 minutes. During daily use, avoid long-term soaking, check sealing regularly, and use waterproof protective covers during high-strength activities.
 What is the price of iPhone 16 Pro Max in Amazon?
Apr 03, 2025 am 12:15 AM
What is the price of iPhone 16 Pro Max in Amazon?
Apr 03, 2025 am 12:15 AM
The iPhone 16 ProMax price on Amazon is $1,200. 1) Search for "iPhone16ProMax" on Amazon to view prices. 2) When evaluating cost-effectiveness, compare it with other mobile phones such as Samsung Galaxy S23 Ultra and Google Pixel7 Pro.
 Fix the Wait Limit in iPhone Shortcuts With This Simple Trick
Apr 11, 2025 am 03:05 AM
Fix the Wait Limit in iPhone Shortcuts With This Simple Trick
Apr 11, 2025 am 03:05 AM
Apple's Shortcuts app offers a "Wait" action for short pauses, but it's unreliable for longer durations. This limitation stems from iOS's background app restrictions. A clever workaround uses custom Focus modes to achieve extended waits,
 Is the iPhone 17 released?
Apr 09, 2025 am 12:07 AM
Is the iPhone 17 released?
Apr 09, 2025 am 12:07 AM
The iPhone 17 has not been released yet and is expected to debut in the fall of 2025. 1. Performance improvement: It may be equipped with a more powerful A17 chip. 2. Camera improvement: Possibly improve pixels and sensors, and advance ProRAW and ProRes formats. 3. Design changes: It may adopt a narrower or borderless design, using new materials. 4. New features are introduced: There may be breakthroughs in health monitoring and AR.
 We Don't Need Slimmer Phones, But You Might Want One Anyway
Apr 13, 2025 am 03:01 AM
We Don't Need Slimmer Phones, But You Might Want One Anyway
Apr 13, 2025 am 03:01 AM
Ultra-thin phones: Amazing design or risky? Samsung and Apple are about to release ultra-thin flagship phones Samsung Galaxy S25 Edge and Apple iPhone 17 Air are about to be released, and its ultra-thin design has sparked heated discussions. While many fans are concerned about their design compromises, ultra-thin phones still have some attractive advantages. Ultra-thin design: how much does it cost? First of all, these devices are expensive. Ultra-thin design requires custom parts and improved manufacturing processes, greatly increasing costs and ultimately passing them on to consumers. While prices may change at any time, reliable news shows that the iPhone 17 Air may be priced the same as the $899 iPhone Plus, or even likely to completely replace the latter; while the S25 Edge
 Apple Confirms Date for WWDC 2025, Including iOS 19's Reveal
Mar 28, 2025 am 02:40 AM
Apple Confirms Date for WWDC 2025, Including iOS 19's Reveal
Mar 28, 2025 am 02:40 AM
Apple's Worldwide Developers Conference (WWDC) 2025 is set for June 9-13, promising major software updates and potential hardware reveals. The event, held at Apple Park, will feature a keynote address on June 9th, followed by sessions through June 13
