
 System Tutorial
Windows Series
Red cross error code 711 solution: win7 network connection problem solution
System Tutorial
Windows Series
Red cross error code 711 solution: win7 network connection problem solution
Red cross error code 711 solution: win7 network connection problem solution

Today the editor brings you the solution to the win7 network connection red cross error code 711! If you have any need in this regard, come and have a look.

win7 network connection red cross error code 711 solution:
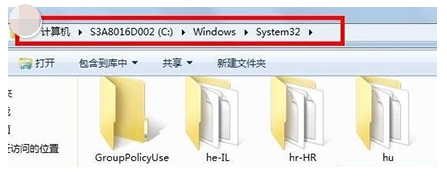
1. First, we double-click the computer icon on the desktop, and then Enter C:/Windows/System32/LogFiles in the address bar. Of course, you can also click in step by step according to the folder name prompted by the path, but this will be more troublesome.
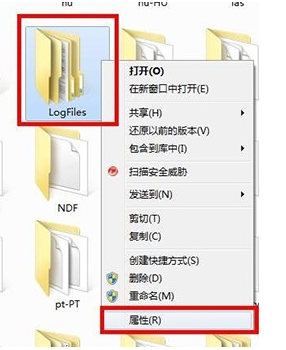
2. Find the LogFiles folder in the folder list, then right-click and select Properties.
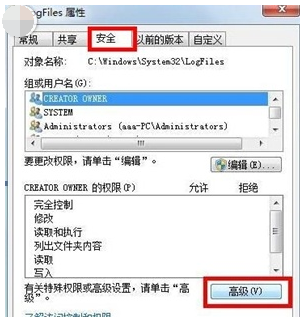
3. In the properties window, we switch the interface to the security column, and then click the Advanced button below.
4. Next, the advanced security settings window will appear. We switch the interface to the owner column, and then click the edit button below.

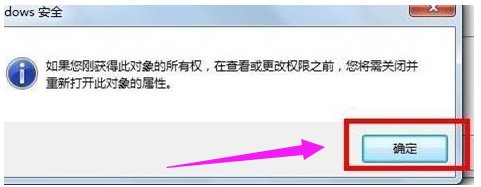
5. Everyone needs to pay attention here. You must first know which account you have currently used. Generally speaking, the account name here is aaa, which will be in the list. is displayed, select the account you are currently using, and then click OK below.
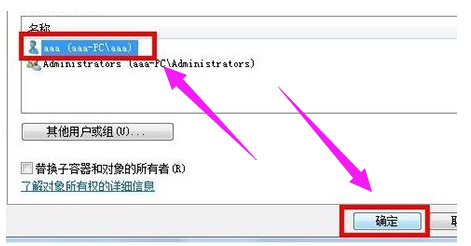
6. In this way, you can obtain ownership of the folder.
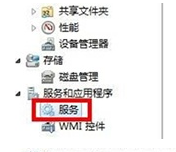
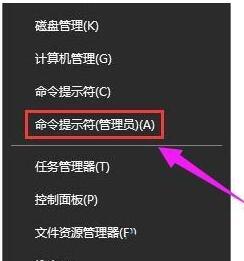
7. Return to the desktop, right-click the computer and select Manage. Then in the management interface, we find the service item in the left menu and click it.
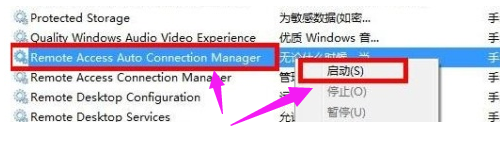
8. Then find Remote Access Auto Connection ManagerRemote in the right window, right-click and select Start.
(The above is the solution to the win7 network connection red cross error code 711 that the editor brought to you today! If it is helpful to your problem, please pay attention to this site)
The above is the detailed content of Red cross error code 711 solution: win7 network connection problem solution. For more information, please follow other related articles on the PHP Chinese website!

Hot AI Tools

Undresser.AI Undress
AI-powered app for creating realistic nude photos

AI Clothes Remover
Online AI tool for removing clothes from photos.

Undress AI Tool
Undress images for free

Clothoff.io
AI clothes remover

AI Hentai Generator
Generate AI Hentai for free.

Hot Article
Hot Tools

Notepad++7.3.1
Easy-to-use and free code editor

SublimeText3 Chinese version
Chinese version, very easy to use

Zend Studio 13.0.1
Powerful PHP integrated development environment

Dreamweaver CS6
Visual web development tools

SublimeText3 Mac version
God-level code editing software (SublimeText3)
Hot Topics
 1371
1371
 52
52

 Solution to the problem that Win11 system cannot install Chinese language pack
Mar 09, 2024 am 09:48 AM
Solution to the problem that Win11 system cannot install Chinese language pack
Mar 09, 2024 am 09:48 AM
Solution to the problem that Win11 system cannot install Chinese language pack With the launch of Windows 11 system, many users began to upgrade their operating system to experience new functions and interfaces. However, some users found that they were unable to install the Chinese language pack after upgrading, which troubled their experience. In this article, we will discuss the reasons why Win11 system cannot install the Chinese language pack and provide some solutions to help users solve this problem. Cause Analysis First, let us analyze the inability of Win11 system to
 Solution for Win11 unable to install Chinese language pack
Mar 09, 2024 am 09:15 AM
Solution for Win11 unable to install Chinese language pack
Mar 09, 2024 am 09:15 AM
Win11 is the latest operating system launched by Microsoft. Compared with previous versions, Win11 has greatly improved the interface design and user experience. However, some users reported that they encountered the problem of being unable to install the Chinese language pack after installing Win11, which caused trouble for them to use Chinese in the system. This article will provide some solutions to the problem that Win11 cannot install the Chinese language pack to help users use Chinese smoothly. First, we need to understand why the Chinese language pack cannot be installed. Generally speaking, Win11
 Strategies to solve Win11's inability to install the Chinese language pack
Mar 08, 2024 am 11:51 AM
Strategies to solve Win11's inability to install the Chinese language pack
Mar 08, 2024 am 11:51 AM
Strategies to deal with Win11’s inability to install the Chinese language pack. With the launch of Windows 11, many users can’t wait to upgrade to this new operating system. However, some users have encountered difficulties when trying to install the Chinese language pack, preventing them from using the Chinese interface properly. In this article, we will discuss the problem that Win11 cannot install the Chinese language pack and propose some countermeasures. First, let’s explore why there are problems installing Chinese language packs on Win11. This may be due to the system's
 What to do if the 0x80004005 error code appears. The editor will teach you how to solve the 0x80004005 error code.
Mar 21, 2024 pm 09:17 PM
What to do if the 0x80004005 error code appears. The editor will teach you how to solve the 0x80004005 error code.
Mar 21, 2024 pm 09:17 PM
When deleting or decompressing a folder on your computer, sometimes a prompt dialog box "Error 0x80004005: Unspecified Error" will pop up. How should you solve this situation? There are actually many reasons why the error code 0x80004005 is prompted, but most of them are caused by viruses. We can re-register the dll to solve the problem. Below, the editor will explain to you the experience of handling the 0x80004005 error code. Some users are prompted with error code 0X80004005 when using their computers. The 0x80004005 error is mainly caused by the computer not correctly registering certain dynamic link library files, or by a firewall that does not allow HTTPS connections between the computer and the Internet. So how about
 What to do if the blue screen error code 0x00000124 appears in Win7 system? The editor will teach you how to solve it
Mar 21, 2024 pm 10:10 PM
What to do if the blue screen error code 0x00000124 appears in Win7 system? The editor will teach you how to solve it
Mar 21, 2024 pm 10:10 PM
Computers are now the most commonly used. Whether it is work, study, or life, they are everywhere. However, computers also have their problems. People are overwhelmed with all kinds of problems, such as the blue screen 0x00000124 error in the Win7 system of the computer. Code is one of the more common problems for win7 users. What should you do if you encounter this problem? For this reason, the editor has brought a method to solve the blue screen 0x00000124. In the process of using the win7 system, it is inevitable to encounter problems of one kind or another, especially problems such as blue screen or black screen, which are often encountered by users. Some users of the win7 ultimate system reported that a blue screen appeared when the computer was turned on. And prompts 0x00000124 error code, how to deal with this
 Tips to solve error code 0xc004f034 during WIN10 system activation
Mar 27, 2024 pm 04:30 PM
Tips to solve error code 0xc004f034 during WIN10 system activation
Mar 27, 2024 pm 04:30 PM
1. Press Windows+X keys and click [Command Indicator (Administrator)]. 2. Enter: slmgr-upk in the command indicator box and press Enter (regardless of whether there is an activation code or not, clear it first). 3. Enter: slmgr.vbs-ipkQN2M7-VCVJQ-Y36FD-T3PHJ-82M93 (load key) and press Enter. 4. Enter: slmgr-ato, and press Enter to take a screenshot of the error code box that pops up (valid if the mantissa is 08020, invalid if the mantissa is 03060).
 What to do if the network connection folder is empty
Mar 13, 2024 am 11:27 AM
What to do if the network connection folder is empty
Mar 13, 2024 am 11:27 AM
1. First click [Start Menu], then click the [Settings] button. 2. In the [Settings] interface, click the [Network and Internet] option. 3. Scroll down to the bottom of the page, find the [Network Reset] option, and click the [Reset Now] option.
 How to use shortcut keys to take screenshots in Win8?
Mar 28, 2024 am 08:33 AM
How to use shortcut keys to take screenshots in Win8?
Mar 28, 2024 am 08:33 AM
How to use shortcut keys to take screenshots in Win8? In our daily use of computers, we often need to take screenshots of the content on the screen. For users of Windows 8 system, taking screenshots through shortcut keys is a convenient and efficient operation method. In this article, we will introduce several commonly used shortcut keys to take screenshots in Windows 8 system to help you take screenshots more quickly. The first method is to use the "Win key + PrintScreen key" key combination to perform full
