

Git Series (2): Getting Started Guide to Git

| Introduction | Because Git is so popular, if you can at least be familiar with some basic Git knowledge, it can bring a lot of convenience to your life. If you can master the basics of Git (you can, I swear!), then you'll be able to download anything you need and maybe even make some contributions in return. After all, that's the essence of open source: you have access to the code of the software you use, the freedom to share it with others, and the right to modify it if you wish. Git makes this easy once you get familiar with it. |

Generally speaking, there are two ways to interact with a Git repository: you can read from the repository, or you can write to the repository. It's like a file: sometimes you open a document just to read it, and other times you open it because you need to make some changes.
This article only explains how to read from the Git repository. We will cover the topic of writing back to a Git repository in a later article.
One sentence to clarify: Git is different from GitHub (or GitLab, or Bitbucket). Git is a command line program, so it looks like this:
- $ git
- usage: Git [--version] [--help] [-C
] - [-p | --paginate | --no-pager] [--bare]
- [--Git-dir=
] [ ]
Because Git is open source, many smart people have built basic software around it; these basic software, including around themselves, have become very popular.
My article series will start by teaching you pure Git knowledge, because once you understand what Git is doing, then you don't need to care about what front-end tool you are using. However, my article series will also cover common ways to accomplish each task through popular Git services, since those will likely be the first ones you'll encounter.
On Linux systems, you can obtain and install Git from the distribution software repository you are using. BSD users should look for Git in the devel section of the Ports tree.
For closed source operating systems, please go to its official project website and install according to the instructions. Once installed, there should be no difference in the commands on Linux, BSD, and Mac OS X. Windows users will need to adjust Git commands to match Windows file systems, or install Cygwin to run Git natively without being hampered by Windows file system translation issues.
Not everyone needs to add Git to our daily life right away. Sometimes, your most interaction with Git is to access a repository, download a file or two, and then never use it again. Think of Git this way, it's more like afternoon tea than a formal banquet. You have some polite conversation, get the information you need, and then you go away and you don't want to talk like this anymore for at least the next three months.
Of course, that's okay.
Generally speaking, there are two ways to access Git: using the command line, or using one of those amazing Internet technologies for quick and easy access through a web browser.
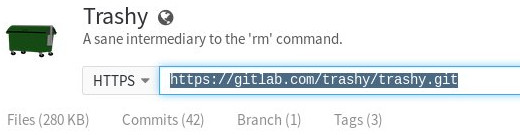
Let's say you want to install a recycle bin for your terminal because you've been destroyed by the rm command too many times. You may have heard of Trashy, which calls itself a "sane rm command middleman", and maybe you want to read its documentation before installing it. Luckily, Trashy is hosted publicly on GitLab.com.
The first step in our work is to use the landgrab sorting method on this Git repository: we will clone the complete repository and then sort according to the content. Since the repository is hosted on a public Git service platform, there are two ways to get the job done: using the command line, or using the web interface.
To get the entire repository using Git, use the git clone command and the URL of the Git repository as parameters. If you don't know what the correct URL is, the repository should tell you. GitLab provides you with a copy-and-paste URL to the Trashy repository.
Once you get the correct URL, cloning the repository is very easy. Just git clone the URL, and an optional directory specifying the directory to be cloned to. By default the git directory will be cloned into the directory you are currently in; for example, 'trashy.git' will be cloned into the 'trashy' directory in your current location. I use the .clone extension to mark repositories that are read-only, and the .git extension to mark repositories that I can read and write to, but this is not officially required.
- $ git clone https://gitlab.com/trashy/trashy.git trashy.clone
- Cloning into 'trashy.clone'...
- remote: Counting objects: 142, done.
- remote: Compressing objects: 100% (91/91), done.
- remote: Total 142 (delta 70), reused 103 (delta 47)
- Receiving objects: 100% (142/142), 25.99 KiB | 0 bytes/s, done.
- Resolving deltas: 100% (70/70), done.
- Checking connectivity... done.
Once you have successfully cloned the repository, you can browse the files in the repository just like any other directory on your computer.
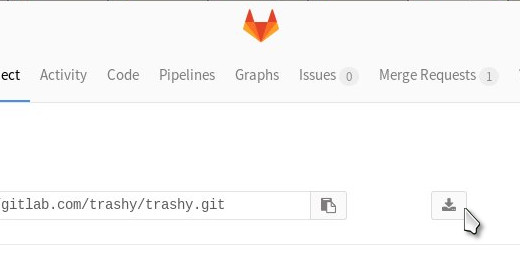
Another way to obtain a copy of the repository is to use the web interface. Both GitLab and GitHub provide a warehouse snapshot file in .zip format. GitHub has a big green download button, but in GitLab, you can find the inconspicuous download button on the right side of the browser.
 Choose carefully
Another way to get files from a Git repository is to find the file you want and then pull it out of the repository. Only the web interface provides this method, and essentially, what you see is a clone of someone else's repository; you can think of it as an HTTP shared directory.
The problem with using this method is that you may find that some files do not exist in the original repository, because the complete form of the file may not be built until you execute the make command. That is only if you download the complete repository and read the README. Or INSTALL file, and then run the relevant commands to generate it. However, if you're sure the file exists and you just want to go into the repository, get that file, and then leave, you can do that.
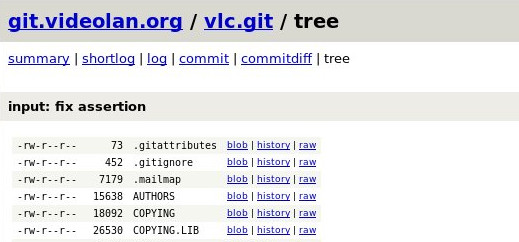
In GitLab and GitHub, click the file link and view it in Raw mode, then use your web browser's save function, for example: in Firefox, File > Save Page As. In a GitWeb repository (which is a private git repository web viewer used by some people who prefer to host git themselves), the Raw view link is in the file list view.
It is generally believed that the correct way to interact with Git is to clone the complete Git repository. There are several reasons for thinking this way. First, you can easily keep your cloned repository updated using the git pull command, so you don't have to go back to the web site to get a fresh copy every time a file changes. Second, if you happen to need to make some improvements, as long as you keep the repository clean, you can submit the changes to the original author very easily.
Now, it might be time to practice finding Git repositories of interest and then cloning them to your hard drive. As long as you know the basics of using the terminal, it's not too difficult to do. Still don’t know how to use the basic terminal? Then give me 5 more minutes.
The first thing to know is that all files have a path. This makes sense; if I ask you to open a file for me in a regular non-terminal environment, you have to navigate to the file's location on your hard drive, and until you find that file, you have to navigate through a bunch of windows. For example, you might click on your Home Directory > Images > InktoberSketches > monkey.kra.
In that case, the path to the file monkeysketch.kra is: $HOME/Pictures/InktoberSketches/monkey.kra.
In the terminal, unless you're doing some special sysadmin tasks, your file paths usually start with $HOME (or, if you're lazy, use the ~ character), followed by a list of folders up to the filename itself.
This is similar to how you click on various icons in a GUI until you find the relevant file or folder.
If you want to clone the Git repository to your documents directory, then you can open a terminal and run the following command:
- $ git clone https://gitlab.com/foo/bar.git
- $HOME/Documentation/bar.clone
Once the cloning is complete, you can open a file manager window, navigate to your Documents folder, and you will find the bar.clone directory waiting for you to access.
If you want to get more advanced, you may want to visit that repository again in the future, and you can try using the git pull command to see if the project has been updated:
- $ cd $HOME/Documentation/bar.clone
- $ pwd
- bar.clone
- $ git pull
So far, that’s all the terminal commands you need to know initially, so go explore. The more you practice, the better you get at Git (practice makes perfect), that's the point and the nature of the matter.
The above is the detailed content of Git Series (2): Getting Started Guide to Git. For more information, please follow other related articles on the PHP Chinese website!

Hot AI Tools

Undresser.AI Undress
AI-powered app for creating realistic nude photos

AI Clothes Remover
Online AI tool for removing clothes from photos.

Undress AI Tool
Undress images for free

Clothoff.io
AI clothes remover

Video Face Swap
Swap faces in any video effortlessly with our completely free AI face swap tool!

Hot Article
Hot Tools

Notepad++7.3.1
Easy-to-use and free code editor

SublimeText3 Chinese version
Chinese version, very easy to use

Zend Studio 13.0.1
Powerful PHP integrated development environment

Dreamweaver CS6
Visual web development tools

SublimeText3 Mac version
God-level code editing software (SublimeText3)
Hot Topics
 1386
1386
 52
52

 How to use docker desktop
Apr 15, 2025 am 11:45 AM
How to use docker desktop
Apr 15, 2025 am 11:45 AM
How to use Docker Desktop? Docker Desktop is a tool for running Docker containers on local machines. The steps to use include: 1. Install Docker Desktop; 2. Start Docker Desktop; 3. Create Docker image (using Dockerfile); 4. Build Docker image (using docker build); 5. Run Docker container (using docker run).
 Difference between centos and ubuntu
Apr 14, 2025 pm 09:09 PM
Difference between centos and ubuntu
Apr 14, 2025 pm 09:09 PM
The key differences between CentOS and Ubuntu are: origin (CentOS originates from Red Hat, for enterprises; Ubuntu originates from Debian, for individuals), package management (CentOS uses yum, focusing on stability; Ubuntu uses apt, for high update frequency), support cycle (CentOS provides 10 years of support, Ubuntu provides 5 years of LTS support), community support (CentOS focuses on stability, Ubuntu provides a wide range of tutorials and documents), uses (CentOS is biased towards servers, Ubuntu is suitable for servers and desktops), other differences include installation simplicity (CentOS is thin)
 What to do if the docker image fails
Apr 15, 2025 am 11:21 AM
What to do if the docker image fails
Apr 15, 2025 am 11:21 AM
Troubleshooting steps for failed Docker image build: Check Dockerfile syntax and dependency version. Check if the build context contains the required source code and dependencies. View the build log for error details. Use the --target option to build a hierarchical phase to identify failure points. Make sure to use the latest version of Docker engine. Build the image with --t [image-name]:debug mode to debug the problem. Check disk space and make sure it is sufficient. Disable SELinux to prevent interference with the build process. Ask community platforms for help, provide Dockerfiles and build log descriptions for more specific suggestions.
 How to view the docker process
Apr 15, 2025 am 11:48 AM
How to view the docker process
Apr 15, 2025 am 11:48 AM
Docker process viewing method: 1. Docker CLI command: docker ps; 2. Systemd CLI command: systemctl status docker; 3. Docker Compose CLI command: docker-compose ps; 4. Process Explorer (Windows); 5. /proc directory (Linux).
 Detailed explanation of docker principle
Apr 14, 2025 pm 11:57 PM
Detailed explanation of docker principle
Apr 14, 2025 pm 11:57 PM
Docker uses Linux kernel features to provide an efficient and isolated application running environment. Its working principle is as follows: 1. The mirror is used as a read-only template, which contains everything you need to run the application; 2. The Union File System (UnionFS) stacks multiple file systems, only storing the differences, saving space and speeding up; 3. The daemon manages the mirrors and containers, and the client uses them for interaction; 4. Namespaces and cgroups implement container isolation and resource limitations; 5. Multiple network modes support container interconnection. Only by understanding these core concepts can you better utilize Docker.
 What computer configuration is required for vscode
Apr 15, 2025 pm 09:48 PM
What computer configuration is required for vscode
Apr 15, 2025 pm 09:48 PM
VS Code system requirements: Operating system: Windows 10 and above, macOS 10.12 and above, Linux distribution processor: minimum 1.6 GHz, recommended 2.0 GHz and above memory: minimum 512 MB, recommended 4 GB and above storage space: minimum 250 MB, recommended 1 GB and above other requirements: stable network connection, Xorg/Wayland (Linux)
 How to switch Chinese mode with vscode
Apr 15, 2025 pm 11:39 PM
How to switch Chinese mode with vscode
Apr 15, 2025 pm 11:39 PM
VS Code To switch Chinese mode: Open the settings interface (Windows/Linux: Ctrl, macOS: Cmd,) Search for "Editor: Language" settings Select "Chinese" in the drop-down menu Save settings and restart VS Code
 What is vscode What is vscode for?
Apr 15, 2025 pm 06:45 PM
What is vscode What is vscode for?
Apr 15, 2025 pm 06:45 PM
VS Code is the full name Visual Studio Code, which is a free and open source cross-platform code editor and development environment developed by Microsoft. It supports a wide range of programming languages and provides syntax highlighting, code automatic completion, code snippets and smart prompts to improve development efficiency. Through a rich extension ecosystem, users can add extensions to specific needs and languages, such as debuggers, code formatting tools, and Git integrations. VS Code also includes an intuitive debugger that helps quickly find and resolve bugs in your code.
