 Technology peripherals
 AI
AI
 PAI x EasyPhoto, bid farewell to April Fool's Day and create a festive atmosphere with AI photos
PAI x EasyPhoto, bid farewell to April Fool's Day and create a festive atmosphere with AI photos
Event address: https://developer.aliyun.com/topic/aigc_pai/newyear
Tutorial Brief
The application of generative AI technology to produce real/like/beautiful personal photos in batches is very popular. The recently launched EasyPhoto, as an open source SD WebUI plug-in, provides a more flexible and easy-to-use development method. It has received attention and praise from a large number of developers. Users can quickly train the LoRA model by uploading several photos of the same person. , and combined with user-defined template pictures, finally generate true, realistic and beautiful portrait photos.
EasyPhoto is a Webui UI plug-in for generating AI portraits. Based on the StableDiffusion character customization method of Lora ControlNet, it supports low-code operations, customized styles, and built-in rich templates, allowing more developers to flexibly develop their own stylized artistic photo generation. This AIGC creation activity is based on Alibaba Cloud's artificial intelligence platform PAI. EasyPhoto is launched with low code and high efficiency, achieving the rapid generation of beautiful pictures with a festive atmosphere.
Based on this tutorial you can experience:
New users can receive trial resources of artificial intelligence platform PAI worth 10,000 yuan for free
Train a personal LoRA model based on interactive modeling PAI-DSW
Create new holiday AI photos, allowing you to experience the personalized atmosphere of Christmas, New Year and other holidays
Submit your works Redmi Watch3, Xiaomi Band 8, etc. to win exquisite gifts!
Use PAI to quickly start EasyPhoto
1. Preparation
1.1 Get the free trial rights of interactive modeling PAI-DSW
Go to the event page of this "hi 2024! AI New Year Photo Challenge" and receive the interactive modeling PAI-DSW product free trial resource package

- For new users of interactive modeling PAI-DSW, Alibaba Cloud provides 5000CU*H free trial resources, which can be obtained directly on the event page (for trial rules, please refer to Alibaba Cloud Free Trial: https://free. aliyun.com/); or you can purchase the interactive modeling PAI-DSW resource package to participate in the event, purchase link: PAI-DSW 100CU*H resource package, price starts at 59 yuan; if you do not purchase the resource package, PAI-DSW will For billing, please refer to Alibaba Cloud product pricing for billing standards.
1.2 Create PAI-DSW instance
- Go to the artificial intelligence platform PAI console, link: https://pai.console.aliyun.com/
- Open artificial intelligence PAI and create a default workspace. See Provisioning and Creating a Default Workspace.
- In the artificial intelligence platform PAI console, select interactive modeling PAI-DSW
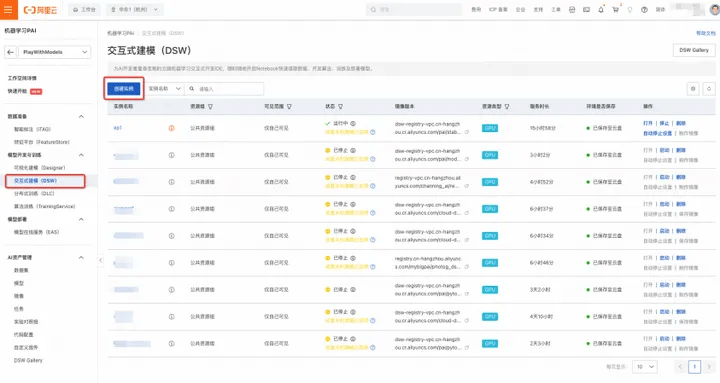
4. Click to create an instance (as shown above)
5. Customize the input instance name, such as "easyphoto"

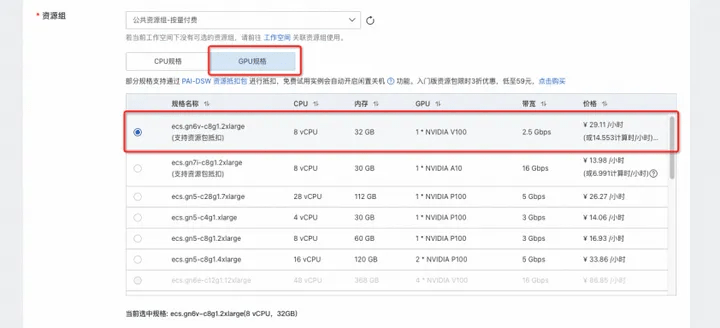
When choosing an instance model, you can consider using the GPU category ecs.gn6v-c8g1.2xlarge (supports resource package deduction) or ecs.gn7i-c8g1.2xlarge
(Support resource package deduction). If these two models are in stock, you can change the region to try, or choose another paid model (free trial is not supported).
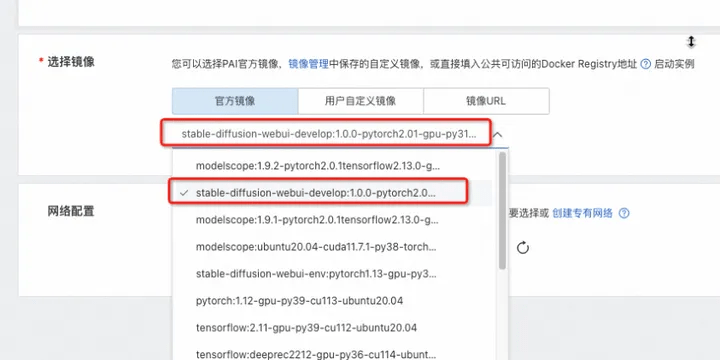
7. Select the image, stable-diffusion-webui-develop:1.0.0-pytorch2.01-gpu-py310-cu117-ubuntu22.04
8. Click "Next"

9. Confirm [Resource Configuration] and [Mirror] as shown in the figure, click Create Instance;
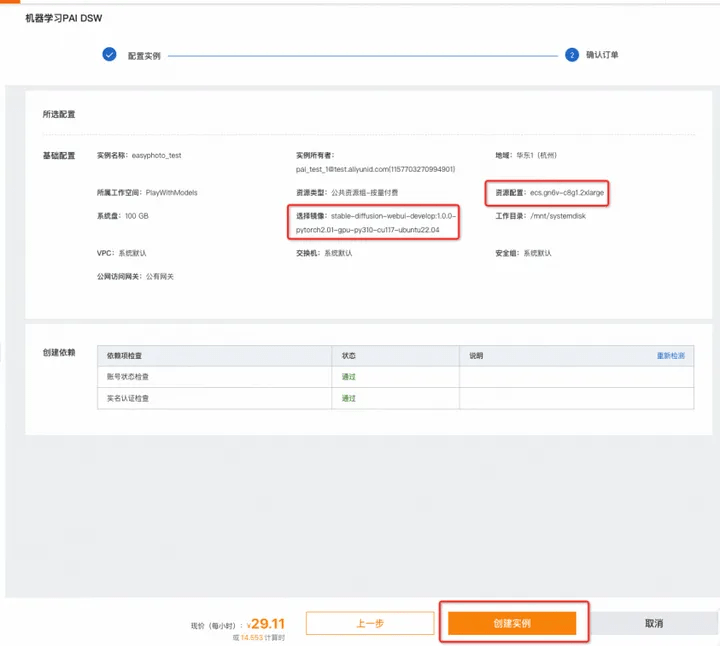
10. Wait about 3-5 minutes, the instance status changes to "Running", and the instance creation is completed;

1.3 Open the EasyPhoto tutorial in PAI-DSW and experience zero-code AI development
- Open the link: AI New Year-Christmas Photo Challenge based on EasyPhoto (WebUI version), click "Open in Alibaba Cloud DSW" in the upper right corner
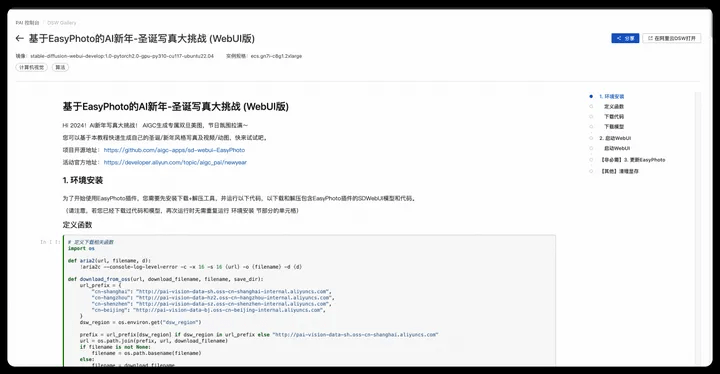
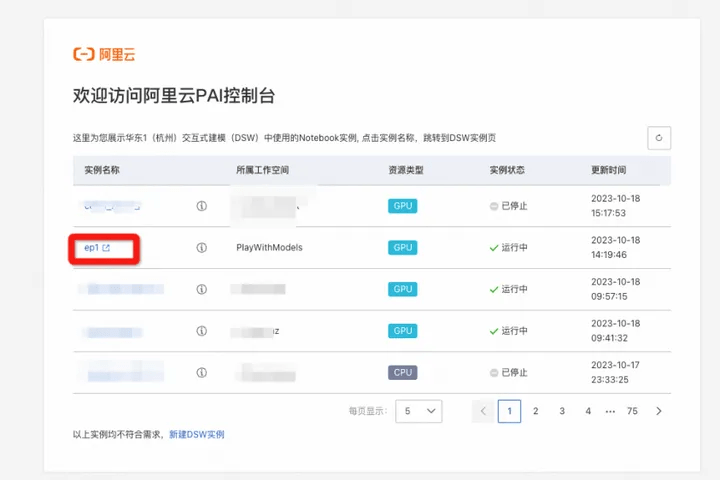
2. Select the previously created instance and click on the instance name
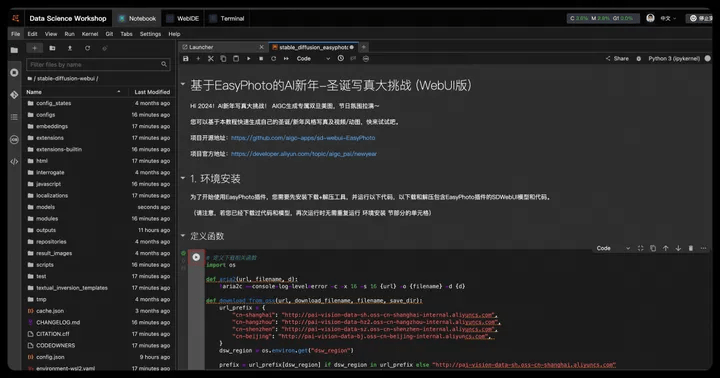
3. Enter the notebook development interface, click the run button step by step; run 1. Environment installation cells in section (3 defined functions - download code - download model), you can download and install the presets The WebUI with the EasyPhoto plug-in, which is the model it relies on.
4. Run 2. Start the cell of the WebUI section to open the WebUI.
5. Click the generated link to enter WebUI

- Open WebUI, enter the experience link, and run EasyPhoto in WebUI;
2. Start experiencing
You can use this tutorial to generate your own holiday photos/animations. We provide the following functions:
- Photo Inference
- Specify the photo of the person in the picture (Photo2Photo)
- Character photo of specified text (Text2Photo)
- Video Inference
- Character animation of specified text (Text2Video)
- Specify the character animation of the picture (Image2Video)
- Specify the character animation of the video (Video2Video)
Generally speaking, the generation of character portraits/animations is divided into the following two steps:
- Step1: Training the digital clone belonging to the character
- Step2: Image/video generation based on digital clone
Please refer to section 2.2 to generate pictures, and please refer to section 2.3 to generate videos.
2.1 Digital clone training
- Step1: Click the EasyPhoto tab
- Step2: Click Upload Photos to upload your own training pictures (5-20 clear portraits, preferably half-length/frontal)
If you do not have 10 clear personal portrait photos, you can choose the Mona Lisa photo as a test. The download link for Mona Lisa photos is: https://pai-aigc-photog.oss-cn-hangzhou.aliyuncs.com/webui/mona.zip
- Step3: Click Start Training (enter any user id (English) in the pop-up box)
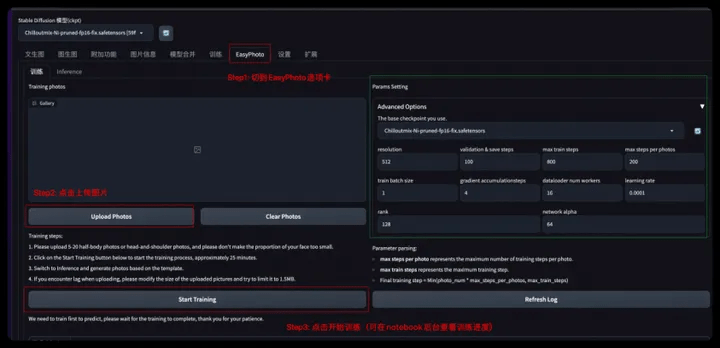
We have built-in two base models in realistic/animation styles for you to choose from. You can also choose your own base model according to your preferences.
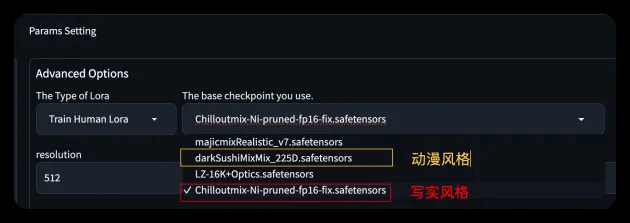
⚠️Please note that if there is a front-end disconnection as shown in the picture during the training process, don't worry, you can see the training progress in the notebook background. After training is completed, refresh the front-end page to perform model inference.
- Front-end disconnection (connection timeout, just make sure the background is training):
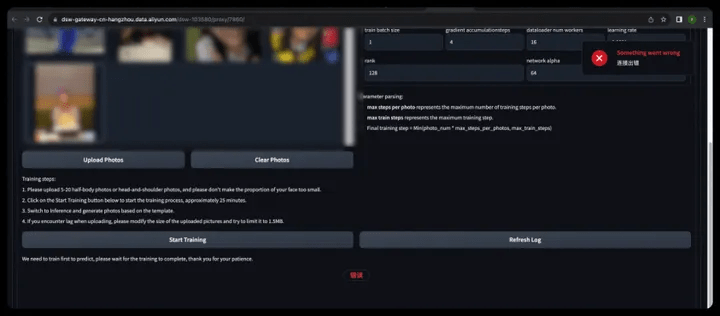
- Training completion reminder:
- SDWebUI Front End

- notebookbackend

2.2 Photo Inference
You can use Photo Inference for image inference, we support:
- Specified image of person photo (Photo2Photo)
- Character photo of specified text (Text2Photo)
2.2.1 Designated images of character portraits
- Step 1: Switch to the Photo inference tab
- Step 2: Choose a suitable image upload method
- Select from the template (Template Gallery), you need to select a picture in the Gallery
- Single Image Upload
- Batch Image Upload Template(Batch Image Upload)
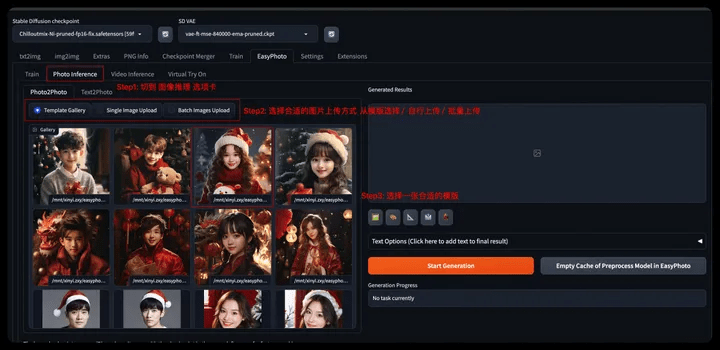
- Step 3: Select the base model and the LoRA model corresponding to the UserId (you can click the refresh icon to get a list of all UserIDs)

- When using Infer With IPA, you don’t need to train your own digital clone. You can directly upload a picture in the pop-up picture box to generate it.
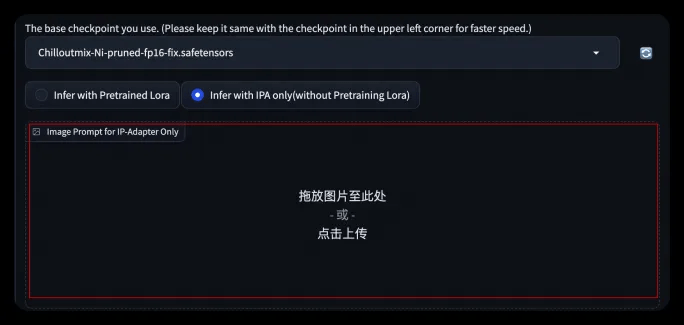
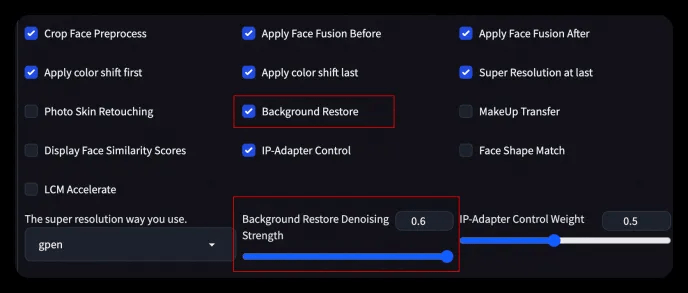
- Step 4: Related parameters can be set in the Advanced Option tab
- You can turn on background restore, adjust the redrawing range, and redraw the template image to achieve different generation effects.
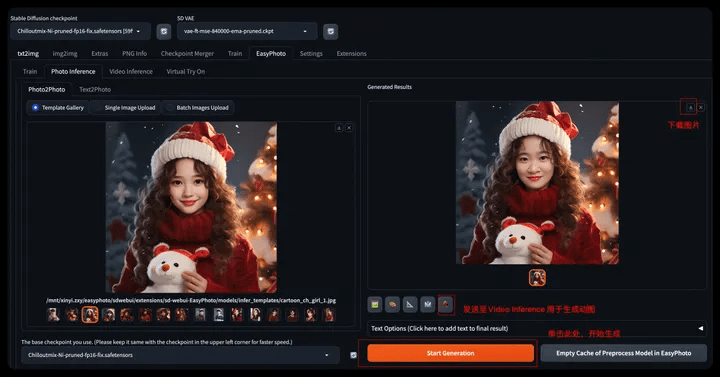
- Step 5: Click Start Generation to perform model inference and generate your own AI portrait
- After waiting for about 1-2 minutes, the image generation is completed and the image can be downloaded and stored;
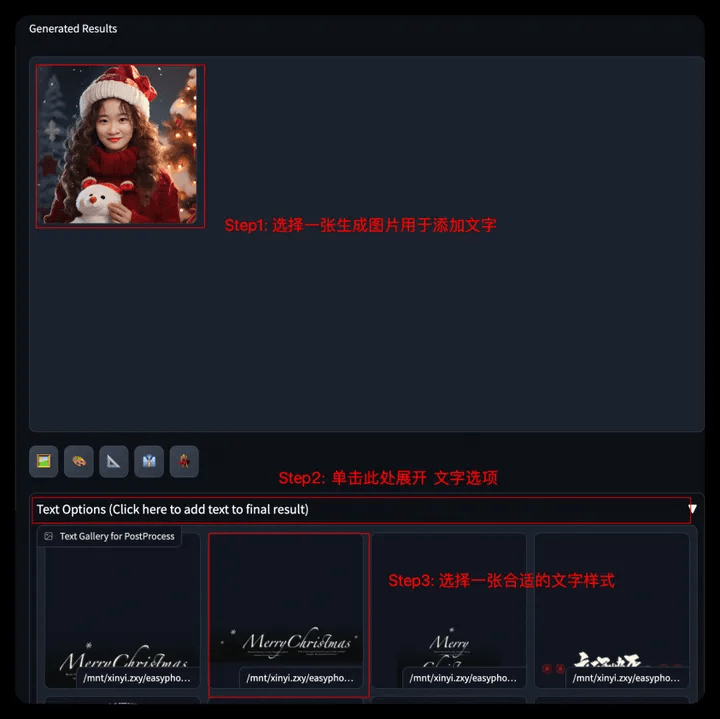
- Step6: You can further choose to generate pictures, click Text Options, select a suitable template to add word art effects, and the generated results will appear on the right side of Results.
- Submit the picture to the event page and participate in the awards event;
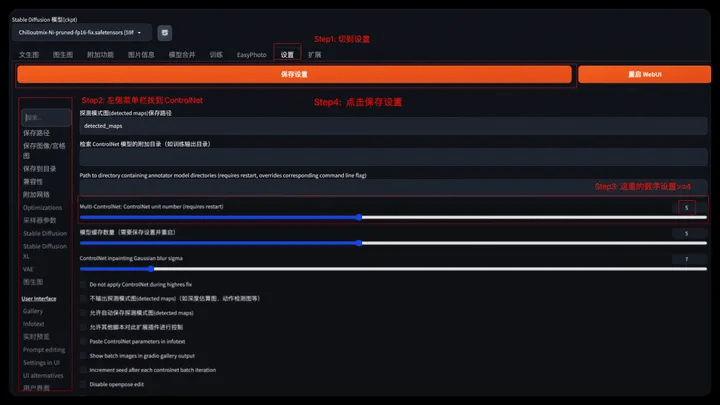
⚠️ If the following prompt appears, please set the ControlNet number >= 4. Exit from the console and restart WebUI to set up.
- Step1: Select Settings menu
- Step2: Find ControlNet in the left menu bar
- Step3: Set the number of Multi-ControlNet >=4
- Step4: Click to save settings
- Step5: Return to the notebook page, stop and restart SDWebUI

2.2.2 Character portrait of specified text
- Step 1: Switch to the Text2Photo tab
- Step 2: Choose a suitable scene
- Step 3: Modify relevant text description
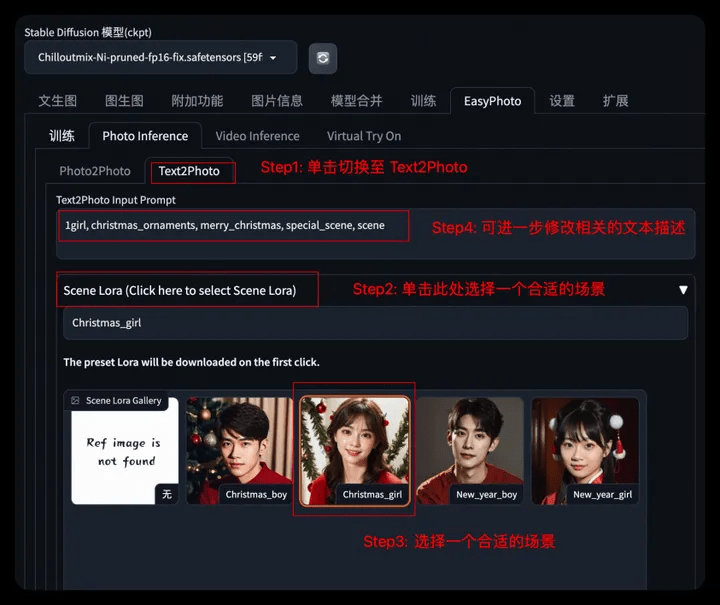
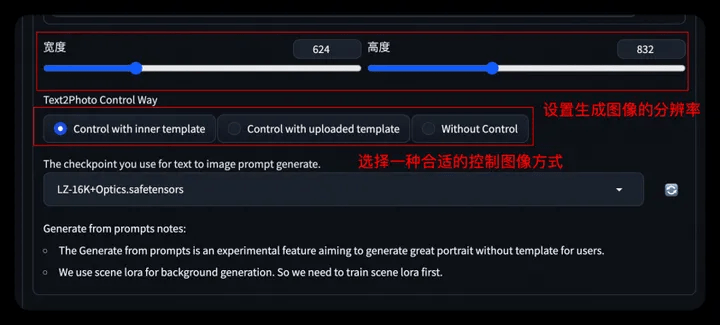
- Step4: Set the generated image resolution
- Step5: Further select/upload the control image (gesture control OpenPose)
- Step6: Set the base model/User_id and other parameters consistent with the Tushengtu, generate the image, and add the word art effect yourself after the generation is completed.
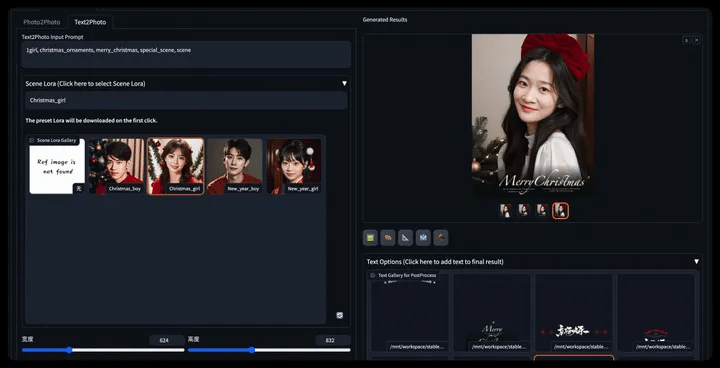
* You can refer to the usage methods here to further train your own festival scenes and generate diverse portraits~
2.3 Video Inference
You can use Video Inference for video inference, we support:
- Character animation of specified text (Text2Video)
- Character animation of specified image (Image2Video)
- Specify the character animation of the video (Video2Video)
2.3.1 Character animation of specified text
- Step 1: Switch to the Video inference tab
- Step 2: Select a suitable scene and modify the corresponding prompt (the same operation as the character photo of the specified text)
- Step 3: Set the image size, or upload a video for control, and choose the appropriate control method.

- Step 4: Set the base model, user_id and related parameters.
⚠️ We turn on lcm acceleration for video generation by default. You can turn off this option to use more generation steps to generate more detailed video results.
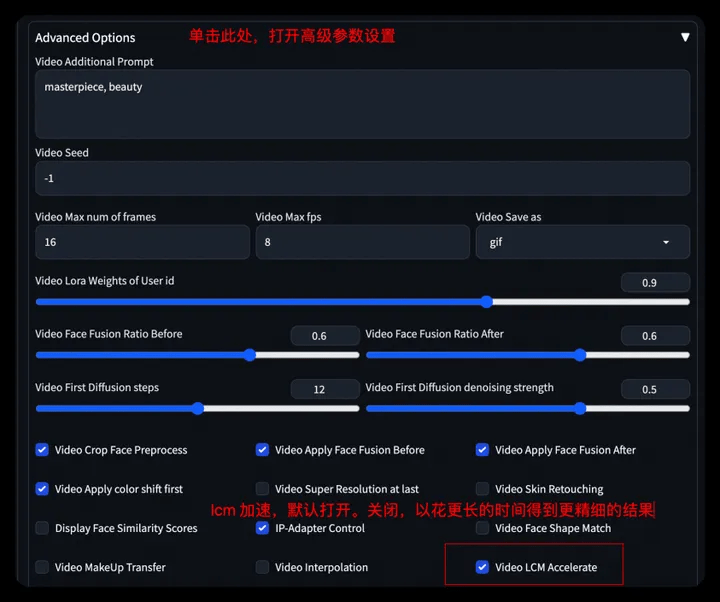
- Step 5: Click Start Generation to generate video
- If there is a front-end error, the background shows that the generation is completed. You can click List Recent Conversion Results to download/view the generated historical video. (No need to refresh)

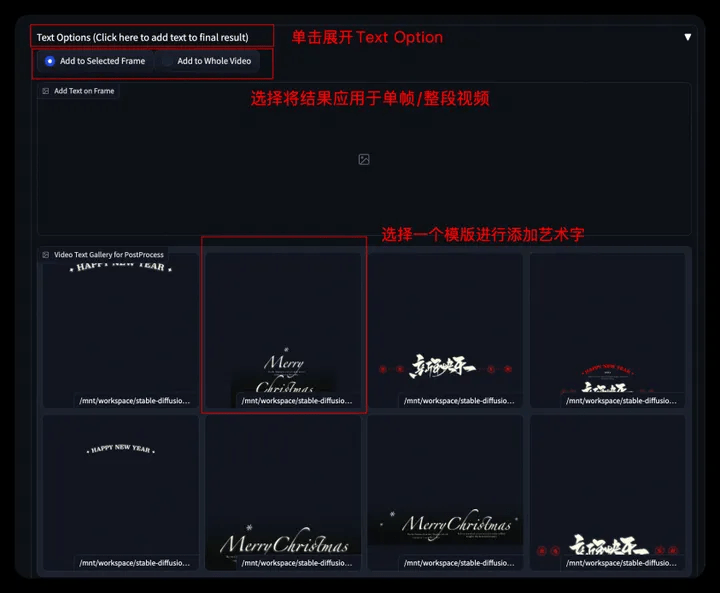
- Step 6: Click Text Option to add word art effects to the generated video. You can select a frame or apply the WordArt effect to the entire video.
2.3.2 Character animation of specified image
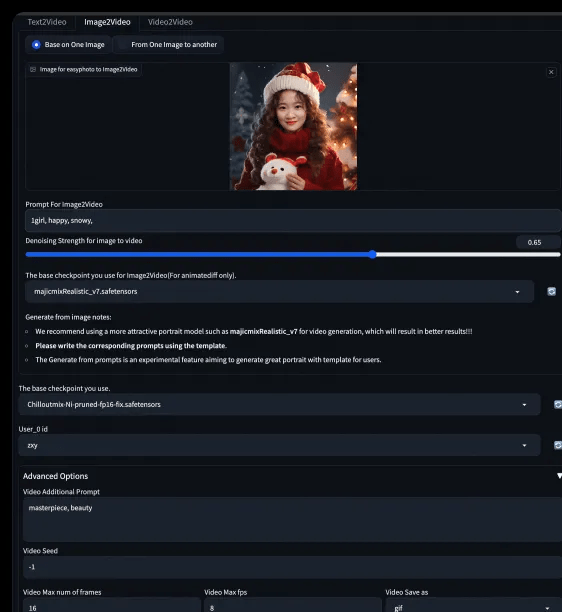
- Step1: Upload a character picture (the generated character photo can be sent here through the button)/Upload the first and last pictures
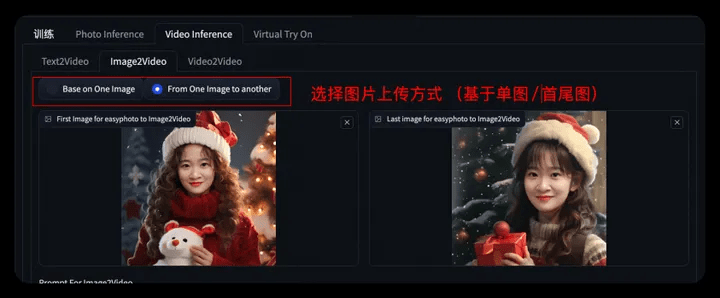
- Step2: Set the base model, user_id and related parameters. Click Start Generation to generate the video. And use Text Options to add word art.

2.3.3 Specify the character animation of the video
- Step1: Upload a character video
- Step2: Set the base model, user_id and related parameters. Click Start Generation to generate the video. And use Text Options to add word art.
3. Resource cleanup and follow-up
3.1 Cleanup
- After the experiment is completed, you can go to the corresponding product console to stop or delete the instance (both operations are acceptable). Avoid the instance continuing to run, which will cause additional deductions after the free trial limit is exceeded. ;
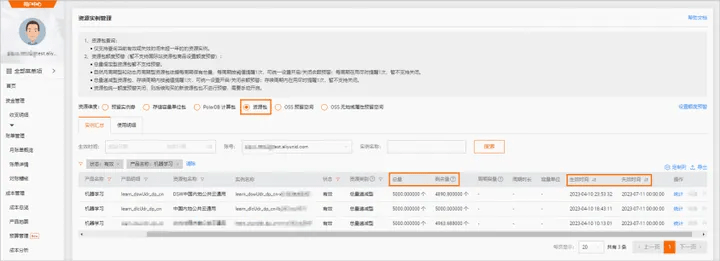
- The instance will still be considered for use in the future>>Stop; the instance will no longer be used in the future>>Delete, and resource consumption will stop after successful stop.
3.2 Follow-up
During the trial validity period, you can continue to use DSW instances for model training and inference verification.
Attachment:
Welcome to co-build EasyPhoto, Github address: https://github.com/aigc-apps/sd-webui-EasyPhoto
Original link: https://developer.aliyun.com/article/1401917?utm_content=g_1000386818
This article is original content of Alibaba Cloud and may not be reproduced without permission.
The above is the detailed content of PAI x EasyPhoto, bid farewell to April Fool's Day and create a festive atmosphere with AI photos. For more information, please follow other related articles on the PHP Chinese website!

Hot AI Tools

Undresser.AI Undress
AI-powered app for creating realistic nude photos

AI Clothes Remover
Online AI tool for removing clothes from photos.

Undress AI Tool
Undress images for free

Clothoff.io
AI clothes remover

AI Hentai Generator
Generate AI Hentai for free.

Hot Article

Hot Tools

Notepad++7.3.1
Easy-to-use and free code editor

SublimeText3 Chinese version
Chinese version, very easy to use

Zend Studio 13.0.1
Powerful PHP integrated development environment

Dreamweaver CS6
Visual web development tools

SublimeText3 Mac version
God-level code editing software (SublimeText3)

Hot Topics
 I Tried Vibe Coding with Cursor AI and It's Amazing!
Mar 20, 2025 pm 03:34 PM
Vibe coding is reshaping the world of software development by letting us create applications using natural language instead of endless lines of code. Inspired by visionaries like Andrej Karpathy, this innovative approach lets dev
 How to Use DALL-E 3: Tips, Examples, and Features
Mar 09, 2025 pm 01:00 PM
DALL-E 3: A Generative AI Image Creation Tool Generative AI is revolutionizing content creation, and DALL-E 3, OpenAI's latest image generation model, is at the forefront. Released in October 2023, it builds upon its predecessors, DALL-E and DALL-E 2
 Top 5 GenAI Launches of February 2025: GPT-4.5, Grok-3 & More!
Mar 22, 2025 am 10:58 AM
February 2025 has been yet another game-changing month for generative AI, bringing us some of the most anticipated model upgrades and groundbreaking new features. From xAI’s Grok 3 and Anthropic’s Claude 3.7 Sonnet, to OpenAI’s G
 How to Use YOLO v12 for Object Detection?
Mar 22, 2025 am 11:07 AM
YOLO (You Only Look Once) has been a leading real-time object detection framework, with each iteration improving upon the previous versions. The latest version YOLO v12 introduces advancements that significantly enhance accuracy
 Elon Musk & Sam Altman Clash over $500 Billion Stargate Project
Mar 08, 2025 am 11:15 AM
The $500 billion Stargate AI project, backed by tech giants like OpenAI, SoftBank, Oracle, and Nvidia, and supported by the U.S. government, aims to solidify American AI leadership. This ambitious undertaking promises a future shaped by AI advanceme
 Google's GenCast: Weather Forecasting With GenCast Mini Demo
Mar 16, 2025 pm 01:46 PM
Google DeepMind's GenCast: A Revolutionary AI for Weather Forecasting Weather forecasting has undergone a dramatic transformation, moving from rudimentary observations to sophisticated AI-powered predictions. Google DeepMind's GenCast, a groundbreak
 Sora vs Veo 2: Which One Creates More Realistic Videos?
Mar 10, 2025 pm 12:22 PM
Google's Veo 2 and OpenAI's Sora: Which AI video generator reigns supreme? Both platforms generate impressive AI videos, but their strengths lie in different areas. This comparison, using various prompts, reveals which tool best suits your needs. T
 Which AI is better than ChatGPT?
Mar 18, 2025 pm 06:05 PM
The article discusses AI models surpassing ChatGPT, like LaMDA, LLaMA, and Grok, highlighting their advantages in accuracy, understanding, and industry impact.(159 characters)


