

| Introduction | Containers are revolutionizing the entire software lifecycle: from the earliest technical experiments and proofs of concept, through development, testing, deployment and support. |
Want to try MongoDB on your laptop? Just execute a command and you'll have a lightweight, self-contained sandbox. You can delete all traces of what you've done when you're done.
Want to use the same application stack copy in multiple environments? Build your own container images and let your development, testing, operations, and support teams use the same environment clone.
Containers are revolutionizing the entire software life cycle: from the earliest technical experiments and proofs of concept, through development, testing, deployment and support.
The orchestration tool is used to manage how to create, upgrade multiple containers, and make them highly available. Orchestration also controls how containers are connected to build complex applications from multiple microservice containers.
Rich functionality, simple tooling, and powerful APIs make containers and orchestration capabilities the first choice for DevOps teams integrating into continuous integration (CI) and continuous delivery (CD) workflows.
This article explores the additional challenges encountered when running and orchestrating MongoDB in containers and explains how to overcome them.
Notes on MongoDBThere are some additional considerations for running MongoDB with containers and orchestration:
MongoDB database nodes are stateful. If a container fails and is rescheduled, the data is lost (can be recovered from other nodes in the replica set, but this takes time), which is undesirable. To solve this problem, you can use features such as the volume abstraction in Kubernetes to map the temporary MongoDB data directory in the container to a persistent location so that the data survives container failures and rescheduling processes.
MongoDB database nodes in a replica set must be able to communicate with each other - including after rescheduling. All nodes in a replica set must know the addresses of all their peers, but when a container is rescheduled, it may restart with a different IP address. For example, all containers in a Kubernetes Pod share an IP address, and when a pod is re-orchestrated, the IP address changes. With Kubernetes, this is handled by associating a Kubernetes service with each MongoDB node, which provides a "hostname" using the Kubernetes DNS service to keep the service unchanged across re-orchestrations.
Once each individual MongoDB node is running (each in its own container), the replica set must be initialized and each node added to it. This may require some additional processing outside of the orchestration tool. Specifically, you must use a MongoDB node in the target replica set to execute the rs.initiate and rs.add commands.
If an orchestration framework provided automated re-orchestration of containers (like Kubernetes), then this would increase MongoDB's resiliency as failed replica set members could be automatically recreated, thereby restoring full redundancy levels without human intervention.
It should be noted that while the orchestration framework may monitor the status of the container, it is unlikely to monitor the application running inside the container or back up its data. This means it's important to use a powerful monitoring and backup solution like MongoDB Cloud Manager included in MongoDB Enterprise Advanced and MongoDB Professional. Consider creating your own image that contains your preferred MongoDB version and MongoDB Automation Agent.
As mentioned in the previous section, distributed databases (such as MongoDB) require some attention when deployed using orchestration frameworks (such as Kubernetes). This section will describe in detail how to achieve this.
We start by creating the entire MongoDB replica set in a single Kubernetes cluster (usually within a data center, which obviously does not provide geographical redundancy). In practice, it is rarely necessary to change to run across multiple clusters, and these steps are described later.
Each member of the replica set will run as its own pod and provide a service with an exposed IP address and port. This "fixed" IP address is important because both external applications and other replica set members can rely on it to remain unchanged in the event of a pod rescheduling.
The following figure illustrates one of the pods and the associated replication controllers and services.
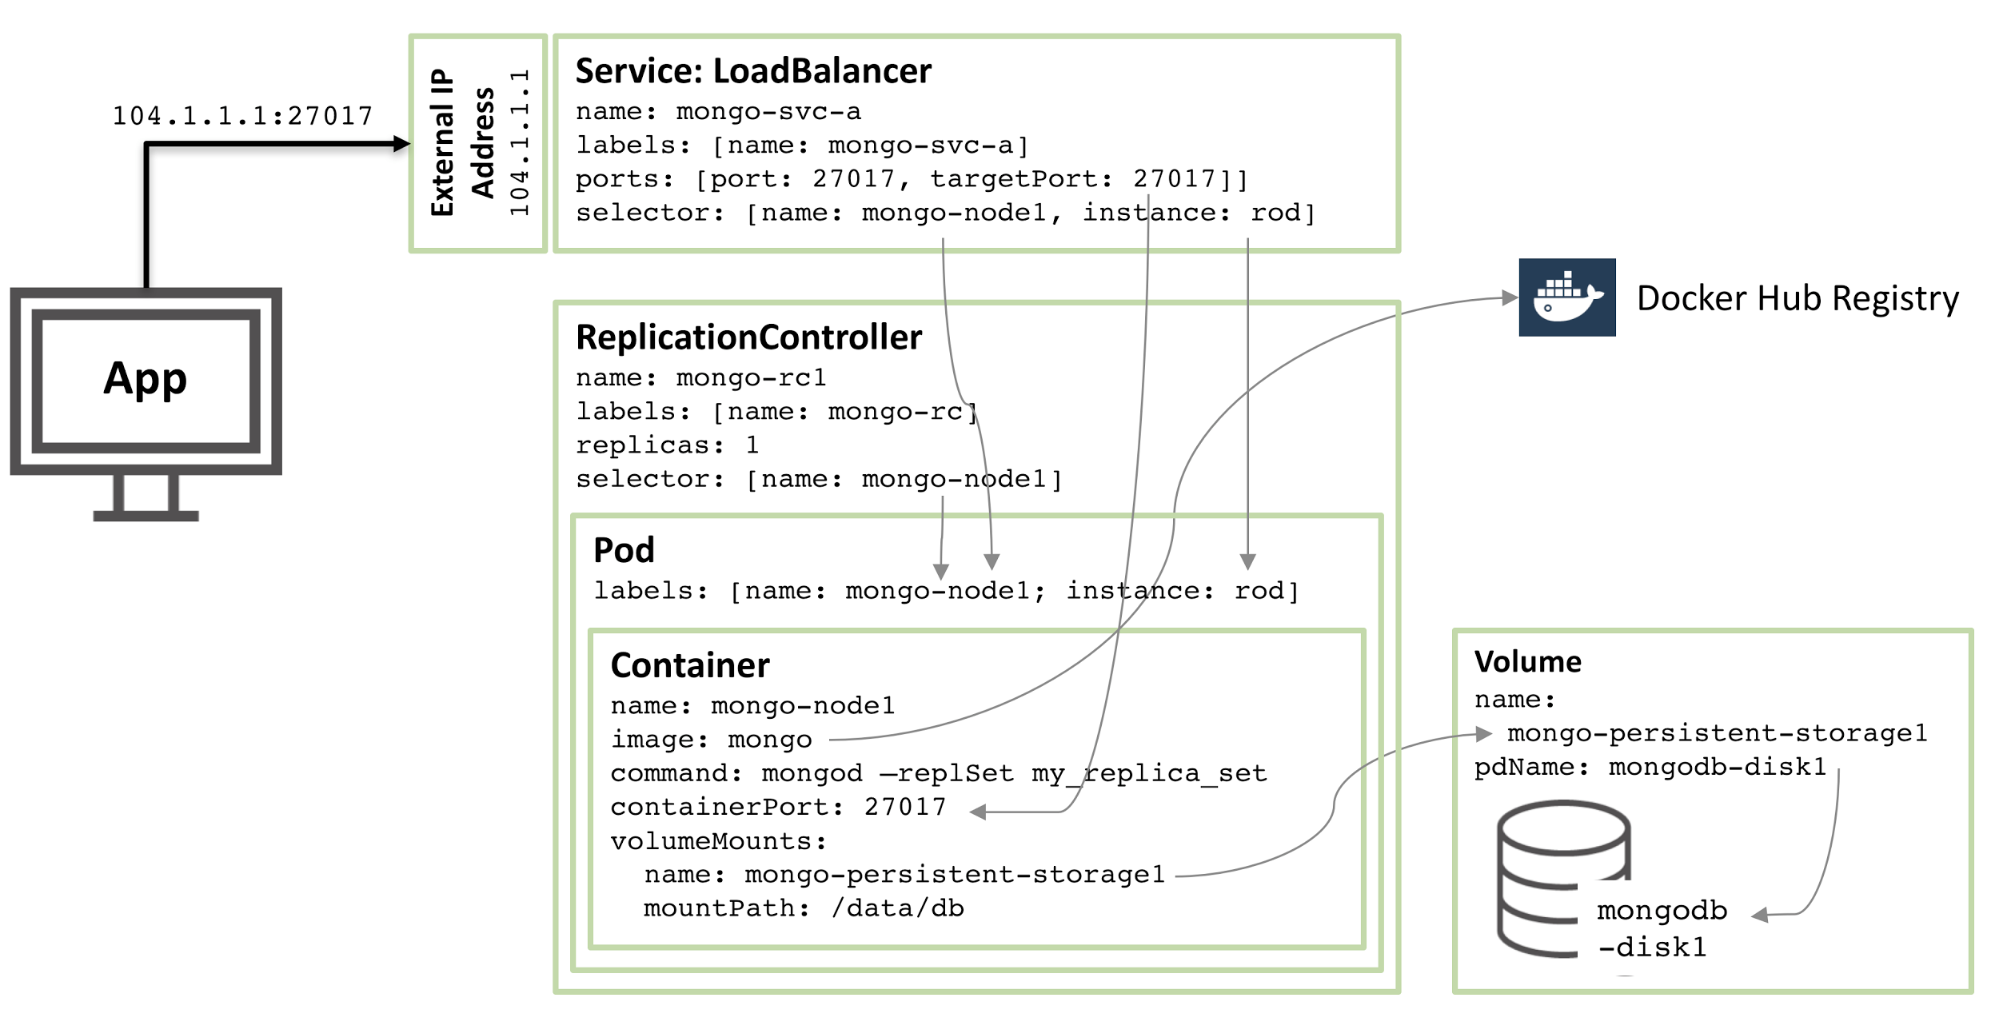
Figure 1: MongoDB replica set members configured as Kubernetes Pods and exposed as services
Figure 1: MongoDB replica set members configured as Kubernetes Pods and exposed as services
Step through the resources described in this configuration:
Starting from the core, there is a container named mongo-node1. mongo-node1 contains an image named mongo, which is a publicly available MongoDB container image hosted on Docker Hub. The container exposes port 27107 in the cluster.
The data volume feature of Kubernetes is used to map the /data/db directory in the connector to a persistent storage named mongo-persistent-storage1, which in turn is mapped to a disk named mongodb-disk1 created in Google Cloud . This is where MongoDB stores its data so that it persists after the container is re-orchestrated.
The container is kept in a pod with a label named mongo-node and an (arbitrary) example named rod .
Configure the mongo-node1 replication controller to ensure that a single instance of the mongo-node1 pod is always running.
The load balancing service named mongo-svc-a opens an IP address and port 27017 to the outside world, which is mapped to the same port number of the container. The service uses selectors to match pod labels to determine the correct pod. The external IP address and port will be used for communication between applications and replica set members. Each container also has a local IP address, but when the container is moved or restarted, these IP addresses change and therefore are not used for the replica set.
The next diagram shows the configuration of the second member of the replica set.

Figure 2: Second MongoDB replica set member configured as a Kubernetes Pod
Figure 2: Second MongoDB replica set member configured as Kubernetes Pod
90% of the configuration is the same, with only these changes:
Disk and volume names must be unique, so mongodb-disk2 and mongo-persistent-storage2 are used
The Pod is assigned a label of instance: jane and name: mongo-node2 so that the new service can be distinguished from the rod Pod shown in Figure 1 using the selector.
The replication controller is named mongo-rc2
The service is named mongo-svc-b and is given a unique external IP address (in this case, Kubernetes assigned 104.1.4.5)
The configuration of the third replica member follows the same pattern, and the following figure shows the complete replica set:
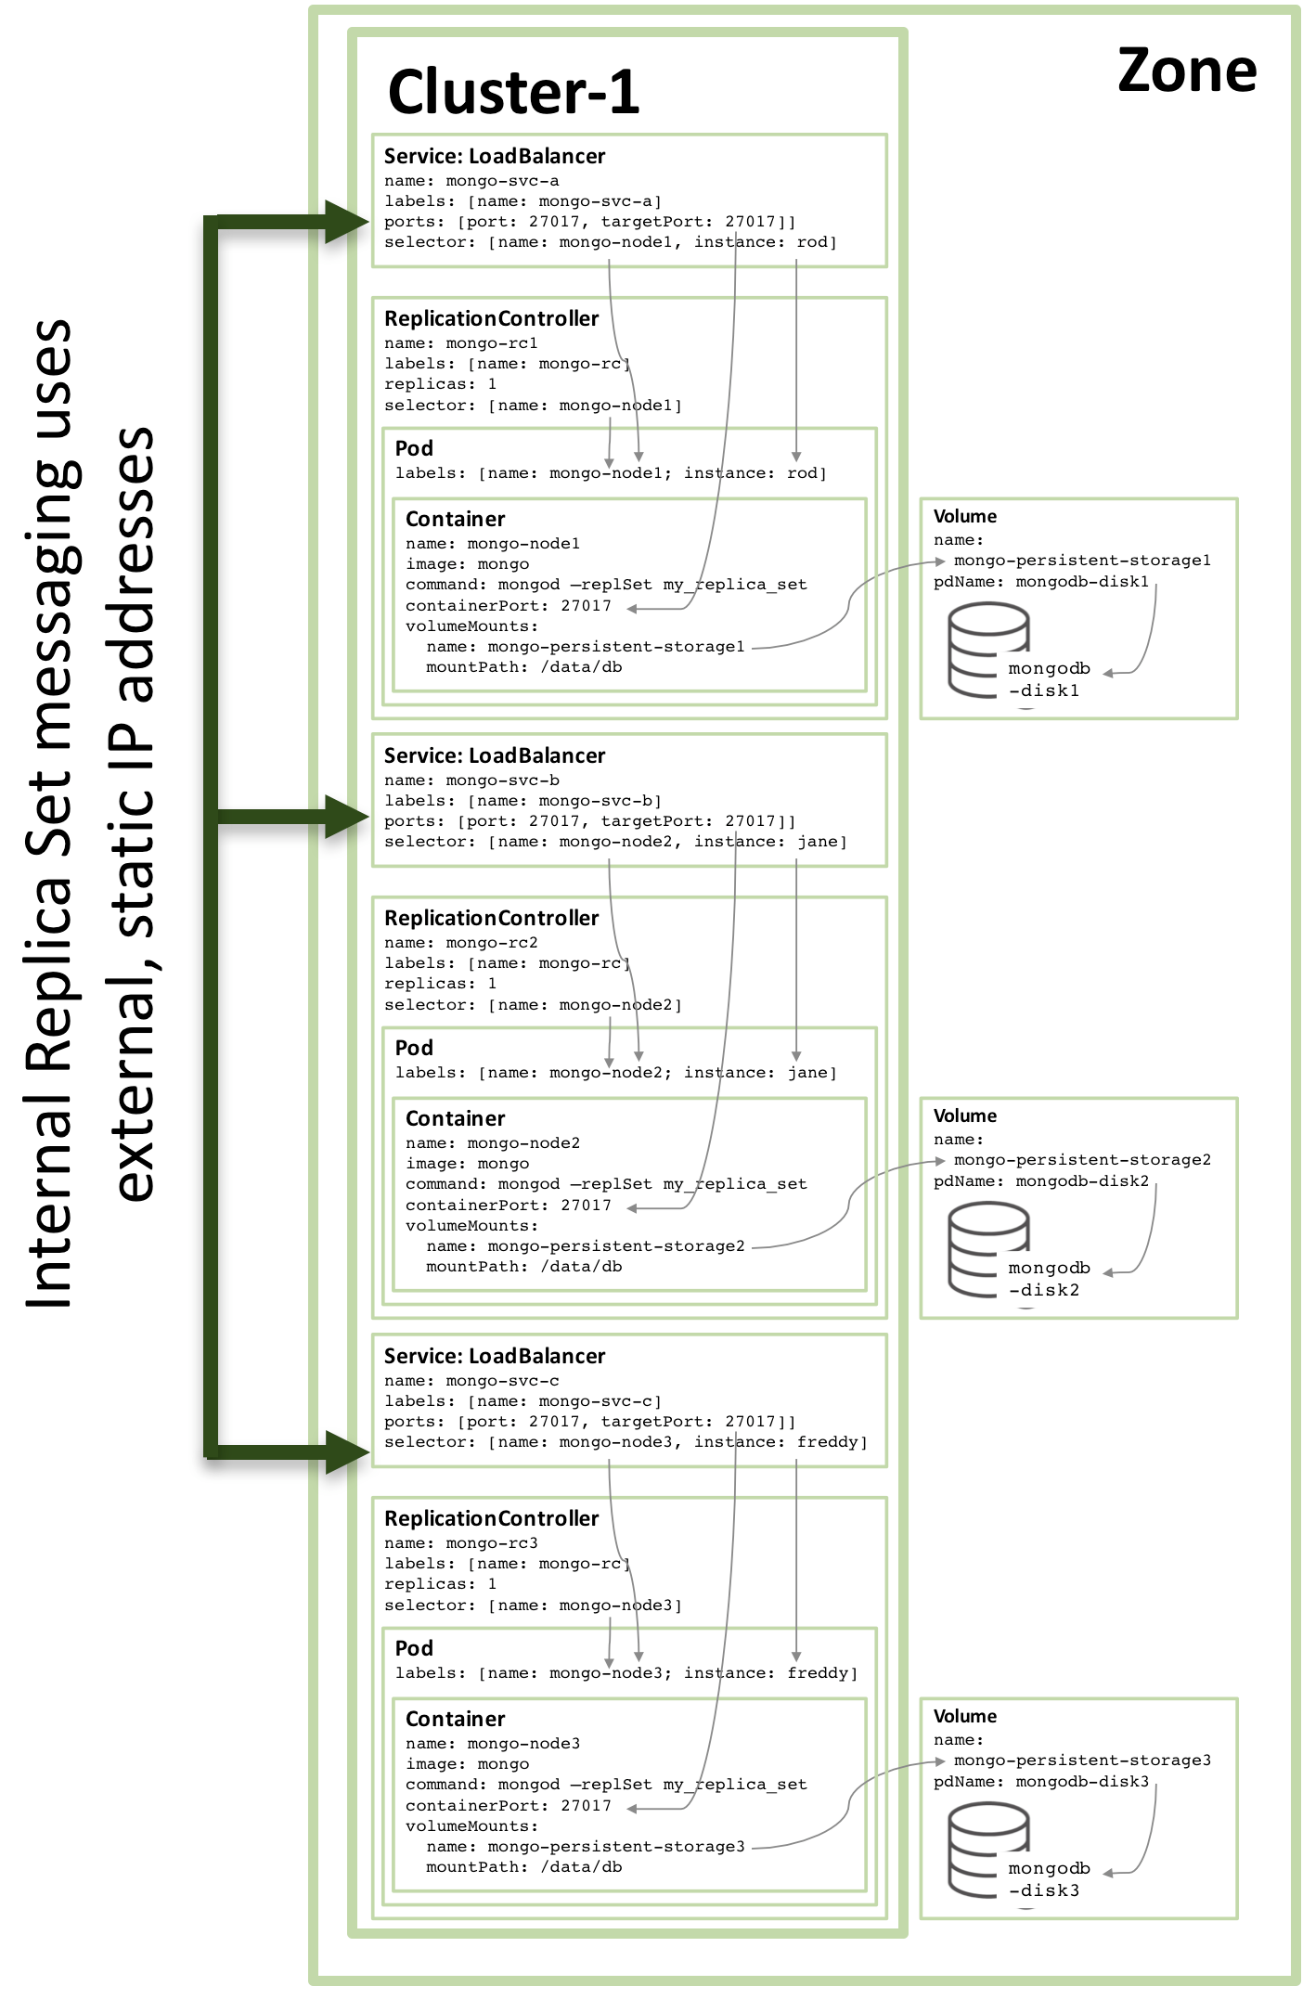
Figure 3: Full replica set member configured as a Kubernetes service
Figure 3: Full replica set member configured as a Kubernetes service
Note that even when running the configuration shown in Figure 3 on a Kubernetes cluster of three or more nodes, Kubernetes may (and often does) orchestrate two or more MongoDB replica set members on the same host. This is because Kubernetes treats the three pods as belonging to three separate services.
To add redundancy within a zone, an additional headless service can be created. The new service doesn't provide any functionality to the outside world (it won't even have an IP address), but it does let Kubernetes notify three MongoDB pods to form a service, so Kubernetes will try to orchestrate them on different nodes.
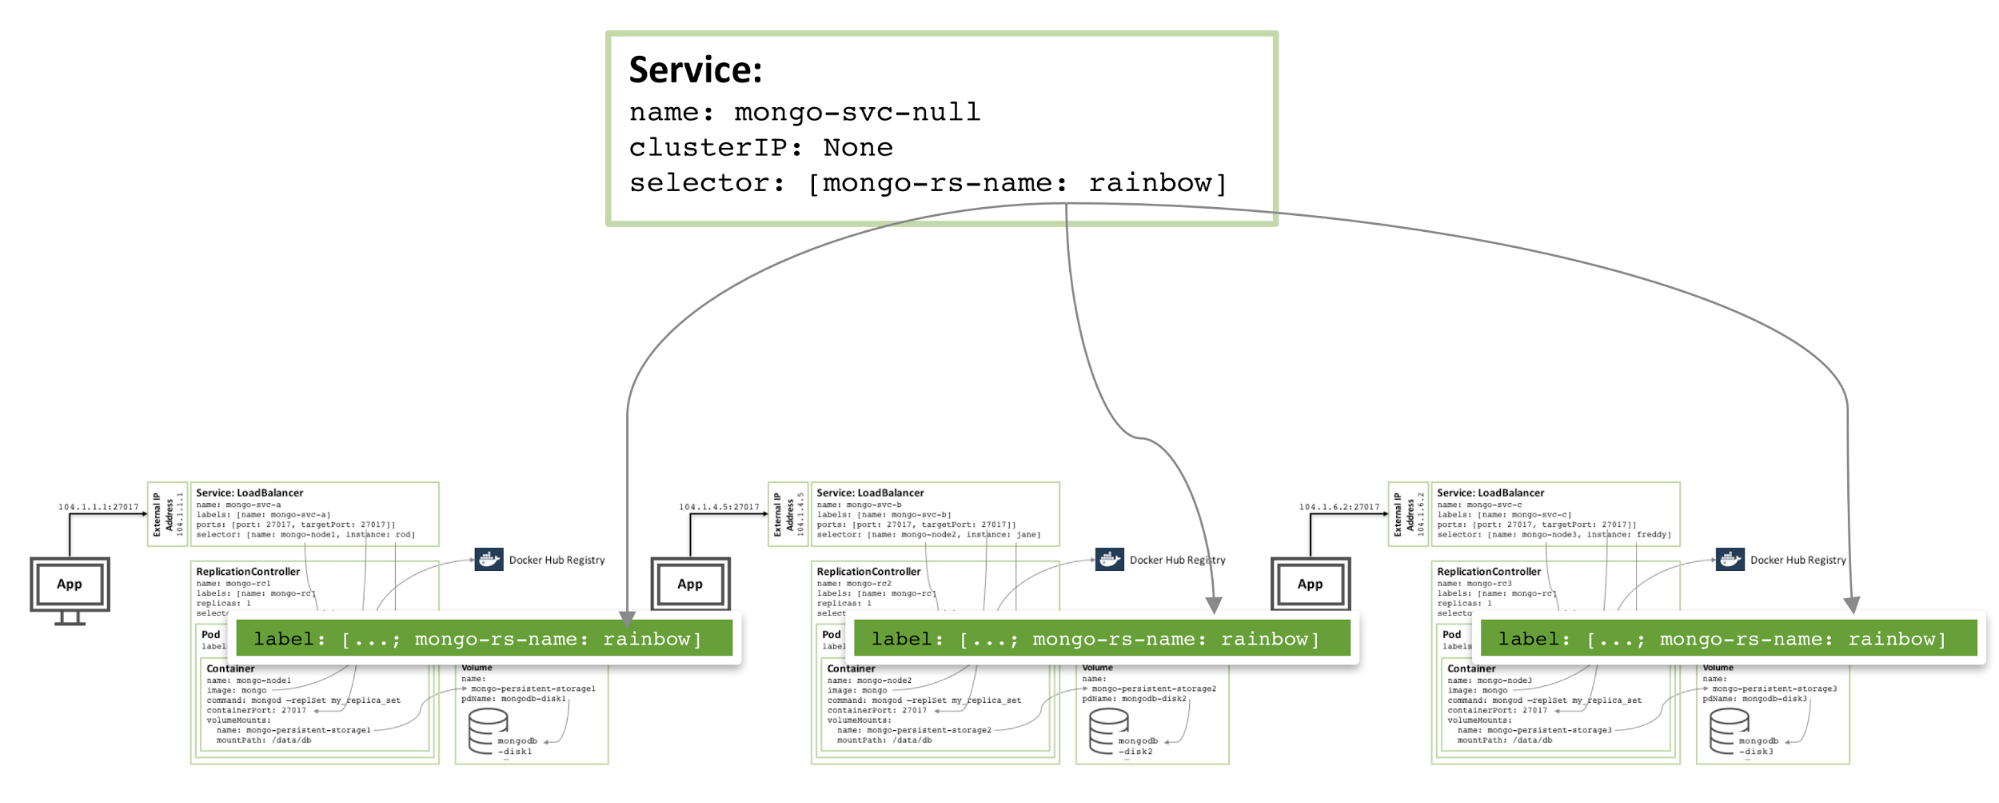
Figure 4: Avoiding Headless services for members of the same MongoDB replica set
Figure 4: Headless services that avoid members of the same MongoDB replica set
The actual configuration files and commands required to configure and launch a MongoDB replica set can be found in the white paper Enabling Microservices: Elucidating Containers and Orchestration. In particular, some of the special steps described in this article are required to combine three MongoDB instances into a functional, robust replica set.
The replica set created above is risky because everything is running in the same GCE cluster and therefore in the same availability zone. If a major event takes an Availability Zone offline, the MongoDB replica set will be unavailable. If geographic redundancy is required, the three pods should run in three different Availability Zones, or regions.
Surprisingly, very few changes were needed in order to create similar replica sets split between three regions (requiring three clusters). Each cluster requires its own Kubernetes YAML file that defines the pods, replication controllers, and services for only one member of that replica set. Then it is a simple matter to create a cluster, persistent storage and MongoDB nodes for each region.
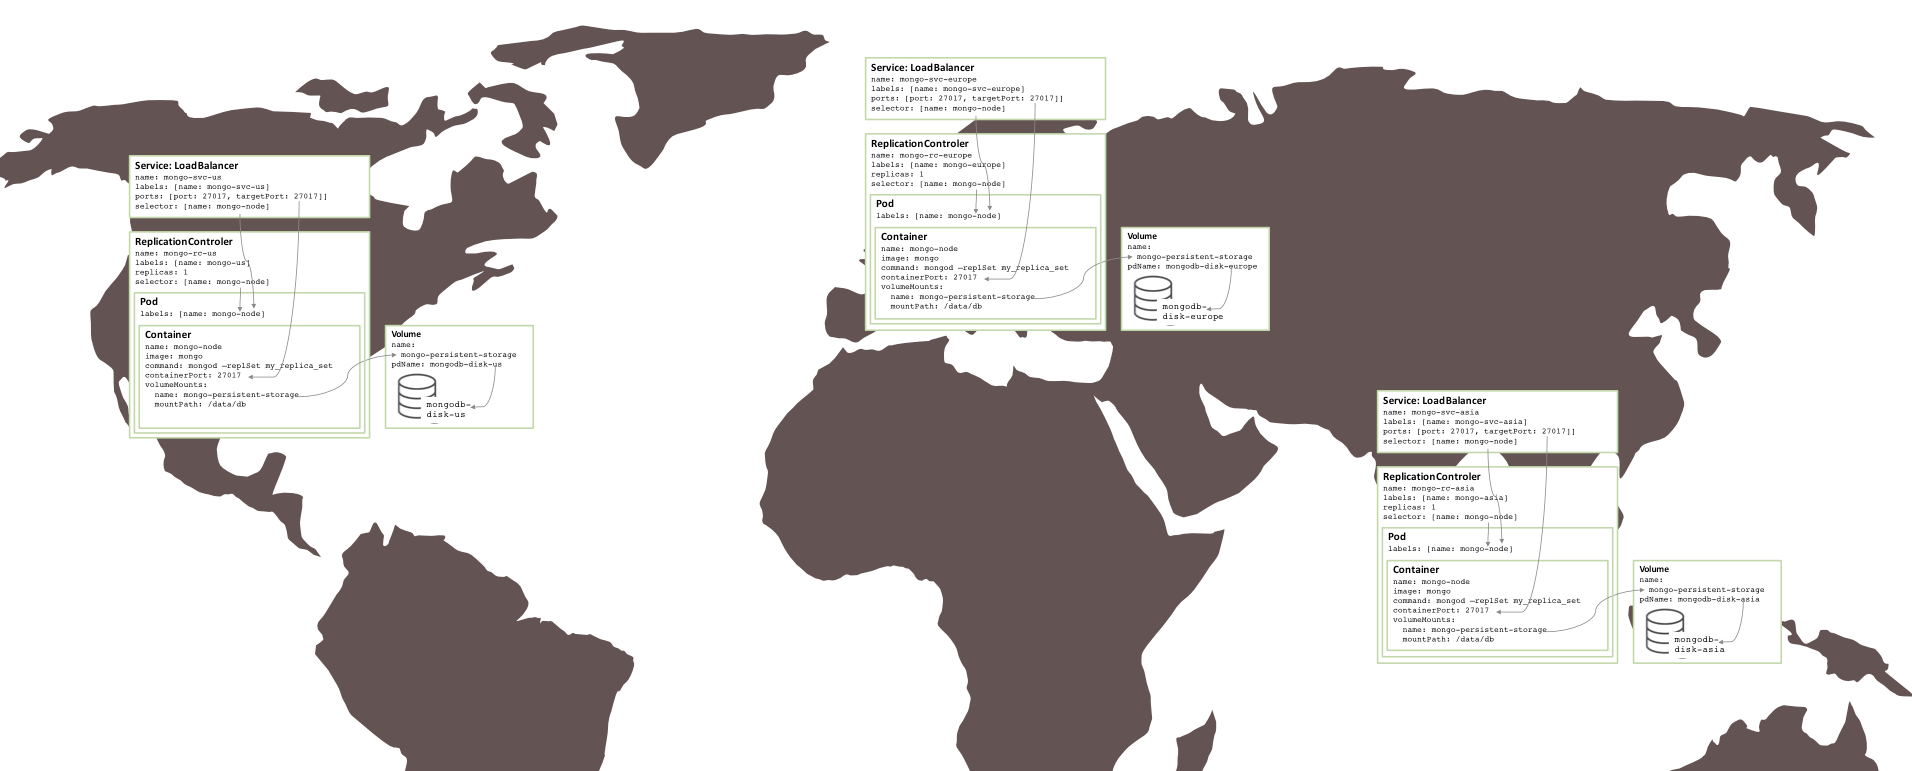
Figure 5: Replica set running on multiple availability zones
Figure 5: Replica set running on multiple availability zones
Next step
To learn more about containers and orchestration—the technologies involved and the business benefits they offer—read the white paper Enabling Microservices: Containers and Orchestration Explained. This document provides complete instructions for getting the replica set described in this article and running it on Docker and Kubernetes in Google Container Engine.
About the Author:
Andrew is the General Manager of Product Marketing at MongoDB. He joined MongoDB last summer from Oracle, where he spent more than six years in product management focusing on high availability. He can be reached at @andrewmorgan or by commenting on his blog (clusterdb.com).
The above is the detailed content of Configure mongodb service. For more information, please follow other related articles on the PHP Chinese website!


![[Web front-end] Node.js quick start](https://img.php.cn/upload/course/000/000/067/662b5d34ba7c0227.png)


