

How to configure and troubleshoot GRUB

This article will introduce you to the knowledge of GRUB and explain why you need a boot loader and how it adds functionality to the system.
The Linux boot process starts from when you press the power button of your computer until you have a fully functional system. The entire process follows these main steps:
- 1. A process called POST (Power-On Self-Test) will perform a comprehensive check on your computer hardware components.
- 2. When POST completes, it transfers control to the bootloader, which then loads the Linux kernel (and initramfs) into memory and execute.
- 3. The kernel first checks and accesses the hardware, then runs the initialization process (mainly known by its common name init), then the initialization process starts some services, and finally completes the system startup process.
In the seventh lecture of the series ("SysVinit, Upstart, and Systemd"), we introduced some of the service management systems and tools used by modern Linux distributions. You may want to review that lesson before continuing.
GRUB Boot Loader IntroductionOn modern systems you will find two main GRUB versions (one is the v1 version sometimes called GRUB Legacy, and the other is ##v2 version), although most latest version distribution systems use the v2 version by default. Today, only Red Hat Enterprise Linux 6 and its derivatives still use version v1.
Therefore, in this guide, we will focus on the features of thev2 version.
Regardless of the version ofGRUB, a bootloader allows the user to:
- Modify the behavior of the system by specifying the use of different kernels;
- Select one to start from multiple operating systems;
- Add or edit configuration blocks to change startup options, etc.
GNU project maintains GRUB and provides extensive documentation on their website. While you are reading this guide, we strongly recommend that you take a look at the official GNU documentation.
When the system boots, you will see the followingGRUB screen on the main console. Initially, you can follow the prompts to select a kernel among multiple kernel versions (by default, the system will boot with the latest kernel), and you can enter the GRUB command line mode (using c key), or edit startup items (press the e key).

GRUB splash screen
One of the reasons you might consider booting with an older version of the kernel is if a hardware device that previously worked fine is "acting up" after an upgrade (for example, you can refer to this thread in the AskUbuntu forum Link).During startup,
GRUB v2 will be read from the /boot/grub/grub.cfg or /boot/grub2/grub.cfg file. Configuration file, while the configuration file used by GRUB v1 comes from /boot/grub/grub.conf or /boot/grub/menu.lst. These files should not be manually edited directly, but should be updated via the contents of /etc/default/grub and the files in the /etc/grub.d directory.
OnCentOS 7, when the system initially completes the installation, the following configuration file will be generated:
GRUB_TIMEOUT=5
GRUB_DISTRIBUTOR="$(sed 's, release .*$,,g' /etc/system-release)"
GRUB_DEFAULT=saved
GRUB_DISABLE_SUBMENU=true
GRUB_TERMINAL_OUTPUT="console"
GRUB_CMDLINE_LINUX="vconsole.keymap=la-latin1 rd.lvm.lv=centos_centos7-2/swap crashkernel=auto  vconsole.font=latarcyrheb-sun16 rd.lvm.lv=centos_centos7-2/root rhgb quiet"
GRUB_DISABLE_RECOVERY="true"
# info grub
/etc/default/grub file, you can directly consult the help documentation in the configuration section:
# info -f grub -n 'Simple configuration'
使用上述命令,你会发现 GRUB_TIMEOUT 用于设置启动画面出现和系统自动开始启动(除非被用户中断)之间的时间。当该变量值为 -1 时,除非用户主动做出选择,否则不会开始启动。
当同一台机器上安装了多个操作系统或内核后,GRUB_DEFAULT 就需要用一个整数来指定 GRUB 启动画面默认选择启动的操作系统或内核条目。我们既可以通过上述启动画面查看启动条目列表,也可以使用下面的命令:
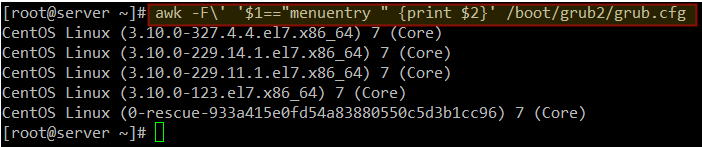
在 CentOS 和 openSUSE 系统上# awk -F/' '$1=="menuentry " {print $2}' /boot/grub2/grub.cfg
# awk -F/' '$1=="menuentry " {print $2}' /boot/grub/grub.cfg
如下图所示的例子中,如果我们想要使用版本为 3.10.0-123.el7.x86_64 的内核(第四个条目),我们需要将 GRUB_DEFAULT 设置为 3(条目从零开始编号),如下所示:
GRUB_DEFAULT=3
使用旧版内核启动系统
最后一个需要特别关注的 GRUB 配置变量是 GRUB_CMDLINE_LINUX,它是用来给内核传递选项的。我们可以在 内核变量文件 和 man 7 bootparam 中找到能够通过 GRUB 传递给内核的选项的详细文档。
我的 CentOS 7 服务器上当前的选项是:
GRUB_CMDLINE_LINUX="vconsole.keymap=la-latin1 rd.lvm.lv=centos_centos7-2/swap crashkernel=auto vconsole.font=latarcyrheb-sun16 rd.lvm.lv=centos_centos7-2/root rhgb quiet"
为什么你希望修改默认的内核参数或者传递额外的选项呢?简单来说,在很多情况下,你需要告诉内核某些由内核自身无法判断的硬件参数,或者是覆盖一些内核检测的值。
不久之前,就在我身上发生过这样的事情,当时我在自己已用了 10 年的老笔记本上尝试了衍生自 Slackware 的 Vector Linux。完成安装后,内核并没有检测出我的显卡的正确配置,所以我不得不通过 GRUB 传递修改过的内核选项来让它工作。
另外一个例子是当你需要将系统切换到单用户模式以执行维护工作时。为此,你可以直接在 GRUB_CMDLINE_LINUX 变量中直接追加 single 并重启即可:
GRUB_CMDLINE_LINUX="vconsole.keymap=la-latin1 rd.lvm.lv=centos_centos7-2/swap crashkernel=auto vconsole.font=latarcyrheb-sun16 rd.lvm.lv=centos_centos7-2/root rhgb quiet single"
编辑完 /etc/default/grub 之后,你需要运行 update-grub (在 Ubuntu 上)或者 grub2-mkconfig -o /boot/grub2/grub.cfg (在 CentOS 和 openSUSE 上)命令来更新 grub.cfg 文件(否则,改动会在系统启动时丢失)。
这条命令会处理早先提到的那些启动配置文件来更新 grub.cfg 文件。这种方法可以确保改动持久化,而在启动时刻通过 GRUB 传递的选项仅在当前会话期间有效。
修复 Linux GRUB 问题如果你安装了第二个操作系统,或者由于人为失误而导致你的 GRUB 配置文件损坏了,依然有一些方法可以让你恢复并能够再次启动系统。
在启动画面中按下 c 键进入 GRUB 命令行模式(记住,你也可以按下 e 键编辑默认启动选项),并可以在 GRUB 提示中输入 help 命令获得可用命令:

修复 Linux 的 Grub 配置问题
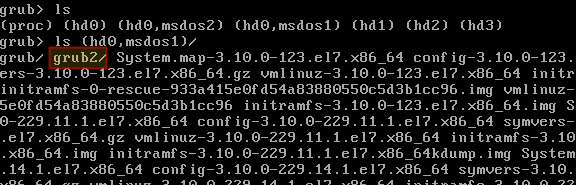
我们将会着重关注 ls 命令,它会列出已安装的设备和文件系统,并且我们将会看看它查找到的东西。在下面的图片中,我们可以看到有 4 块硬盘(hd0 到 hd3)。
貌似只有 hd0 已经分区了(msdos1 和 msdos2 可以证明,这里的 1 和 2 是分区号,msdos 则是分区方案)。
现在我们来看看能否在第一个分区 hd0(msdos1)上找到 GRUB。这种方法允许我们启动 Linux,并且使用高级工具修复配置文件,或者如果有必要的话,干脆重新安装 GRUB:
# ls (hd0,msdos1)/
从高亮区域可以发现,grub2 目录就在这个分区:
查找 Grub 配置
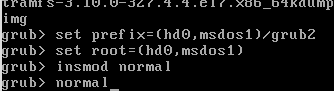
一旦我们确信了 GRUB 位于 (hd0, msdos1),那就让我们告诉 GRUB 该去哪儿查找它的配置文件并指示它去尝试启动它的菜单:
set prefix=(hd0,msdos1)/grub2
set root=(hd0,msdos1)
insmod normal
normal
查找并启动 Grub 菜单
然后,在 GRUB 菜单中,选择一个条目并按下回车键以使用它启动。一旦系统成功启动后,你就可以运行 grub2-install /dev/sdX 命令修复问题了(将 sdX 改成你想要安装 GRUB 的设备)。然后启动信息将会更新,并且所有相关文件都会得到恢复。
# grub2-install /dev/sdX
其它更加复杂的情景及其修复建议都记录在 Ubuntu GRUB2 故障排除指南 中。该指南中阐述的概念对于其它发行版也是有效的。
总结本文向你介绍了 GRUB,并指导你可以在何处找到线上和线下的文档,同时说明了如何面对由于引导加载相关的问题而导致系统无法正常启动的情况。
幸运的是,GRUB 是文档支持非常丰富的工具之一,你可以使用我们在文中分享的资源非常轻松地获取已安装的文档或在线文档。
你有什么问题或建议吗?请不要犹豫,使用下面的评论框告诉我们吧。我们期待着来自你的回复!
The above is the detailed content of How to configure and troubleshoot GRUB. For more information, please follow other related articles on the PHP Chinese website!

Hot AI Tools

Undresser.AI Undress
AI-powered app for creating realistic nude photos

AI Clothes Remover
Online AI tool for removing clothes from photos.

Undress AI Tool
Undress images for free

Clothoff.io
AI clothes remover

AI Hentai Generator
Generate AI Hentai for free.

Hot Article
Hot Tools

Notepad++7.3.1
Easy-to-use and free code editor

SublimeText3 Chinese version
Chinese version, very easy to use

Zend Studio 13.0.1
Powerful PHP integrated development environment

Dreamweaver CS6
Visual web development tools

SublimeText3 Mac version
God-level code editing software (SublimeText3)
Hot Topics


 Android TV Box gets unofficial Ubuntu 24.04 upgrade
Sep 05, 2024 am 06:33 AM
Android TV Box gets unofficial Ubuntu 24.04 upgrade
Sep 05, 2024 am 06:33 AM
For many users, hacking an Android TV box sounds daunting. However, developer Murray R. Van Luyn faced the challenge of looking for suitable alternatives to the Raspberry Pi during the Broadcom chip shortage. His collaborative efforts with the Armbia
 deepseek web version entrance deepseek official website entrance
Feb 19, 2025 pm 04:54 PM
deepseek web version entrance deepseek official website entrance
Feb 19, 2025 pm 04:54 PM
DeepSeek is a powerful intelligent search and analysis tool that provides two access methods: web version and official website. The web version is convenient and efficient, and can be used without installation; the official website provides comprehensive product information, download resources and support services. Whether individuals or corporate users, they can easily obtain and analyze massive data through DeepSeek to improve work efficiency, assist decision-making and promote innovation.
 How to install deepseek
Feb 19, 2025 pm 05:48 PM
How to install deepseek
Feb 19, 2025 pm 05:48 PM
There are many ways to install DeepSeek, including: compile from source (for experienced developers) using precompiled packages (for Windows users) using Docker containers (for most convenient, no need to worry about compatibility) No matter which method you choose, Please read the official documents carefully and prepare them fully to avoid unnecessary trouble.
 BitPie Bitpie wallet app download address
Sep 10, 2024 pm 12:10 PM
BitPie Bitpie wallet app download address
Sep 10, 2024 pm 12:10 PM
How to download BitPie Bitpie Wallet App? The steps are as follows: Search for "BitPie Bitpie Wallet" in the AppStore (Apple devices) or Google Play Store (Android devices). Click the "Get" or "Install" button to download the app. For the computer version, visit the official BitPie wallet website and download the corresponding software package.
 BITGet official website installation (2025 beginner's guide)
Feb 21, 2025 pm 08:42 PM
BITGet official website installation (2025 beginner's guide)
Feb 21, 2025 pm 08:42 PM
BITGet is a cryptocurrency exchange that provides a variety of trading services including spot trading, contract trading and derivatives. Founded in 2018, the exchange is headquartered in Singapore and is committed to providing users with a safe and reliable trading platform. BITGet offers a variety of trading pairs, including BTC/USDT, ETH/USDT and XRP/USDT. Additionally, the exchange has a reputation for security and liquidity and offers a variety of features such as premium order types, leveraged trading and 24/7 customer support.
 Zabbix 3.4 Source code compilation installation
Sep 04, 2024 am 07:32 AM
Zabbix 3.4 Source code compilation installation
Sep 04, 2024 am 07:32 AM
1. Installation environment (Hyper-V virtual machine): $hostnamectlStatichostname:localhost.localdomainIconname:computer-vmChassis:vmMachineID:renwoles1d8743989a40cb81db696400BootID:renwoles272f4aa59935dcdd0d456501Virtualization:microsoftOperatingSystem:CentOS Linux7(Core)CPEOSName:cpe:
 Ouyi okx installation package is directly included
Feb 21, 2025 pm 08:00 PM
Ouyi okx installation package is directly included
Feb 21, 2025 pm 08:00 PM
Ouyi OKX, the world's leading digital asset exchange, has now launched an official installation package to provide a safe and convenient trading experience. The OKX installation package of Ouyi does not need to be accessed through a browser. It can directly install independent applications on the device, creating a stable and efficient trading platform for users. The installation process is simple and easy to understand. Users only need to download the latest version of the installation package and follow the prompts to complete the installation step by step.
 Get the gate.io installation package for free
Feb 21, 2025 pm 08:21 PM
Get the gate.io installation package for free
Feb 21, 2025 pm 08:21 PM
Gate.io is a popular cryptocurrency exchange that users can use by downloading its installation package and installing it on their devices. The steps to obtain the installation package are as follows: Visit the official website of Gate.io, click "Download", select the corresponding operating system (Windows, Mac or Linux), and download the installation package to your computer. It is recommended to temporarily disable antivirus software or firewall during installation to ensure smooth installation. After completion, the user needs to create a Gate.io account to start using it.
