

win11 system update permanently disabled

Win11 sometimes keeps popping up the system update interface, which makes us feel very irritated, and every update takes up memory. So how should we permanently turn off system updates? Let’s take a look.
Win11 permanently closes system updates:
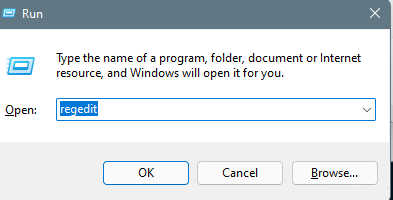
1. We can hold down "win r" to open the run interface, and then enter "regedit" to open the registration edit form.
2. Then open HKEY_LOCAL_MACHINE\SOFTWARE\Policies\Microsoft\Windows according to the following path.
3. Then right-click the windows folder, then open "New", "Item" and name it "windowsupdate".
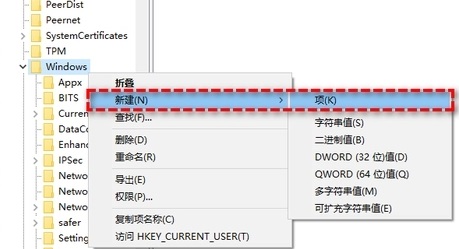
4. Then we right-click the newly created windowsupdate folder, select New, then click the item and name it au.
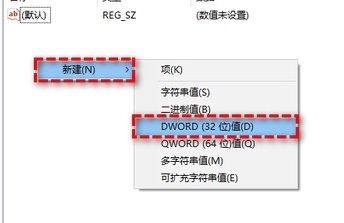
5. Right-click the blank space on the right side of the newly created au folder and select "New", then click "DOWORD (32-bit) value" and name it NoAutoUpdate.
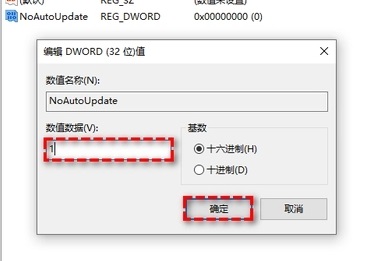
6. We double-click the newly created NoAutoUpdate, change the data from 0 to 1, and click "OK".
#7. Finally, close the registry and restart it to completely close it.
Method 2:
1. Press and hold win r on the keyboard to open the run interface.
2. Enter services.msc and press enter to open the service interface.
#3. Then we find "Windows Update" in the list on the right and double-click to enter the detailed properties page.
4. Then change the startup type configuration to "Disabled".
5. Then click Apply, then click OK to turn off automatic updates.

The above is the detailed content of win11 system update permanently disabled. For more information, please follow other related articles on the PHP Chinese website!

Hot AI Tools

Undresser.AI Undress
AI-powered app for creating realistic nude photos

AI Clothes Remover
Online AI tool for removing clothes from photos.

Undress AI Tool
Undress images for free

Clothoff.io
AI clothes remover

AI Hentai Generator
Generate AI Hentai for free.

Hot Article
Hot Tools

Notepad++7.3.1
Easy-to-use and free code editor

SublimeText3 Chinese version
Chinese version, very easy to use

Zend Studio 13.0.1
Powerful PHP integrated development environment

Dreamweaver CS6
Visual web development tools

SublimeText3 Mac version
God-level code editing software (SublimeText3)
Hot Topics


 How to check the word count in Windows 10 Notepad
Dec 29, 2023 am 10:19 AM
How to check the word count in Windows 10 Notepad
Dec 29, 2023 am 10:19 AM
When using Win10 Notepad to input text, many friends want to check how much text they have input. So how to check it? In fact, you can see the number of words by just opening the text properties and checking the byte count. How to check the word count in Notepad in win10: 1. First, after editing the content in Notepad, save it. 2. Then right-click the notepad you saved and select. 3. We see that it is 8 bytes, because the size of each Chinese character is 2 bytes. 4. After we see the total bytes, just divide it by 2. For example, 984 bytes, divided by 2 is 492 words. 5. But it should be noted that each number such as 123 only occupies one byte, and each English word only occupies one byte.
 Teach you how to turn off the automatic screen lock function in win10
Jan 08, 2024 am 11:49 AM
Teach you how to turn off the automatic screen lock function in win10
Jan 08, 2024 am 11:49 AM
Many friends need to turn off the screen to protect the screen when they leave the computer, but they don’t want to lock the screen because they turn off the screen. When they come back, they have to enter a password to enter the system. In fact, we can complete this step through settings. Let’s take a look at it together. Bar. Tutorial on turning off the screen without locking the screen in win10 1. First enter settings and select "Personalization" 2. Click "Lock Screen" on the left 3. Select "Screen Saver Settings" below 4. Uncheck "Show login on recovery" Screen" 5. Then click "Change Power Settings" 6. Select the icon settings on the left. 7. Set a time to turn off the monitor, and then change the sleep status to "Never" 8. Then return to the power settings just now and select the sleep time below. 9. Use the same as above
 How to create a win10 remote connection shortcut on the desktop
Jan 02, 2024 pm 02:47 PM
How to create a win10 remote connection shortcut on the desktop
Jan 02, 2024 pm 02:47 PM
When using the remote connection function of win10, many users said that it is too slow to open using commands or other methods. Why is this remote connection function placed on the desktop? Come and take a look at the detailed tutorial ~ How to place win10 remote connection on the desktop: 1. In the start menu, expand the folder and find it. 2. Then we hold down the mouse, drag it to a blank space on the desktop, and let go. 3. Then connect the remote desktop and it will be on the computer desktop. Related articles: win10 remote connection win7 cannot connect >>> win10 remote connection prompts function error >>>
 Win10 screen brightness adjustment option disappears
Jan 04, 2024 am 09:33 AM
Win10 screen brightness adjustment option disappears
Jan 04, 2024 am 09:33 AM
Nowadays, friends spend more and more time using computers. Using computers for a long time is very harmful to our eyes. It is recommended that everyone should stop and rest for 10 minutes after using the computer for one or two hours and look into the distance. In addition, it is also necessary to control the brightness of the computer screen. But I found that the screen brightness adjustment in win10 is missing. What should I do? The following is a solution. Let’s take a look at the details. A simple method to restore win10 screen brightness adjustment 1. Open the Device Manager at the following path: C:\Windows\System32\devmgmt.msc 2. Right-click on each option in "Monitor" and select Properties (operate each one once) 3 , select "Uninstall" and then "OK" (uninstall does not
 Guide to permanently shutting down Microsoft Windows 11 update
Dec 22, 2023 pm 05:31 PM
Guide to permanently shutting down Microsoft Windows 11 update
Dec 22, 2023 pm 05:31 PM
Win11 is the same as win10. If it detects that there is an available update, it will usually update automatically. However, this will cause a sudden update when booting and become unusable. So how can Microsoft win11 update be turned off permanently? How to permanently turn off Microsoft win11 update: The first step is to press the "Win+R" key combination at the same time to open Run. Step 2. Enter "gpedit.msc" in the location shown and click "OK" below. Step 3. Open "Administrative Templates" on the left, then enter "Windows Components". Step 4. Open "Windows Update", and then Go to the fifth step of "Manage End User Experience" and double-click to open the "Configure automatic updates" option on the right. Step 6: Check "Enabled" and change it to "Not configured"
 Detailed explanation of the time required to upgrade win10 to win11 system
Dec 26, 2023 pm 12:36 PM
Detailed explanation of the time required to upgrade win10 to win11 system
Dec 26, 2023 pm 12:36 PM
Currently, Microsoft has pushed the preview version of the win11 system to users. Many users want to download and use it, but they don’t know how long it will take. They are afraid that it will take too long to update and they will not be able to work and study normally. Let’s follow the editor’s instructions. Let’s take a look at the introduction of the time required to upgrade win10 to win11 system. How long does it take to upgrade Win10 to Win11? Answer: About 10 minutes. The specific situation depends on the computer configuration. 1. If we include all steps such as version selection, installation settings, etc., it will take 10-15 minutes. 2. Because before installing win11, we need to select multiple settings such as system version, installation disk, regional language, network, keyboard, etc. 3. After the setting is completed, the system will enter the automatic installation process. At this time, you only need to wait.
 How to set the language of Win10 computer to Chinese?
Jan 05, 2024 pm 06:51 PM
How to set the language of Win10 computer to Chinese?
Jan 05, 2024 pm 06:51 PM
Sometimes we just install the computer system and find that the system is in English. In this case, we need to change the computer language to Chinese. So how to change the computer language to Chinese in the win10 system? Now Give you specific operation methods. How to change the computer language in win10 to Chinese 1. Turn on the computer and click the start button in the lower left corner. 2. Click the settings option on the left. 3. Select "Time and Language" on the page that opens. 4. After opening, click "Language" on the left. 5. Here you can set the computer language you want.
 How to use multitasking split screen in win10
Dec 24, 2023 pm 09:31 PM
How to use multitasking split screen in win10
Dec 24, 2023 pm 09:31 PM
When using a computer, we can sometimes use a lot of shortcut keys to make using the computer easier, such as the computer's multi-split screen function. Just click on it to quickly switch our windows, saving a lot of work time. . How to use multitasking split screen in win10: 1. Press and hold a window you want to split screen, drag it to the right side of the desktop, and drag it to the bottom. When a transparent blurred window appears, release the mouse. 2. Then the split screen function is turned on. The left screen shows you the mission drive in, and you can choose another window you want to see. 3. We can also press the "alt+tab" shortcut key to open the multitasking view, in which we can browse all currently known windows and quickly open or close them.
