

In-depth analysis of the core points of Pytorch, CNN decryption!

Hello, I am Xiaozhuang!
Beginners may not be familiar with creating convolutional neural networks (CNN). Let’s illustrate it with a complete case below.
CNN is a deep learning model widely used in image classification, target detection, image generation and other tasks. It automatically extracts features of images through convolutional layers and pooling layers, and performs classification through fully connected layers. The key to this model is to use convolution and pooling operations to effectively capture local features in images and combine them through multi-layer networks to achieve advanced feature extraction and classification of images.
Principle
1. Convolutional Layer:
The convolutional layer extracts features from the input image through convolution operations. This operation involves a learnable convolution kernel that slides over the input image and computes the dot product under the sliding window. This process helps extract local features, thereby enhancing the network’s perception of translation invariance.
Formula:
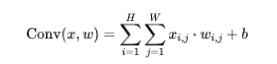
Where, x is the input, w is the convolution kernel, and b is the bias.
2. Pooling Layer:
The pooling layer is a commonly used dimensionality reduction technology. Its function is to reduce the spatial dimension of the data, thereby reducing the amount of calculation and Extract the most significant features. Among them, max pooling is a common pooling method, which selects the largest value in each window as a representative. Through max pooling, we can reduce the complexity of the data and improve the computational efficiency of the model while retaining important information.
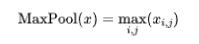
Formula (maximum pooling):
3. Fully Connected Layer:
The fully connected layer is in the neural network The network plays an important role in connecting the feature maps extracted by the convolution and pooling layers to the output categories. Each neuron in the fully connected layer is connected to all neurons in the previous layer, so that feature synthesis and classification can be achieved.
Practical steps and detailed explanation
1. Steps
- Import the necessary libraries and modules.
- Define the network structure: Use nn.Module to define a custom neural network class inherited from it, and define the convolution layer, activation function, pooling layer and fully connected layer.
- Define the loss function and optimizer.
- Loading and preprocessing data.
- Training network: Use training data to iteratively train network parameters.
- Test network: Use test data to evaluate model performance.
2. Code implementation
import torchimport torch.nn as nnimport torch.optim as optimfrom torchvision import datasets, transforms# 定义卷积神经网络类class SimpleCNN(nn.Module):def __init__(self):super(SimpleCNN, self).__init__()# 卷积层1self.conv1 = nn.Conv2d(in_channels=1, out_channels=16, kernel_size=3, stride=1, padding=1)self.relu = nn.ReLU()self.pool = nn.MaxPool2d(kernel_size=2, stride=2)# 卷积层2self.conv2 = nn.Conv2d(in_channels=16, out_channels=32, kernel_size=3, stride=1, padding=1)# 全连接层self.fc1 = nn.Linear(32 * 7 * 7, 10)# 输入大小根据数据调整def forward(self, x):x = self.conv1(x)x = self.relu(x)x = self.pool(x)x = self.conv2(x)x = self.relu(x)x = self.pool(x)x = x.view(-1, 32 * 7 * 7)x = self.fc1(x)return x# 定义损失函数和优化器net = SimpleCNN()criterion = nn.CrossEntropyLoss()optimizer = optim.Adam(net.parameters(), lr=0.001)# 加载和预处理数据transform = transforms.Compose([transforms.ToTensor(), transforms.Normalize((0.5,), (0.5,))])train_dataset = datasets.MNIST(root='./data', train=True, download=True, transform=transform)train_loader = torch.utils.data.DataLoader(dataset=train_dataset, batch_size=64, shuffle=True)# 训练网络num_epochs = 5for epoch in range(num_epochs):for i, (images, labels) in enumerate(train_loader):optimizer.zero_grad()outputs = net(images)loss = criterion(outputs, labels)loss.backward()optimizer.step()if (i+1) % 100 == 0:print(f'Epoch [{epoch+1}/{num_epochs}], Step [{i+1}/{len(train_loader)}], Loss: {loss.item()}')# 测试网络net.eval()with torch.no_grad():correct = 0total = 0for images, labels in test_loader:outputs = net(images)_, predicted = torch.max(outputs.data, 1)total += labels.size(0)correct += (predicted == labels).sum().item()accuracy = correct / totalprint('Accuracy on the test set: {}%'.format(100 * accuracy))This example shows a simple CNN model, trained and tested using the MNIST data set.
Next, we add visualization steps to understand the performance and training process of the model more intuitively.
Visualization
1. Import matplotlib
import matplotlib.pyplot as plt
2. Record loss and accuracy during training:
In the training loop, record each Epoch loss and accuracy.
# 在训练循环中添加以下代码train_loss_list = []accuracy_list = []for epoch in range(num_epochs):running_loss = 0.0correct = 0total = 0for i, (images, labels) in enumerate(train_loader):optimizer.zero_grad()outputs = net(images)loss = criterion(outputs, labels)loss.backward()optimizer.step()running_loss += loss.item()_, predicted = torch.max(outputs.data, 1)total += labels.size(0)correct += (predicted == labels).sum().item()if (i+1) % 100 == 0:print(f'Epoch [{epoch+1}/{num_epochs}], Step [{i+1}/{len(train_loader)}], Loss: {loss.item()}')epoch_loss = running_loss / len(train_loader)accuracy = correct / totaltrain_loss_list.append(epoch_loss)accuracy_list.append(accuracy)3. Visualize loss and accuracy:
# 在训练循环后,添加以下代码plt.figure(figsize=(12, 4))# 可视化损失plt.subplot(1, 2, 1)plt.plot(range(1, num_epochs + 1), train_loss_list, label='Training Loss')plt.title('Training Loss')plt.xlabel('Epochs')plt.ylabel('Loss')plt.legend()# 可视化准确率plt.subplot(1, 2, 2)plt.plot(range(1, num_epochs + 1), accuracy_list, label='Accuracy')plt.title('Accuracy')plt.xlabel('Epochs')plt.ylabel('Accuracy')plt.legend()plt.tight_layout()plt.show()In this way, we can see the changes in training loss and accuracy after the training process.
After importing the code, you can adjust the visual content and format as needed.
The above is the detailed content of In-depth analysis of the core points of Pytorch, CNN decryption!. For more information, please follow other related articles on the PHP Chinese website!

Hot AI Tools

Undresser.AI Undress
AI-powered app for creating realistic nude photos

AI Clothes Remover
Online AI tool for removing clothes from photos.

Undress AI Tool
Undress images for free

Clothoff.io
AI clothes remover

Video Face Swap
Swap faces in any video effortlessly with our completely free AI face swap tool!

Hot Article
Hot Tools

Notepad++7.3.1
Easy-to-use and free code editor

SublimeText3 Chinese version
Chinese version, very easy to use

Zend Studio 13.0.1
Powerful PHP integrated development environment

Dreamweaver CS6
Visual web development tools

SublimeText3 Mac version
God-level code editing software (SublimeText3)
Hot Topics
 1386
1386
 52
52

 iFlytek: Huawei's Ascend 910B's capabilities are basically comparable to Nvidia's A100, and they are working together to create a new base for my country's general artificial intelligence
Oct 22, 2023 pm 06:13 PM
iFlytek: Huawei's Ascend 910B's capabilities are basically comparable to Nvidia's A100, and they are working together to create a new base for my country's general artificial intelligence
Oct 22, 2023 pm 06:13 PM
This site reported on October 22 that in the third quarter of this year, iFlytek achieved a net profit of 25.79 million yuan, a year-on-year decrease of 81.86%; the net profit in the first three quarters was 99.36 million yuan, a year-on-year decrease of 76.36%. Jiang Tao, Vice President of iFlytek, revealed at the Q3 performance briefing that iFlytek has launched a special research project with Huawei Shengteng in early 2023, and jointly developed a high-performance operator library with Huawei to jointly create a new base for China's general artificial intelligence, allowing domestic large-scale models to be used. The architecture is based on independently innovative software and hardware. He pointed out that the current capabilities of Huawei’s Ascend 910B are basically comparable to Nvidia’s A100. At the upcoming iFlytek 1024 Global Developer Festival, iFlytek and Huawei will make further joint announcements on the artificial intelligence computing power base. He also mentioned,
 The perfect combination of PyCharm and PyTorch: detailed installation and configuration steps
Feb 21, 2024 pm 12:00 PM
The perfect combination of PyCharm and PyTorch: detailed installation and configuration steps
Feb 21, 2024 pm 12:00 PM
PyCharm is a powerful integrated development environment (IDE), and PyTorch is a popular open source framework in the field of deep learning. In the field of machine learning and deep learning, using PyCharm and PyTorch for development can greatly improve development efficiency and code quality. This article will introduce in detail how to install and configure PyTorch in PyCharm, and attach specific code examples to help readers better utilize the powerful functions of these two. Step 1: Install PyCharm and Python
 Introduction to five sampling methods in natural language generation tasks and Pytorch code implementation
Feb 20, 2024 am 08:50 AM
Introduction to five sampling methods in natural language generation tasks and Pytorch code implementation
Feb 20, 2024 am 08:50 AM
In natural language generation tasks, sampling method is a technique to obtain text output from a generative model. This article will discuss 5 common methods and implement them using PyTorch. 1. GreedyDecoding In greedy decoding, the generative model predicts the words of the output sequence based on the input sequence time step by time. At each time step, the model calculates the conditional probability distribution of each word, and then selects the word with the highest conditional probability as the output of the current time step. This word becomes the input to the next time step, and the generation process continues until some termination condition is met, such as a sequence of a specified length or a special end marker. The characteristic of GreedyDecoding is that each time the current conditional probability is the best
 Implementing noise removal diffusion model using PyTorch
Jan 14, 2024 pm 10:33 PM
Implementing noise removal diffusion model using PyTorch
Jan 14, 2024 pm 10:33 PM
Before we understand the working principle of the Denoising Diffusion Probabilistic Model (DDPM) in detail, let us first understand some of the development of generative artificial intelligence, which is also one of the basic research of DDPM. VAEVAE uses an encoder, a probabilistic latent space, and a decoder. During training, the encoder predicts the mean and variance of each image and samples these values from a Gaussian distribution. The result of the sampling is passed to the decoder, which converts the input image into a form similar to the output image. KL divergence is used to calculate the loss. A significant advantage of VAE is its ability to generate diverse images. In the sampling stage, one can directly sample from the Gaussian distribution and generate new images through the decoder. GAN has made great progress in variational autoencoders (VAEs) in just one year.
 Tutorial on installing PyCharm with PyTorch
Feb 24, 2024 am 10:09 AM
Tutorial on installing PyCharm with PyTorch
Feb 24, 2024 am 10:09 AM
As a powerful deep learning framework, PyTorch is widely used in various machine learning projects. As a powerful Python integrated development environment, PyCharm can also provide good support when implementing deep learning tasks. This article will introduce in detail how to install PyTorch in PyCharm and provide specific code examples to help readers quickly get started using PyTorch for deep learning tasks. Step 1: Install PyCharm First, we need to make sure we have
 Deep Learning with PHP and PyTorch
Jun 19, 2023 pm 02:43 PM
Deep Learning with PHP and PyTorch
Jun 19, 2023 pm 02:43 PM
Deep learning is an important branch in the field of artificial intelligence and has received more and more attention in recent years. In order to be able to conduct deep learning research and applications, it is often necessary to use some deep learning frameworks to help achieve it. In this article, we will introduce how to use PHP and PyTorch for deep learning. 1. What is PyTorch? PyTorch is an open source machine learning framework developed by Facebook. It can help us quickly create and train deep learning models. PyTorc
 so fast! Recognize video speech into text in just a few minutes with less than 10 lines of code
Feb 27, 2024 pm 01:55 PM
so fast! Recognize video speech into text in just a few minutes with less than 10 lines of code
Feb 27, 2024 pm 01:55 PM
Hello everyone, I am Kite. Two years ago, the need to convert audio and video files into text content was difficult to achieve, but now it can be easily solved in just a few minutes. It is said that in order to obtain training data, some companies have fully crawled videos on short video platforms such as Douyin and Kuaishou, and then extracted the audio from the videos and converted them into text form to be used as training corpus for big data models. If you need to convert a video or audio file to text, you can try this open source solution available today. For example, you can search for the specific time points when dialogues in film and television programs appear. Without further ado, let’s get to the point. Whisper is OpenAI’s open source Whisper. Of course it is written in Python. It only requires a few simple installation packages.
 How to install pytorch in pycharm
Dec 08, 2023 pm 03:05 PM
How to install pytorch in pycharm
Dec 08, 2023 pm 03:05 PM
Installation steps: 1. Open PyCharm and create a new Python project; 2. In the bottom status bar of PyCharm, click the "Terminal" icon to open the terminal window; 3. In the terminal window, use the pip command to install PyTorch, according to the system and requirements, you can choose different installation methods; 4. After the installation is completed, you can write code in PyCharm and import the PyTorch library to use it.
