

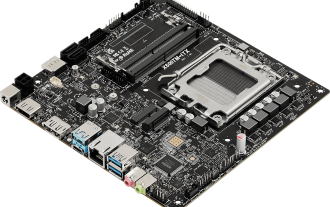
ASUS P8875V motherboard wiring tutorial

ASUS 885md motherboard plug-in tutorial

In the middle of the bottom of the motherboard: F_panel This interface is used to connect the cables of the chassis panel.
First find the connecting cable on the chassis. Then find F_PANEL on the motherboard. Just insert the corresponding pins. PWR LED = Power indicator light. PWR BTN = power on/off key. HDD-LED = hard drive working indicator light. RESET = reset button.
What wire is connected to the motherboard jumper msg

The computer motherboard jumper has a message indicator light marked MSG, which is connected to the power indicator light on the front panel of the chassis. When the system When the system is operating, the indicator light is continuously on. When the system enters standby (s1) mode, the indicator light flashes. When the system enters sleep or shuts down, it goes out. Pay attention to the positive and negative when connecting. Mostly used on Gigabyte motherboards.
Related buttons
Power switch: white positive pole, brown-negative pole can be plugged forward or reverse
Reset switch: white and blue, two colors, can be plugged forward or reverse.
Power indicator light: The green one is plugged into the P LED pin, and the white one is plugged into the P LED-pin.
Hard disk indicator light: Red is plugged into the "HDD LED", white is plugged into the "HDD LED-" pin.
Speaker: Red plugs into the positive pole, black plugs into the negative pole. According to its working principle, it can be used regardless of the positive and negative poles, just plug it in and use it.
How to connect the motherboard's shutdown cable
If you want to connect the motherboard's power-off cable, it is actually relatively simple, because there will be a silk screen on the motherboard, and we only need to face this silk screen Just look for the corresponding wires on the chassis and find a suitable direct connection.
If you want to connect the motherboard power supply cable, it may be a little more complicated. First we need to find the 20pin wire, which is generally the widest of all motherboard wires.
We need to connect this wire directly to a corresponding interface on the motherboard, then connect the CPU to the corresponding CPU socket, and finally install some hardware.
How to plug in the fpanel of the motherboard? The motherboard interface has +MSG HD PW RES C
+MSG- HD-hard disk indicator PW-power cord-RES restart line-CI SPEAK-buzzer PWR_LED-power indicator The lamp wire ends include POWERLED -H.D.DLED -POWERSWRESETSW. .
Which one should correspond to which one? Plug the online mark into the same mark on the motherboard. Note that the positive and negative poles " " are positive poles and "-" are negative poles
The above is the detailed content of ASUS P8875V motherboard wiring tutorial. For more information, please follow other related articles on the PHP Chinese website!

Hot AI Tools

Undresser.AI Undress
AI-powered app for creating realistic nude photos

AI Clothes Remover
Online AI tool for removing clothes from photos.

Undress AI Tool
Undress images for free

Clothoff.io
AI clothes remover

AI Hentai Generator
Generate AI Hentai for free.

Hot Article
Hot Tools

Notepad++7.3.1
Easy-to-use and free code editor

SublimeText3 Chinese version
Chinese version, very easy to use

Zend Studio 13.0.1
Powerful PHP integrated development environment

Dreamweaver CS6
Visual web development tools

SublimeText3 Mac version
God-level code editing software (SublimeText3)
Hot Topics
 1385
1385
 52
52

 ASUS Tianxuan Air 14-inch gaming notebook released: equipped with up to Ryzen AI 9 HX 370, 110W full machine performance, starting from 7,299 yuan
Jul 23, 2024 am 12:42 AM
ASUS Tianxuan Air 14-inch gaming notebook released: equipped with up to Ryzen AI 9 HX 370, 110W full machine performance, starting from 7,299 yuan
Jul 23, 2024 am 12:42 AM
According to news from this website on July 22, ASUS released the Tianxuan Air2024 gaming notebook with a 14-inch screen at the Tianxuan 2024 summer new product launch conference held tonight, priced from 7,299 yuan. Tianxuan Air2024 is the first 14-inch notebook product in ASUS Tianxuan series. It adopts a new design, supports 180° opening and closing for the first time, and has a new square power interface. The A and D sides of this computer are made of metal, and the corners of the fuselage are polished using CNC technology. The fuselage weighs about 1.46kg and is about 16.9mm thick. In terms of performance, Tianxuan Air is equipped with the new 12-core Zen5 architecture AMD Ryzen AI9HX370 processor, built-in Radeon 890MGPU with 16CURDNA3.5 architecture, and built-in NPU with a computing power of 50
 The system has posted in safe mode ASUS motherboard
Jun 19, 2024 am 07:35 AM
The system has posted in safe mode ASUS motherboard
Jun 19, 2024 am 07:35 AM
After the computer is turned on, it prompts The system has posted in safe mode. You can set it in the BIOS to ignore the F1 error. Although it does not prompt, it directly enters the BIOS when it is turned on. Sometimes F1 is useless every time it is turned on. Then you need to restart the BIOS, and then exit the BIOS to enter the system. . thesystemhaspostedinsafemode=The system is in safe mode. This problem is relatively common on ASUS motherboards. As long as you turn off the XMP of the memory and adjust the memory frequency back to normal, you can boot normally without the thesystemhaspostedinsafemode error. Updating the latest motherboard BIOS should be OK.
 ASUS ROG Dragon Scale ACE EXTREME carbon fiber mouse and Night Demon EXTREME mechanical keyboard released by the National Bank: priced at 1,799 yuan / 3,599 yuan
Jul 17, 2024 pm 02:27 PM
ASUS ROG Dragon Scale ACE EXTREME carbon fiber mouse and Night Demon EXTREME mechanical keyboard released by the National Bank: priced at 1,799 yuan / 3,599 yuan
Jul 17, 2024 pm 02:27 PM
According to news from this website on July 13, in addition to ROG Handheld X, ASUS also released the national bank prices of three ROG peripheral products at BiliBiliWorld 2024 today. The new products are expected to go on sale in August. ROG Dragon Scale ACE EXTREME Mouse: Initial Price: 1,799 Yuan ROG Night Demon EXTREME Keyboard: Initial Price: 3,599 Yuan ROG Prism 2 Headphones: 1,599 Yuan, 300 RMB off for 1,299 Yuan ROG Dragon Scale ACE EXTREME Mouse According to reports, ROG Dragon Scale ACE EXTREME gaming mouse adopts Carbon fiber shell, weight only 47g. In terms of performance, the Dragon Scale ACEEXTREME mouse is equipped with a 42KDPI AIMPOINTPRO optical sensor and a
 'The world's first Thin Mini ITX motherboard supporting AM5', ASRock releases X600TM-ITX: up to 96GB memory, 4 external monitors
Jul 27, 2024 am 10:37 AM
'The world's first Thin Mini ITX motherboard supporting AM5', ASRock releases X600TM-ITX: up to 96GB memory, 4 external monitors
Jul 27, 2024 am 10:37 AM
According to news from this site on July 27, ASRock recently announced the launch of the X600TM-ITX motherboard, claiming to be "the world's first ThinMiniITX motherboard that supports AM5". The motherboard size is 17*17 cm and supports AMD Ryzen 9000/8000/7000 series processing. device. ASRock said that this motherboard is suitable for products such as mini computers, all-in-one computers, smart mirrors, educational tools, and home theater computers, and can handle various tasks in daily offices, presentations, and work. X600TM-ITX supports the latest AM5 processor, which improves performance by up to 1.33 times compared to the previous generation. This means faster speeds, increased multitasking capabilities, better gaming experiences, faster data processing, and
 ASUS releases BIOS update for Z790 motherboards to alleviate instability issues with Intel's 13th/14th generation Core processors
Aug 09, 2024 am 12:47 AM
ASUS releases BIOS update for Z790 motherboards to alleviate instability issues with Intel's 13th/14th generation Core processors
Aug 09, 2024 am 12:47 AM
According to news from this website on August 8, MSI and ASUS today launched a beta version of BIOS containing the 0x129 microcode update for some Z790 motherboards in response to the instability issues in Intel Core 13th and 14th generation desktop processors. ASUS's first batch of motherboards to provide BIOS updates include: ROGMAXIMUSZ790HEROBetaBios2503ROGMAXIMUSZ790DARKHEROBetaBios1503ROGMAXIMUSZ790HEROBTFBetaBios1503ROGMAXIMUSZ790HEROEVA-02 joint version BetaBios2503ROGMAXIMUSZ790A
 ASUS ROG 8 gaming phone 'QQ Speed Mobile Game' customized limited edition released: super competitive racing car model, permanent league A car, priced at 4999 yuan
Jul 18, 2024 am 04:28 AM
ASUS ROG 8 gaming phone 'QQ Speed Mobile Game' customized limited edition released: super competitive racing car model, permanent league A car, priced at 4999 yuan
Jul 18, 2024 am 04:28 AM
According to news on July 13, the customized limited edition of ASUS ROG8 "QQ Speed Mobile Game" was officially released at BiliBiliWorld 2024 today, offering a 12GB+256GB obsidian black configuration and priced at 4,999 yuan. The limited collection gift box of "QQ Speed Mobile Game" contains a physical car model of a super competitive racing car, a flame card pin and a customized protective case. This phone is also equipped with a customized theme of "QQ Speed", which integrates classic IP elements such as Little Orange, Four Great Car Gods, and Speed into the desktop UI, lock screen interface, caller ID, screen clock and other scenes. In addition, players who purchase the ROG8 "QQ Speed Mobile Game" customized limited edition mobile phone can also choose any one of the S-League permanent A cars: S-Star Chaser S-Skywalker S-Time Messenger. If all 3 cars are
 In summer, you must try shooting a rainbow
Jul 21, 2024 pm 05:16 PM
In summer, you must try shooting a rainbow
Jul 21, 2024 pm 05:16 PM
After rain in summer, you can often see a beautiful and magical special weather scene - rainbow. This is also a rare scene that can be encountered in photography, and it is very photogenic. There are several conditions for a rainbow to appear: first, there are enough water droplets in the air, and second, the sun shines at a low angle. Therefore, it is easiest to see a rainbow in the afternoon after the rain has cleared up. However, the formation of a rainbow is greatly affected by weather, light and other conditions, so it generally only lasts for a short period of time, and the best viewing and shooting time is even shorter. So when you encounter a rainbow, how can you properly record it and photograph it with quality? 1. Look for rainbows. In addition to the conditions mentioned above, rainbows usually appear in the direction of sunlight, that is, if the sun shines from west to east, rainbows are more likely to appear in the east.
 ASUS Lingyao 16 Air notebook goes on sale in China: 1.1cm thick, Ryzen AI 9 HX370, starting from 12,999 yuan
Jul 28, 2024 pm 06:00 PM
ASUS Lingyao 16 Air notebook goes on sale in China: 1.1cm thick, Ryzen AI 9 HX370, starting from 12,999 yuan
Jul 28, 2024 pm 06:00 PM
According to news from this site on July 28, the Chinese version of the Asus Lingyao 16Air notebook is now on sale, equipped with AMD Ryzen AI9HX370 processor, and the 32GB+1TB version is priced at 12,999 yuan. In terms of appearance, the Lingyao 16 Air notebook is made of Ceraluminum high-tech ceramic aluminum material and CNC technology. It is available in two colors: snowy white and mountain gray. It is about 1.1cm thick and weighs 1.49kg. Lingyao 16Air is equipped with the new AMD Ryzen AI9HX370 processor, equipped with 12C24TZen5 core, 16CURDNA3.5 architecture Radeon890M core display, and the NPU computing power reaches 50TOPS. This computer is also equipped with a dual-fan VC vapor chamber cooling system that can provide 28W
