

Steps to install Greenplum 4.3.5.2 on CentOS 6.6

On the GP official website, I can’t see the corresponding version of the latest GP on Centos, so just use the RedHat version.
Foreword:
GP installation is roughly like this, select one host as the Master machine and the others as Segment machines. Since there are not that many machines, I opened three centos6.6 virtual machines in 1+2 mode.
When installing, remember that GP can be installed on the Master machine first, and then similar remote installation can be performed by establishing mutual trust (gpssh-exkeys) between the Master machine and the Segment machine. You can log in to all machines through gpssh and perform What you want includes creating a user, copying the installed GP, and a series of other operations. Of course, before installation, some people will configure the kernel parameters, restriction parameters, etc., depending on your needs. Because my virtual machine and hardware basically cannot meet the official website requirements, I gave up this step.
Preparation before installation (optional)
1. Add
in /etc/sysctl.conf of the Master machine[html] view plaincopy
kernel.shmmax = 500000000
kernel.shmmni = 4096
kernel.shmall = 4000000000
kernel.sem = 250 512000 100 2048
kernel.sysrq = 1
kernel.core_uses_pid = 1
kernel.msgmnb = 65536
kernel.msgmax = 65536
kernel.msgmni = 2048
net.ipv4.tcp_syncookies = 1
net.ipv4.ip_forward = 0
net.ipv4.conf.default.accept_source_route = 0
net.ipv4.tcp_tw_recycle = 1
net.ipv4.tcp_max_syn_backlog = 4096
net.ipv4.conf.all.arp_filter = 1
net.ipv4.ip_local_port_range = 1025 65535
net.core.netdev_max_backlog = 10000
net.core.rmem_max = 2097152
net.core.wmem_max = 2097152
vm.overcommit_memory = 2
Restart the machine or run sysctl -p to take effect
2. Add
to the Master machine /etc/security/limits.conf[html] view plaincopy
* soft nofile 65536
* hard nofile 65536
* soft nproc 131072
* hard nproc 131072
!!! Note that for RedHat 6.x and Centos6.x machines, the parameters in /etc/security/limits.d/90-nproc.conf will override the above file parameters. If parameters are set in both files, ensure that the parameters are set in 90-nproc.conf.
3. Turn off the firewall
chkconfig iptables off ;//Permanently closed, will not start after restart
service iptables stop ;//It will start after restarting, use service iptables status to check the status.
Start GP installation
1. Install GP on the Master with root permissions
Put the downloaded greenplum-db-4.3.5.2-build-1-RHEL5-x86_64.zip into a directory, decompress (unzip), and get a ReadMe and .bin file. The default GP is installed in /usr It is under /local/greenplum. In fact, it can be installed anywhere. Here we install it under /opt/greenplum/.
Execute the bin file and unzip the directory ./greenplum-db-4.3.5.2-build-1-RHEL5-x86_64.bin
Press the space bar all the way until you are asked to enter yes|no, hit yes
Select the installation directory and enter the directory you want to install, here /opt/greenplum/greenplum-db-4.3.5.2
Just go all the way to yes and it will be installed, very quickly.
2. It is customary to first create a user gpadmin responsible for the GP database on the master machine, and then add the user gpadmin on the segment machine through gpssh
Generally, there is no gpadmin user at the beginning, just create a new one
groupadd -g 530 gpadmin
useradd -g 530 -u 530 -m -d /home/gpadmin -s /bin/bash gpadmin
passwd gpadmin ;Add password
Modify permissions on the GP installation folder
chown -R gpadmin:gpadmin /home/gpadmin
chown -R gpadmin:gpadmin /opt/greenplum
Add an environment variable file in the GP installation directory to the user.
source /opt/greenplum/greenplum-db/greenplum_path.sh;/opt/greenplum/greenplum-db is a link to /opt/greenplum/greenplum-db-4.3.5.2. If not, link it yourself ln -s / opt/greenplum/greenplum-db-4.3.5.2 /opt/greenplum/greenplum-db
3. Establish mutual trust between hosts
First, on the Master machine, edit the /etc/hosts file,
Enter the IP and hostname of the Master machine and segment machine.
like
# /etc/hosts
127.0.0.1 localhost localhost.localdomain localhost4 localhost4.localdomain4
::1 localhost localhost.localdomain localhost6 localhost6.localdomain6
192.168.127.136 mdw #master machine
192.168.127.137 sdw1 #segment machine
192.168.127.138 sdw2 #segment machine
Secondly, in a certain directory such as /var, create a file hostlists (name whatever you want) that protects the hostname of all hosts and seg_hosts containing the hostname of the segment machine.
/var/hostlists:
mdw
sdw1
sdw2
/var/seg_hosts
sdw1
sdw2
Start building mutual trust
gpssh-exkeys -f /var/hostlists
[root@localhost ~]$ gpssh-exkeys -f /var/hostlists
[STEP 1 of 5] create local ID and authorize on local host
... /home/root/.ssh/id_rsa file exists ... key generation skipped
[STEP 2 of 5] keyscan all hosts and update known_hosts file
[STEP 3 of 5] authorize current user on remote hosts
... send to mdw
... send to sdw1
***
*** Enter password for sdw1:
[STEP 4 of 5] determine common authentication file content
[STEP 5 of 5] copy authentication files to all remote hosts
... finished key exchange with mdw
... finished key exchange with sdw1
[INFO] completed successfully
Note: If prompted that there is no secret key, just ssh-keygen -t rsa; ssh-add /root/.ssh/id_rsa. You can get the secret key. If you execute ssd-add and it appears that Could not open a connection to your authentication agent, just execute ssh-agent bash.
After establishing mutual trust, you can access all machines through gpssh -f /var/seg_hosts.
The above is the detailed content of Steps to install Greenplum 4.3.5.2 on CentOS 6.6. For more information, please follow other related articles on the PHP Chinese website!

Hot AI Tools

Undresser.AI Undress
AI-powered app for creating realistic nude photos

AI Clothes Remover
Online AI tool for removing clothes from photos.

Undress AI Tool
Undress images for free

Clothoff.io
AI clothes remover

AI Hentai Generator
Generate AI Hentai for free.

Hot Article
Hot Tools

Notepad++7.3.1
Easy-to-use and free code editor

SublimeText3 Chinese version
Chinese version, very easy to use

Zend Studio 13.0.1
Powerful PHP integrated development environment

Dreamweaver CS6
Visual web development tools

SublimeText3 Mac version
God-level code editing software (SublimeText3)
Hot Topics
 1386
1386
 52
52

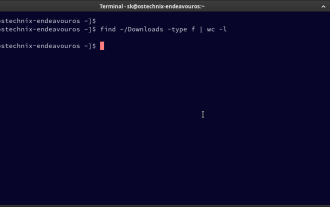 How To Count Files And Directories In Linux: A Beginner's Guide
Mar 19, 2025 am 10:48 AM
How To Count Files And Directories In Linux: A Beginner's Guide
Mar 19, 2025 am 10:48 AM
Efficiently Counting Files and Folders in Linux: A Comprehensive Guide Knowing how to quickly count files and directories in Linux is crucial for system administrators and anyone managing large datasets. This guide demonstrates using simple command-l
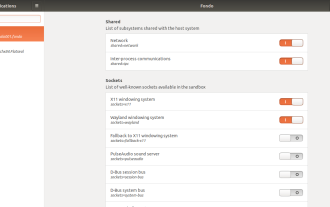 How To Easily Configure Flatpak Apps Permissions With Flatseal
Mar 22, 2025 am 09:21 AM
How To Easily Configure Flatpak Apps Permissions With Flatseal
Mar 22, 2025 am 09:21 AM
Flatpak application permission management tool: Flatseal User Guide Flatpak is a tool designed to simplify Linux software distribution and use. It safely encapsulates applications in a virtual sandbox, allowing users to run applications without root permissions without affecting system security. Because Flatpak applications are located in this sandbox environment, they must request permissions to access other parts of the operating system, hardware devices (such as Bluetooth, network, etc.) and sockets (such as pulseaudio, ssh-auth, cups, etc.). This guide will guide you on how to easily configure Flatpak with Flatseal on Linux
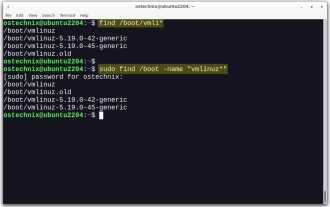 How To List Or Check All Installed Linux Kernels From Commandline
Mar 23, 2025 am 10:43 AM
How To List Or Check All Installed Linux Kernels From Commandline
Mar 23, 2025 am 10:43 AM
Linux Kernel is the core component of a GNU/Linux operating system. Developed by Linus Torvalds in 1991, it is a free, open-source, monolithic, modular, and multitasking Unix-like kernel. In Linux, it is possible to install multiple kernels on a sing
 How To Type Indian Rupee Symbol In Ubuntu Linux
Mar 22, 2025 am 10:39 AM
How To Type Indian Rupee Symbol In Ubuntu Linux
Mar 22, 2025 am 10:39 AM
This brief guide explains how to type Indian Rupee symbol in Linux operating systems. The other day, I wanted to type "Indian Rupee Symbol (₹)" in a word document. My keyboard has a rupee symbol on it, but I don't know how to type it. After
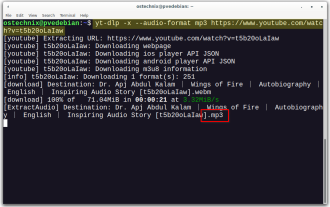 Yt-dlp Commands: The Complete Tutorial For Beginners (2025)
Mar 21, 2025 am 11:00 AM
Yt-dlp Commands: The Complete Tutorial For Beginners (2025)
Mar 21, 2025 am 11:00 AM
Have you ever wanted to save your favorite videos from the internet? Whether it's a funny cat video or a tutorial you want to watch later, Yt-dlp is here to help! In this comprehensive yt-dlp tutorial, we will explain what yt-dlp is, how to install i
 What is the Linux best used for?
Apr 03, 2025 am 12:11 AM
What is the Linux best used for?
Apr 03, 2025 am 12:11 AM
Linux is best used as server management, embedded systems and desktop environments. 1) In server management, Linux is used to host websites, databases, and applications, providing stability and reliability. 2) In embedded systems, Linux is widely used in smart home and automotive electronic systems because of its flexibility and stability. 3) In the desktop environment, Linux provides rich applications and efficient performance.
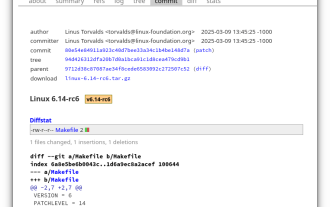 Linux Kernel 6.14 RC6 Released
Mar 24, 2025 am 10:21 AM
Linux Kernel 6.14 RC6 Released
Mar 24, 2025 am 10:21 AM
Linus Torvalds has released Linux Kernel 6.14 Release Candidate 6 (RC6), reporting no significant issues and keeping the release on track. The most notable change in this update addresses an AMD microcode signing issue, while the rest of the updates
 LocalSend - The Open-Source Airdrop Alternative For Secure File Sharing
Mar 24, 2025 am 09:20 AM
LocalSend - The Open-Source Airdrop Alternative For Secure File Sharing
Mar 24, 2025 am 09:20 AM
If you're familiar with AirDrop, you know it's a popular feature developed by Apple Inc. that enables seamless file transfer between supported Macintosh computers and iOS devices using Wi-Fi and Bluetooth. However, if you're using Linux and missing o
