How to change BIOS settings to install XP system on Win7
When we were using the win7 operating system, some friends wanted to change their system to the xp operating system due to some needs. Then some friends may have encountered some problems during this process. Regarding how to set up the BIOS of Windows 7 to XP system, the editor thinks that we should first enter the BIOS of our computer through the shortcut keys, and then find the relevant options and follow the editor to set them. Let’s take a look at the specific operation steps~

How to set up the bios of win7 to xp system
1. Enter BIOSThinkPad and Lenovo VBKEM For series notebooks, press the F1 key on the keyboard
(for some models, press the keyboard combination key Fn F1, hold down the Fn key, and press the F1 key repeatedly).
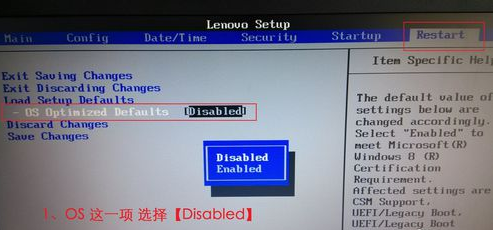
2. Select the Restart tab, find the -OS Optimized Defaults option, and press Enter to select Disabled.

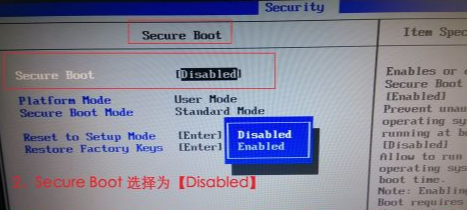
3. Select the Security tab, find the Secure Boot option and press Enter.
4. Find the Secure Boot option again and press Enter to select.
Note: If you select Enabled here, under Startup later, the UEFI/Legacy Boot setting will be gray and cannot be set. You need to select Disabled to set it.

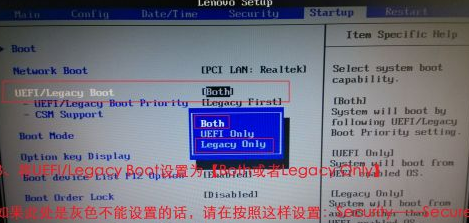
5. Select the Startup tab, find the UEFI/Legacy Boot option and press Enter to select Both or Legacy Only.
6. Both options are acceptable . If it is gray and cannot be set,
Look at the previous step (Security——Secure Boot——Secure Boot).

7. After the above settings are completed, press F10 (press Fn F10 on some models) to save and exit to proceed with the system installation process.
The above is the detailed content of How to change BIOS settings to install XP system on Win7. For more information, please follow other related articles on the PHP Chinese website!

Hot AI Tools

Undresser.AI Undress
AI-powered app for creating realistic nude photos

AI Clothes Remover
Online AI tool for removing clothes from photos.

Undress AI Tool
Undress images for free

Clothoff.io
AI clothes remover

Video Face Swap
Swap faces in any video effortlessly with our completely free AI face swap tool!

Hot Article

Hot Tools

Notepad++7.3.1
Easy-to-use and free code editor

SublimeText3 Chinese version
Chinese version, very easy to use

Zend Studio 13.0.1
Powerful PHP integrated development environment

Dreamweaver CS6
Visual web development tools

SublimeText3 Mac version
God-level code editing software (SublimeText3)

Hot Topics
 When I turn on the computer, it always stops at the motherboard logo screen. Nothing happens when I press anything, and I can't enter the bios?
Apr 23, 2024 am 09:13 AM
When I turn on the computer, it always stops at the motherboard logo screen. Nothing happens when I press anything, and I can't enter the bios? This is usually because the BIOS battery voltage is too low, and the system time has returned to the BIOS preset time, such as 2000.1.1, 00:00. You can use it after pressing F1 to enter the bios and set the time. Do not turn off the AC power after shutting down at night. Generally, the system time will not be lost when you turn on the computer the next day, and you can still enter the system normally. If the AC power is cut off, the battery voltage cannot sustain the power consumption of the bios, and the computer will be in the same state again the next day when it is turned on. Replacing the bios battery is the ultimate solution. Win11 is stuck on the motherboard logo interface when booting? 1. It is a problem with bios settings. We only need to find the corresponding setting items.
 In which folder is the win10 graphics card driver located?
Apr 18, 2024 am 09:20 AM
What is the installation path of the graphics card driver? 1. Turn on the computer, click Computer, and open the Device Manager. For all devices on our computer, find the installation directory location of the graphics card driver. Click on the display adapter, find the device to which the driver belongs, and click to select properties. After entering properties, select Update Driver. 2. The graphics card driver is best installed on the C drive. By default, some drives are installed on the system disk. Cannot make selection. If you want to choose, you can install it on other disks. It is better to divide the hard disk into multiple areas than one area. The access speed through the C drive is faster than the D drive, and the access speed through the D drive is faster than the E drive. 3. It cannot be changed otherwise problems will occur. The driver is installed in C:\ProgramFiles, and C:\WINDOW
 How to enter bios on hp motherboard
May 04, 2024 pm 09:01 PM
How to set up the U disk boot in the HP notebook bios (how to enter the HP computer bios) and then insert the U disk to be booted first into the USB port of the notebook. If you want to install the system, the system program must have been prepared in the U disk. First, open the laptop. Make sure the laptop is turned off. Setting the bios must be done with the computer turned off. Then insert the U disk that you want to boot first into the USB port of the notebook. If you want to install the system, the prerequisite is that the system program has been prepared in the U disk. Take the HP ProDesk400G5SFF desktop computer as an example. Set the BIOS disk startup method: First, restart the computer and wait for the startup screen to appear. There are two ways to set up USB disk startup on HP notebooks. One is to directly press the shortcut key to select
 Tutorial on assembling a computer and installing a system? How to install win11 system when assembling a computer?
Apr 27, 2024 pm 03:38 PM
Tutorial on assembling a computer and installing a system? Nowadays, the system installation for assembling computers is very simple and convenient, and only requires a CD. First enter the bios settings, set the computer to boot first with the CD-ROM drive, then restart the computer and load the system CD into the CD-ROM drive. The CD will automatically enter the installation state. At this time, you only need to manually repartition the partitions, and the rest will be completed automatically. How to install win11 system when assembling a computer? 1. First, we need to download a win11 image file from this site before installing it. 2. The win11 image file has undergone a large number of professional tests to ensure stable installation and smooth operation. 3. After the download is completed, load the folder in the download path and run the "windowssetup" process in it.
 MSI motherboard boot logo
May 08, 2024 pm 02:20 PM
How to cancel the MSI motherboard icon when booting 1. Press the DEL key when booting to enter the BIOS. Generally, in the "Advanced Features" item, you can find the words MSI motherboard LOGO screen. Select DISABLED, save and exit. There will no longer be this MSI motherboard LOGO screen when you turn on the computer in the future. MSI motherboard refers to the motherboard brand developed by MSI (MSI Technology Company). 2. The logo displayed when the computer is turned on is basically that of the motherboard manufacturer. You can set QUICKPOST to DISENABLE in the BIOS, so that the logo will generally no longer be displayed. It will display computer configuration-related information and give you more details. 3. First, teach you how to flash the BIOS in Windows environment. First: Go online
 How to enter bios after assembling a computer? How to enter bios when assembling a computer?
May 07, 2024 am 09:13 AM
How to enter bios after assembling a computer? Before entering the BIOS, you need to make sure that the computer is completely shut down and powered off. Here are several common ways to enter the BIOS: 1. Use shortcut keys: Most computer manufacturers will display a prompt message at startup telling you which key to press to enter the BIOS settings. Usually the F2, F10, F12 or Delete key. After pressing the appropriate keys, you should be able to see a screen with information about your computer's hardware and BIOS settings. 2. Use the button on the motherboard: Some computer motherboards have a dedicated button for entering BIOS settings. This button is usually labeled "BIOS" or "UEFI". After pressing the button you should be able to see
 How to upgrade Gigabyte motherboard to Win11_How to upgrade Gigabyte motherboard to Win11
May 06, 2024 pm 12:04 PM
1. Win11 does not have very high requirements for the motherboard. You can first download healthcheck or whynotwin11 to check whether your other hardware devices support it (you can download it from this site). 2. If other conditions are met and only tpm does not meet the requirements, you can enable tpm in the bios settings. 3. Restart the system, and then press [DEL] on the keyboard to enter the BIOS settings when the logo pops up. 4. Enter the [Settings] option and [Miscellaneous] option in sequence. 5. Find [Intel Platform Trust Technology (PTT)] below and set it to [Start]. 6. If it is an AMD platform, then
 How to enable tpm2.0 in win11_How to enable tpm2.0 in win11
May 08, 2024 pm 06:10 PM
1. Gigabyte motherboard 1. First, we restart the computer and use the keyboard [DEL] to enter the BIOS settings when restarting. 2. Find and enter the [Settings] tab above. 3. Then find and enter [Miscellaneous] under settings. 4. Set [Intel Platform Trust Technology (PTT)] to [Enabled]. 5. After the settings are completed, use the keyboard [F10] to save, and then click [YES] to exit. 2. ASUS motherboard 1. First restart the computer and continuously tap [del] on the keyboard to enter the bios settings when booting. 2. Click [AdvancedMode] or press [F7] to find [A


