 System Tutorial
 Windows Series
 Your organization is responsible for managing certain settings for Windows 10 system updates
Your organization is responsible for managing certain settings for Windows 10 system updates
Some settings of win10 system update are managed by your organization. Generally, they are caused by two problems, one is software conflict and the other is system activation problem. Let’s take a look at the detailed solution below.
Some settings of win10 system updates are managed by your organization
Method 1: Software conflicts cause
1. Eliminate security guards’ intervention in system updates
Although Windows comes with Defender, because I am a novice, I also installed 360 Security Guard. Unexpectedly, 360 Security Guard was one of the reasons for this problem to occur.
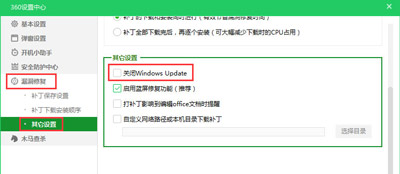
When installing 360 Security Guard, 360 will automatically turn on the "Turn off Windows Update" option for you, so we need to uncheck this option first.
Open the 360 Security Guard Settings Center - Vulnerability Repair - Uncheck the Turn off Windows Update option in other settings.

2. Automatically enable Windows updates in services
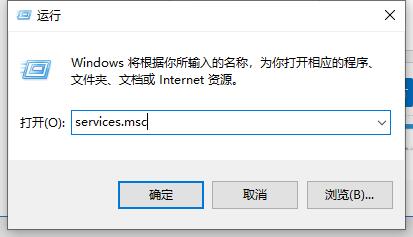
First win r, open the run window, enter "services .msc" (without quotation marks) to bring up the local service items;
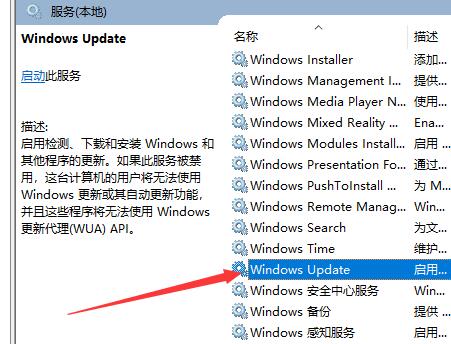
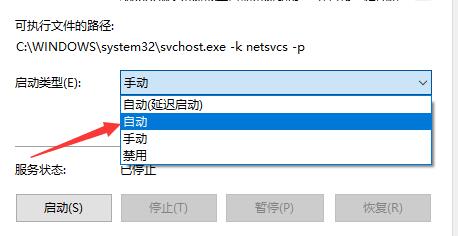
Find Windows Update to start and set it to automatic.
3. Restore the editing group policy about Windows Update
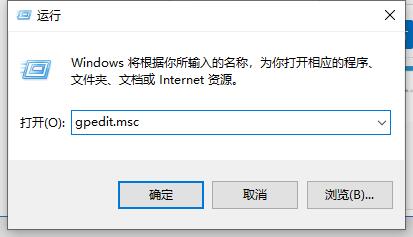
First Enter "gpedit.msc" (without quotation marks) in the run window to bring up the local service item;
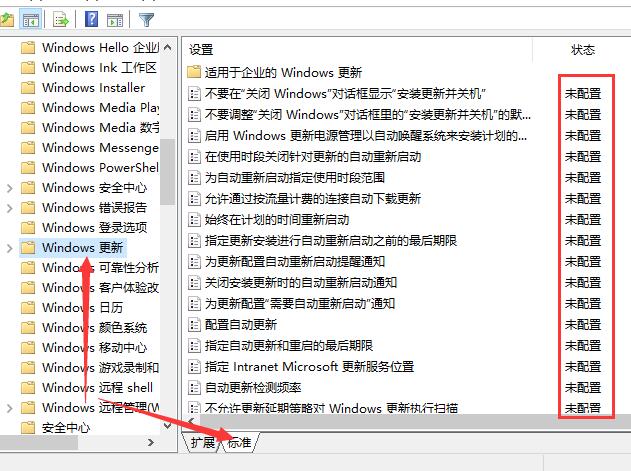
Then select Computer Configuration - Administrative Templates - Windows Components - Windows Update - on the lower right side on the left Click Standard to view the specific configuration.
Then select all options that are not set to unconfigured to unconfigured. The result after completion is as shown below.
4. Check for updates
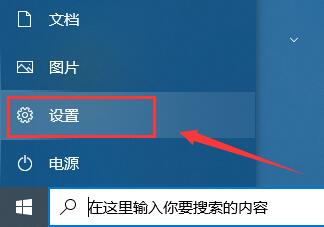
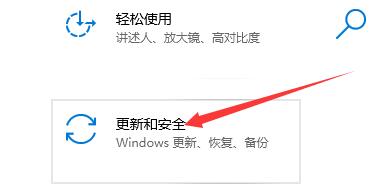
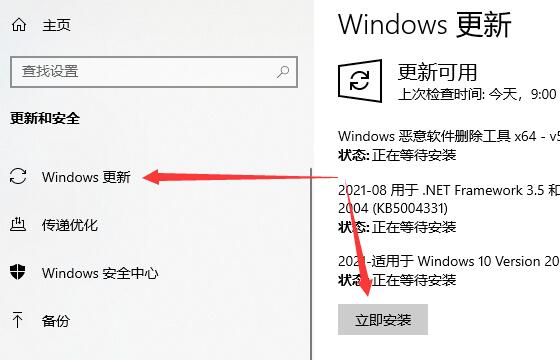
First open settings, go to Windows Update, click the Check for updates button, after that, everything will return to normal (If that doesn't work, try restarting your computer).
Method 2: Activation code problem
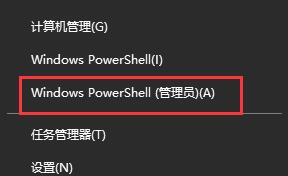
1. First, uninstall Existing activation code. Right-click on the Start menu and select the Windows PowerShell (Administrator) item, as shown in the figure.
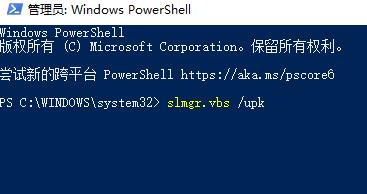
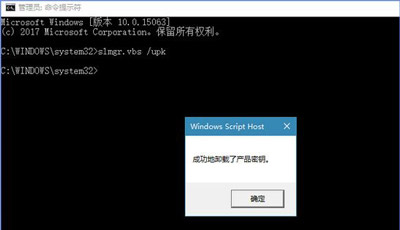
2. Then enter the command slmgr.vbs /upk in the window and press Enter to run.
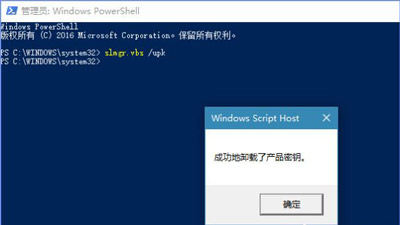
3. A window of successful uninstallation of the key will pop up, indicating that we have uninstalled the key installed on the current Windows 10 system. We can re-enter the key for reactivation in the future. .
4. In fact, to uninstall the key, you can also perform the same operation in the command prompt (run as administrator) window, as shown in the figure. However, after the Creator version was updated, there was no Command Prompt item in the right-click Start menu, so for convenience, I chose Windows PowerShell. In fact, the effect of both is the same.
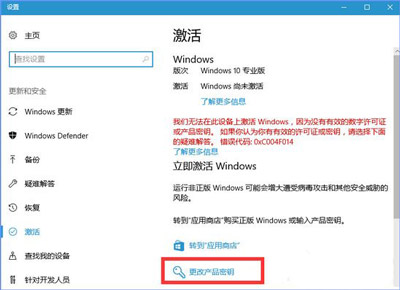
5. The last step is to re-enter the key to activate Windows 10. Open the Win10 menu.
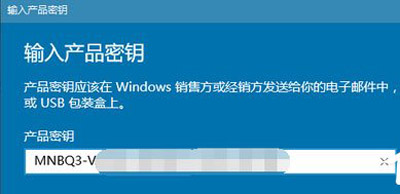
6. Enter the activation key in Enter Product Key. After entering, click Next and select Activate.
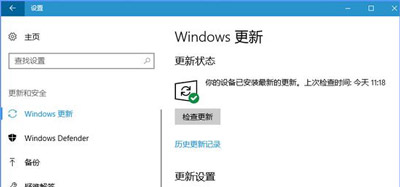
7. After activation, select the item and click Check for updates (optional). You will see that the red text with ※ "Some settings are hidden or managed by your organization" has completely disappeared.
8. If you cannot perform the above settings, or it is still useless after setting them. Then your system may be a pirated system, and it is recommended to install a genuine system.
 |
##win10 system imageSimple and pure installation with high speed
One-click installation tutorial |
table tbody tr td button{background: #4E9FF7;border:none;border-radius: 4px;padding: 5px 16px;display: inline -block;vertical-align: text-top;}table tbody tr td button a{border:none;color: #fff;}Details |
The above is the detailed content of Your organization is responsible for managing certain settings for Windows 10 system updates. For more information, please follow other related articles on the PHP Chinese website!

Hot AI Tools

Undresser.AI Undress
AI-powered app for creating realistic nude photos

AI Clothes Remover
Online AI tool for removing clothes from photos.

Undress AI Tool
Undress images for free

Clothoff.io
AI clothes remover

AI Hentai Generator
Generate AI Hentai for free.

Hot Article

Hot Tools

Notepad++7.3.1
Easy-to-use and free code editor

SublimeText3 Chinese version
Chinese version, very easy to use

Zend Studio 13.0.1
Powerful PHP integrated development environment

Dreamweaver CS6
Visual web development tools

SublimeText3 Mac version
God-level code editing software (SublimeText3)

Hot Topics
 Detailed explanation of the time required to upgrade win10 to win11 system
Dec 26, 2023 pm 12:36 PM
Currently, Microsoft has pushed the preview version of the win11 system to users. Many users want to download and use it, but they don’t know how long it will take. They are afraid that it will take too long to update and they will not be able to work and study normally. Let’s follow the editor’s instructions. Let’s take a look at the introduction of the time required to upgrade win10 to win11 system. How long does it take to upgrade Win10 to Win11? Answer: About 10 minutes. The specific situation depends on the computer configuration. 1. If we include all steps such as version selection, installation settings, etc., it will take 10-15 minutes. 2. Because before installing win11, we need to select multiple settings such as system version, installation disk, regional language, network, keyboard, etc. 3. After the setting is completed, the system will enter the automatic installation process. At this time, you only need to wait.
 How to solve the problem of network card incompatibility with Windows 10 system
Dec 22, 2023 pm 01:33 PM
When our computer was upgraded and installed with the win10 operating system, some friends had a prompt on their computer that the current network card did not support the win10 system when they were surfing the Internet. For this kind of problem, the editor thinks that it is probably because there is a problem with the network card driver of our computer. You can try to update or reinstall the driver. It can also be operated using third-party software. Let’s take a look at the specific steps to see how the editor did it~ How to solve the problem that the network card does not support the win10 system 1. Right-click the computer and select “Properties”. 2. Select "Device Manager". 3. Click "Network Adapter". First uninstall the network card driver whose original model is incorrect or does not display the model. After the uninstallation is complete, rescan to detect hardware changes. After completion, there will be a network in the unrecognized devices.
 What to do if a system update error occurs in Win11
Jul 02, 2023 pm 04:49 PM
What should I do if there is a system update error in Win11? Microsoft has been pushing patches for the win11 system, so what should you do if you encounter an error in the update system? Below, the editor will bring you a method to solve the problem of win11 system update. If you are curious about how to operate, please continue reading! Methods to solve win11 system update errors: 1. Uninstall the latest update Press the Windows + key, then select Windows Update from the left navigation bar, and then select Update History. Scroll down until you come across the Uninstall Updates button and click on it. Click on the first update in the MicrosoftWindows list and click Uninstall. 2. Use third-party tools Restor
 Is it recommended to update the ios14.6.1 system?
May 31, 2023 pm 01:25 PM
It is recommended to update the ios14.6.1 system because: iOS 14.6.1 is Apple’s latest operating system version, which fixes some known vulnerabilities and problems and improves the stability and security of the system.
 win11 system update permanently disabled
Jan 04, 2024 pm 06:31 PM
Win11 sometimes keeps popping up the system update interface, which makes us feel very irritated, and every update takes up memory. So how should we permanently turn off system updates? Let’s take a look. Win11 permanently shuts down system updates: 1. We can hold down "win+r" to open the run interface, and then enter "regedit" to open the registration edit form. 2. Then open HKEY_LOCAL_MACHINE\SOFTWARE\Policies\Microsoft\Windows according to the following path. 3. Then right-click the windows folder, then open "New", "Item" and name it "windowsupdate"
 Be sure to upgrade! Samsung S24 series China Bank pushes the first system update: display and camera are greatly improved
Feb 24, 2024 pm 03:50 PM
According to news on February 24, Samsung recently began to push the first system update to the Galaxy S24 series mobile phones of the National Bank. This update is the latest version in the world and has more camera optimizations than the XB5 version pushed in South Korea. It is recommended that users of the Samsung Galaxy S24 series in China upgrade this version, because this update solves some important problems with the new machine. According to the official update content, the updated version number is S9210ZCU1AXBA/S9210CHC1AXBA/S9210ZCU1AXBA, the file size is about 587MB, and the security patch level is October 1, 2023. Updates include: adding a screen brightness control option through which users can adjust the brightness of the screen; the camera has been optimized
 win10 system update error 0x800f081f
Jul 09, 2023 pm 04:42 PM
Many friends may encounter various errors when updating the win10 system on their computers. Today I will tell you about the solution to the win10 system update error 0x800f081f. Let’s take a look. 1. Right-click "This PC" and select "Manage". 2. After entering Computer Management, click "Services and Applications" on the left side and click "Services". 3. Find windowsUpdate, click it, and select "Properties". 4. After entering the properties interface, select Manual in the startup type. Click OK to exit settings. 5. Right-click: windowsUpdate and select: Start. The above is the detailed solution to the win10 system update error. You can follow the above
 The screen turns black after updating win10 system
Jan 05, 2024 pm 11:32 PM
Generally speaking, there will be no problems after the win10 system is updated! But among so many win10 system users, there are always some exceptions! Recently, many friends have reported that their win10 system computers have a black screen problem after updating! Today, the editor will bring you the solution to the problem of black screen and unresponsiveness after win10 update. Let’s take a look at it together. Solution to the black screen after win10 system update: Operation steps: 1. Restart the computer and enter the BIOS; Enter the BIOS method: After restarting the computer, continuously press the "Del" key in the lower right corner of the keyboard to enter. Generally, the "F2" key is used in notebooks. (If the F2 key cannot be entered, you can consult the manufacturer on how to enter the BIOS). After entering the BIOS, normally


