
 Java
javaTutorial
Quickly get started with Java virtual machine: steps and techniques for easy installation
Java
javaTutorial
Quickly get started with Java virtual machine: steps and techniques for easy installation
Quickly get started with Java virtual machine: steps and techniques for easy installation


Easy Getting Started: Methods and Techniques to Quickly Install Java Virtual Machine
The Java Virtual Machine (Java Virtual Machine, referred to as JVM) is a tool that ensures that Java programs can be used in different operations Critical components running on the system. Through the JVM, programmers can translate the code written in Java into bytecode that a specific operating system can understand, realizing the dream of "write once, run anywhere". In this article, we will introduce you to the methods and techniques of installing Java virtual machine, and attach specific code examples.
- Download and install JDK
JDK (Java Development Kit) is a software package required to develop Java programs. It includes JVM and other development tools. First, let us download the latest JDK version from Oracle's official website.
Steps:
- Open Oracle official website (https://www.oracle.com/java/technologies/javase-jdk15-downloads.html)
- Select version for your operating system and download the installation package (usually in .exe or .dmg format).
- Double-click the installation package and follow the installation wizard's prompts to complete the installation process.
- Configuring environment variables
After installing the JDK, we need to configure the system's environment variables so that Java commands can be executed directly on the command line.
Steps:
- In Windows operating system, open the "Control Panel" and search for "Environment Variables". Select "Edit system environment variables".
- Click the "Environment Variables" button, find the "Path" variable in the "System Variables" section, and click "Edit".
- Add the JDK installation path (for example: C:Program FilesJavajdk1.8.0_251 in) at the end of "Variable Value", and click "OK" to save the changes.
-
In Mac OS, open a terminal and execute the following command:
echo 'export PATH="/Library/Java/JavaVirtualMachines/jdk1.8.0_251.jdk/Contents/Home/bin:$PATH"' >> ~/.bash_profile
source ~/.bash_profile
Copy after login
- ##Verify the installation results
- Open the terminal or command line interface.
- Execute the following command:
java -version
Copy after loginIf the JVM version information is displayed, the installation is successful. Otherwise, the environment variables may be configured incorrectly, please check again.
- Write and run a Java program
- Open any text editor and create a file named
- HelloWorld.java
. - Enter the following code in the file:
class HelloWorld {
  public static void main(String[] args) {
    System.out.println("Hello, World!");
  }
}
Copy after loginCopy after loginSave the file and enter the directory where the file is located through the command line. - Execute the following command:
javac HelloWorld.java
java HelloWorld
Copy after loginIf "Hello, World!" is successfully output, it means that your Java program has run successfully.
class HelloWorld {
  public static void main(String[] args) {
    System.out.println("Hello, World!");
  }
}The above is the detailed content of Quickly get started with Java virtual machine: steps and techniques for easy installation. For more information, please follow other related articles on the PHP Chinese website!

Hot AI Tools

Undresser.AI Undress
AI-powered app for creating realistic nude photos

AI Clothes Remover
Online AI tool for removing clothes from photos.

Undress AI Tool
Undress images for free

Clothoff.io
AI clothes remover

Video Face Swap
Swap faces in any video effortlessly with our completely free AI face swap tool!

Hot Article
Hot Tools

Notepad++7.3.1
Easy-to-use and free code editor

SublimeText3 Chinese version
Chinese version, very easy to use

Zend Studio 13.0.1
Powerful PHP integrated development environment

Dreamweaver CS6
Visual web development tools

SublimeText3 Mac version
God-level code editing software (SublimeText3)
Hot Topics
 1386
1386
 52
52

 A Diffusion Model Tutorial Worth Your Time, from Purdue University
Apr 07, 2024 am 09:01 AM
A Diffusion Model Tutorial Worth Your Time, from Purdue University
Apr 07, 2024 am 09:01 AM
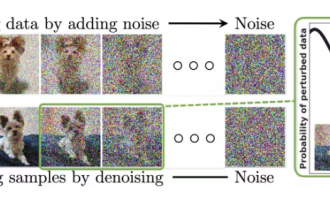
Diffusion can not only imitate better, but also "create". The diffusion model (DiffusionModel) is an image generation model. Compared with the well-known algorithms such as GAN and VAE in the field of AI, the diffusion model takes a different approach. Its main idea is a process of first adding noise to the image and then gradually denoising it. How to denoise and restore the original image is the core part of the algorithm. The final algorithm is able to generate an image from a random noisy image. In recent years, the phenomenal growth of generative AI has enabled many exciting applications in text-to-image generation, video generation, and more. The basic principle behind these generative tools is the concept of diffusion, a special sampling mechanism that overcomes the limitations of previous methods.
 How to write a novel in the Tomato Free Novel app. Share the tutorial on how to write a novel in Tomato Novel.
Mar 28, 2024 pm 12:50 PM
How to write a novel in the Tomato Free Novel app. Share the tutorial on how to write a novel in Tomato Novel.
Mar 28, 2024 pm 12:50 PM
Tomato Novel is a very popular novel reading software. We often have new novels and comics to read in Tomato Novel. Every novel and comic is very interesting. Many friends also want to write novels. Earn pocket money and edit the content of the novel you want to write into text. So how do we write the novel in it? My friends don’t know, so let’s go to this site together. Let’s take some time to look at an introduction to how to write a novel. Share the Tomato novel tutorial on how to write a novel. 1. First open the Tomato free novel app on your mobile phone and click on Personal Center - Writer Center. 2. Jump to the Tomato Writer Assistant page - click on Create a new book at the end of the novel.
 How to recover deleted contacts on WeChat (simple tutorial tells you how to recover deleted contacts)
May 01, 2024 pm 12:01 PM
How to recover deleted contacts on WeChat (simple tutorial tells you how to recover deleted contacts)
May 01, 2024 pm 12:01 PM
Unfortunately, people often delete certain contacts accidentally for some reasons. WeChat is a widely used social software. To help users solve this problem, this article will introduce how to retrieve deleted contacts in a simple way. 1. Understand the WeChat contact deletion mechanism. This provides us with the possibility to retrieve deleted contacts. The contact deletion mechanism in WeChat removes them from the address book, but does not delete them completely. 2. Use WeChat’s built-in “Contact Book Recovery” function. WeChat provides “Contact Book Recovery” to save time and energy. Users can quickly retrieve previously deleted contacts through this function. 3. Enter the WeChat settings page and click the lower right corner, open the WeChat application "Me" and click the settings icon in the upper right corner to enter the settings page.
 Generate PPT with one click! Kimi: Let the 'PPT migrant workers' become popular first
Aug 01, 2024 pm 03:28 PM
Generate PPT with one click! Kimi: Let the 'PPT migrant workers' become popular first
Aug 01, 2024 pm 03:28 PM
Kimi: In just one sentence, in just ten seconds, a PPT will be ready. PPT is so annoying! To hold a meeting, you need to have a PPT; to write a weekly report, you need to have a PPT; to make an investment, you need to show a PPT; even when you accuse someone of cheating, you have to send a PPT. College is more like studying a PPT major. You watch PPT in class and do PPT after class. Perhaps, when Dennis Austin invented PPT 37 years ago, he did not expect that one day PPT would become so widespread. Talking about our hard experience of making PPT brings tears to our eyes. "It took three months to make a PPT of more than 20 pages, and I revised it dozens of times. I felt like vomiting when I saw the PPT." "At my peak, I did five PPTs a day, and even my breathing was PPT." If you have an impromptu meeting, you should do it
 How to set font size on mobile phone (easily adjust font size on mobile phone)
May 07, 2024 pm 03:34 PM
How to set font size on mobile phone (easily adjust font size on mobile phone)
May 07, 2024 pm 03:34 PM
Setting font size has become an important personalization requirement as mobile phones become an important tool in people's daily lives. In order to meet the needs of different users, this article will introduce how to improve the mobile phone use experience and adjust the font size of the mobile phone through simple operations. Why do you need to adjust the font size of your mobile phone - Adjusting the font size can make the text clearer and easier to read - Suitable for the reading needs of users of different ages - Convenient for users with poor vision to use the font size setting function of the mobile phone system - How to enter the system settings interface - In Find and enter the "Display" option in the settings interface - find the "Font Size" option and adjust it. Adjust the font size with a third-party application - download and install an application that supports font size adjustment - open the application and enter the relevant settings interface - according to the individual
 The secret of hatching mobile dragon eggs is revealed (step by step to teach you how to successfully hatch mobile dragon eggs)
May 04, 2024 pm 06:01 PM
The secret of hatching mobile dragon eggs is revealed (step by step to teach you how to successfully hatch mobile dragon eggs)
May 04, 2024 pm 06:01 PM
Mobile games have become an integral part of people's lives with the development of technology. It has attracted the attention of many players with its cute dragon egg image and interesting hatching process, and one of the games that has attracted much attention is the mobile version of Dragon Egg. To help players better cultivate and grow their own dragons in the game, this article will introduce to you how to hatch dragon eggs in the mobile version. 1. Choose the appropriate type of dragon egg. Players need to carefully choose the type of dragon egg that they like and suit themselves, based on the different types of dragon egg attributes and abilities provided in the game. 2. Upgrade the level of the incubation machine. Players need to improve the level of the incubation machine by completing tasks and collecting props. The level of the incubation machine determines the hatching speed and hatching success rate. 3. Collect the resources required for hatching. Players need to be in the game
 All CVPR 2024 awards announced! Nearly 10,000 people attended the conference offline, and a Chinese researcher from Google won the best paper award
Jun 20, 2024 pm 05:43 PM
All CVPR 2024 awards announced! Nearly 10,000 people attended the conference offline, and a Chinese researcher from Google won the best paper award
Jun 20, 2024 pm 05:43 PM
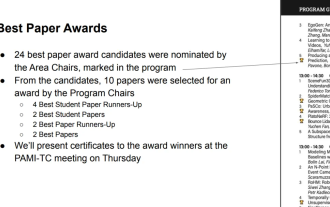
In the early morning of June 20th, Beijing time, CVPR2024, the top international computer vision conference held in Seattle, officially announced the best paper and other awards. This year, a total of 10 papers won awards, including 2 best papers and 2 best student papers. In addition, there were 2 best paper nominations and 4 best student paper nominations. The top conference in the field of computer vision (CV) is CVPR, which attracts a large number of research institutions and universities every year. According to statistics, a total of 11,532 papers were submitted this year, and 2,719 were accepted, with an acceptance rate of 23.6%. According to Georgia Institute of Technology’s statistical analysis of CVPR2024 data, from the perspective of research topics, the largest number of papers is image and video synthesis and generation (Imageandvideosyn
 Win11 Tips Sharing: Skip Microsoft Account Login with One Trick
Mar 27, 2024 pm 02:57 PM
Win11 Tips Sharing: Skip Microsoft Account Login with One Trick
Mar 27, 2024 pm 02:57 PM
Win11 Tips Sharing: One trick to skip Microsoft account login Windows 11 is the latest operating system launched by Microsoft, with a new design style and many practical functions. However, for some users, having to log in to their Microsoft account every time they boot up the system can be a bit annoying. If you are one of them, you might as well try the following tips, which will allow you to skip logging in with a Microsoft account and enter the desktop interface directly. First, we need to create a local account in the system to log in instead of a Microsoft account. The advantage of doing this is
