

Windows 10 Installation Guide

The win10 U disk installation tutorial on this site provides a convenient and quick installation method for users who cannot enter the system. As long as you have a U disk, you can install it. All the graphic and text steps can make your installation successful with zero foundation. Let’s do it together. Let’s start installing the system.
win10 U disk installation tutorial
1. Required tools:
1. A U disk of 8GB or above is enough, preferably It is 16GB or above.
2. Download a system iso file. This article installs and uses the latest version. This website also has other systems.
PS: It is recommended to use Thunder and Netdisk tools to download system files for more stable and high-speed downloading. If you encounter a download problem, just pause and then restart the download.
2. PE tool installation method:
1. First download the micro PE toolbox, then make a U disk boot disk, and insert the U disk into the computer after completion .
PS: The tool for making a U disk into a PE will clean all U disk data.
Select the installation plan, it is recommended to choose "Plan 1"
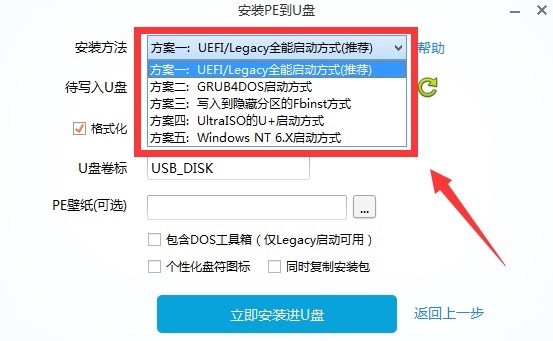
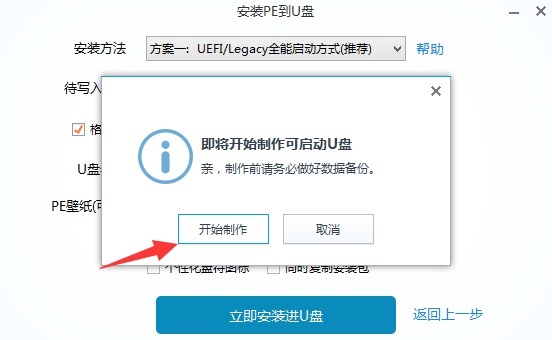
2. After selecting, click "Install into U disk now", then click "Start production" ".
3. After the boot disk is created, copy the downloaded system to the prepared PEU disk, and then insert the USB disk into the computer.
3. Detailed steps for win10 system installation:
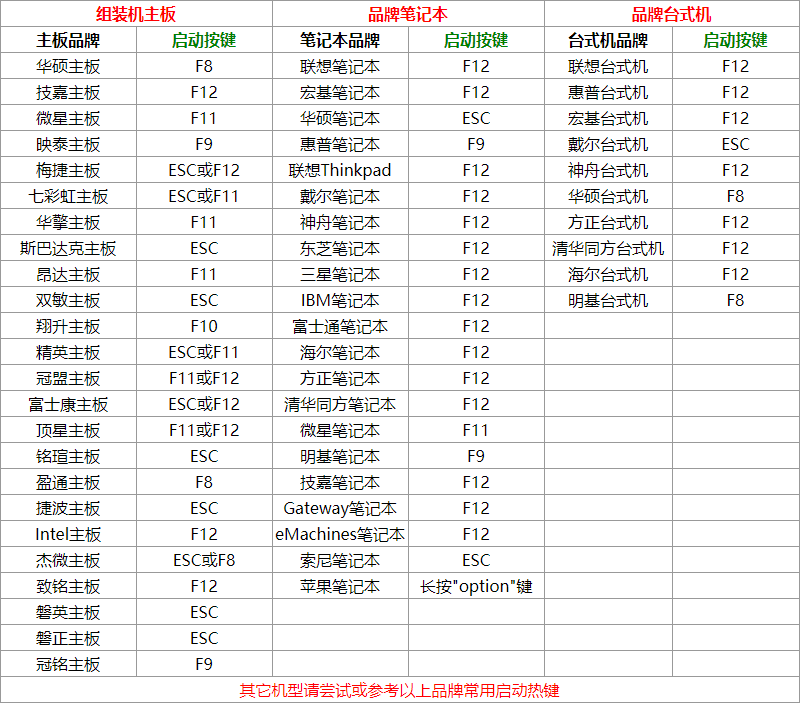
1. Start the computer power button - press the F11 key (the key will be displayed after staying on the startup interface for a few seconds, generally the default is F8/F11/F12 )
2. Computers that cannot directly enter PE need to enter the BISO motherboard to set the startup sequence. (If you can enter PE directly, you don’t need to set the startup sequence. Only old motherboards need to set it)
(1) The default keys to enter the BIOS interface are DELETE and F2.
(2) Press the left and right arrow keys to move to the startup column. The English name is BOOT, and then move the options with words like UEFI, USB hard disk, etc. to the first startup item. The BIOS of my computer is Use the plus and minus signs to move
PS: The English user location can be the same, or it can be modified to Chinese (particularly old motherboards do not support it, and those that support it can be modified on the first page).
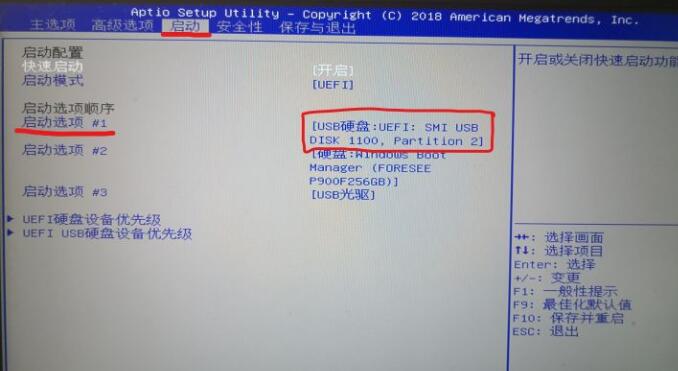
After the move is completed, press F10, or go to the Save and Exit column to select save changes and restart and press the ENTER key.
3. After entering PE, select the U disk device to enter. Users who set startup items will directly enter the PE system.
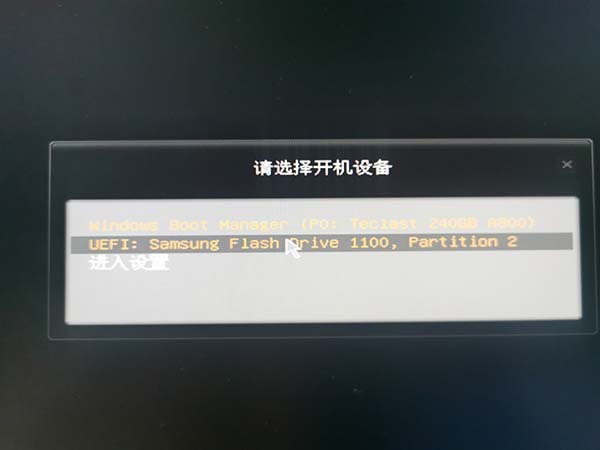
ps: Choose the second one here, which is the prepared U disk to boot. The name of the U disk is Samsung. Each user is different, two hard drives. The user is booting from the third USB disk.
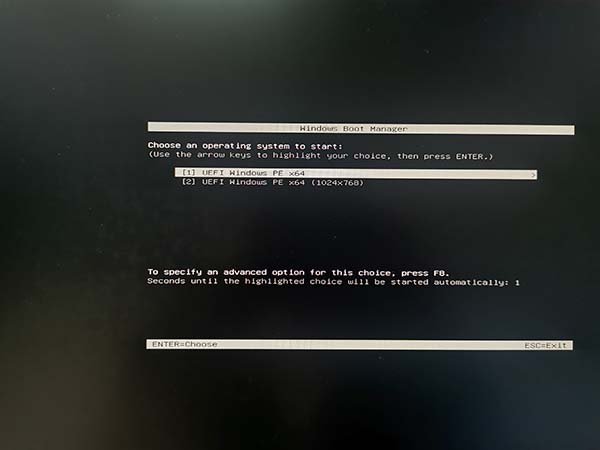
4. Just select the first one to enter (here you select the resolution, it has no effect.)
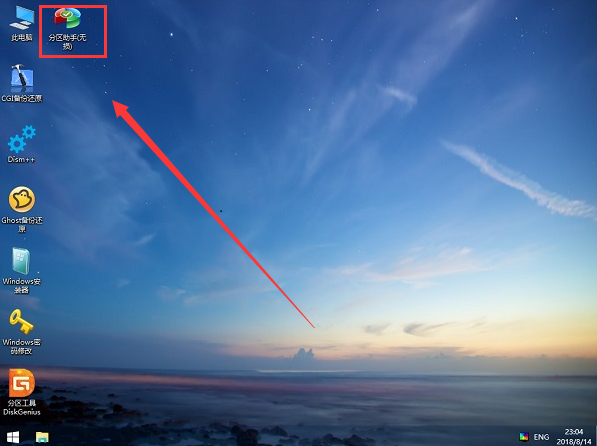
5. Enter the micro PE interface . Seeing this interface means you have entered the PE system. Next is the system partition.
PS: Click Partition Assistant (lossless) or choose the partition tool DiskGenius, which is included with the PE tool. The editor here uses the partition assistant, which essentially makes no difference.
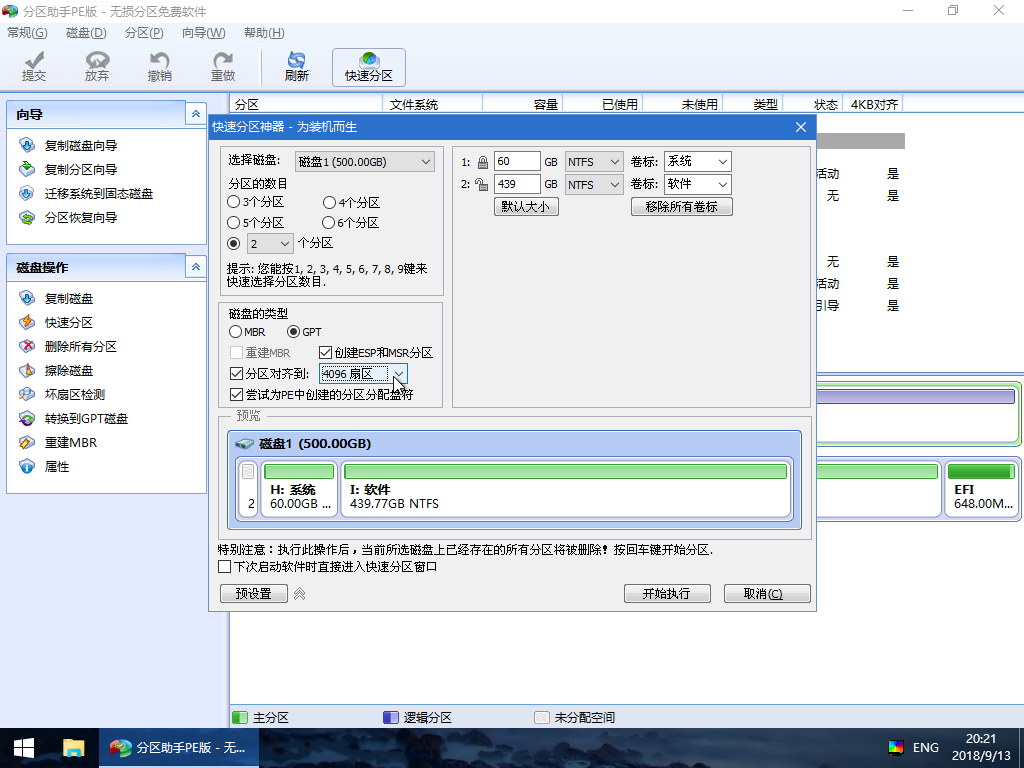
6. After entering the software, click Quick Partition, and a partition setting box will pop up. Set it according to your needs.
(1) The number of partitions is preferably greater than 1, that is to say at least two, separate the C drive from other drives.
(2) It is recommended to use the GPT (GUID) type as the disk type. The MBR type is basically obsolete. It is only used by old computers and motherboards. Those who do not support GPT should choose MBR.
(3) Partition to: 2048 sectors. Disk size C drive is recommended to be larger, preferably 100GB.
(4) It is recommended to use a solid-state drive directly as the system disk, which will make startup and installation smoother.
PS: If you can enter PE directly with shortcut keys, you can generally use GPT (GUID). If you need to set the startup sequence to enter, you can only use MBR.
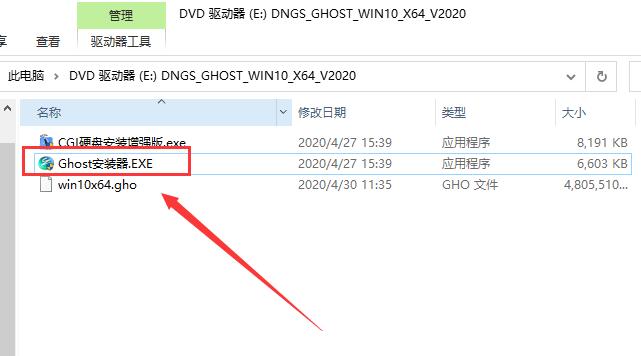
7. After partitioning, you can install the system directly. Find the downloaded ISO file and right-click to load it. Just click on the ghost installer.
PS: Prompt users who cannot use it, click on the CGI hard disk installer enhanced version, and select C drive to restore.
8. After clicking to open the exe one-click installation program, select the C drive (system disk) for installation, and click OK. Be careful not to choose the wrong one here.
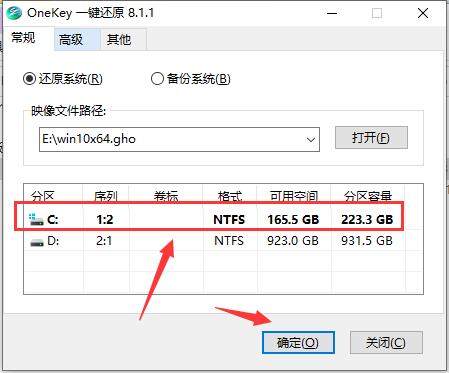
PS: The ghost hard disk file will be copied here. After a period of time, restart the computer. (Users who have modified the startup items need to unplug the USB flash drive before restarting.)
9. The system will then automatically install it, and users only need to wait patiently.

10. After the restoration is completed, start installing the system. After the system is installed, restart and it can be used normally.
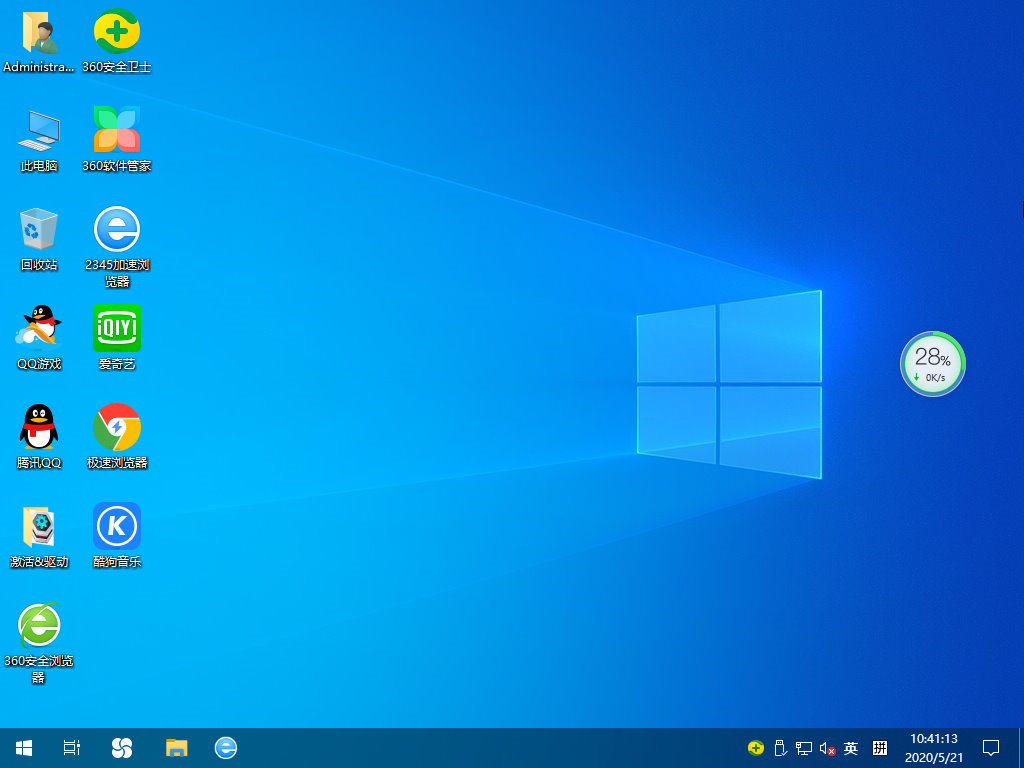
11. All installation steps are completed, automatic restart, and the system can be used. This system integrates the latest drivers, so users do not need to install drivers separately.
Win10 installation tutorial summary
| Original tutorial | |
| Direct installation | U disk installation |
| Original installation |
Original U disk |
| Tutorials for each version | |
| Professional version |
Official version |
| Home version |
Mirror |
|
Dell |
|
|
Lenovo |
|
|
HP |
|
|
Xuanlong |
|
|
大白菜 |
|
|
UStart |
|
|
udepth |
|
|
Cloud Knight |
|
The above is the detailed content of Windows 10 Installation Guide. For more information, please follow other related articles on the PHP Chinese website!

Hot AI Tools

Undresser.AI Undress
AI-powered app for creating realistic nude photos

AI Clothes Remover
Online AI tool for removing clothes from photos.

Undress AI Tool
Undress images for free

Clothoff.io
AI clothes remover

AI Hentai Generator
Generate AI Hentai for free.

Hot Article
Hot Tools

Notepad++7.3.1
Easy-to-use and free code editor

SublimeText3 Chinese version
Chinese version, very easy to use

Zend Studio 13.0.1
Powerful PHP integrated development environment

Dreamweaver CS6
Visual web development tools

SublimeText3 Mac version
God-level code editing software (SublimeText3)
Hot Topics
 1384
1384
 52
52

 How to use shortcut keys to take screenshots in Win8?
Mar 28, 2024 am 08:33 AM
How to use shortcut keys to take screenshots in Win8?
Mar 28, 2024 am 08:33 AM
How to use shortcut keys to take screenshots in Win8? In our daily use of computers, we often need to take screenshots of the content on the screen. For users of Windows 8 system, taking screenshots through shortcut keys is a convenient and efficient operation method. In this article, we will introduce several commonly used shortcut keys to take screenshots in Windows 8 system to help you take screenshots more quickly. The first method is to use the "Win key + PrintScreen key" key combination to perform full
 Win11 Tips Sharing: Skip Microsoft Account Login with One Trick
Mar 27, 2024 pm 02:57 PM
Win11 Tips Sharing: Skip Microsoft Account Login with One Trick
Mar 27, 2024 pm 02:57 PM
Win11 Tips Sharing: One trick to skip Microsoft account login Windows 11 is the latest operating system launched by Microsoft, with a new design style and many practical functions. However, for some users, having to log in to their Microsoft account every time they boot up the system can be a bit annoying. If you are one of them, you might as well try the following tips, which will allow you to skip logging in with a Microsoft account and enter the desktop interface directly. First, we need to create a local account in the system to log in instead of a Microsoft account. The advantage of doing this is
 In summer, you must try shooting a rainbow
Jul 21, 2024 pm 05:16 PM
In summer, you must try shooting a rainbow
Jul 21, 2024 pm 05:16 PM
After rain in summer, you can often see a beautiful and magical special weather scene - rainbow. This is also a rare scene that can be encountered in photography, and it is very photogenic. There are several conditions for a rainbow to appear: first, there are enough water droplets in the air, and second, the sun shines at a low angle. Therefore, it is easiest to see a rainbow in the afternoon after the rain has cleared up. However, the formation of a rainbow is greatly affected by weather, light and other conditions, so it generally only lasts for a short period of time, and the best viewing and shooting time is even shorter. So when you encounter a rainbow, how can you properly record it and photograph it with quality? 1. Look for rainbows. In addition to the conditions mentioned above, rainbows usually appear in the direction of sunlight, that is, if the sun shines from west to east, rainbows are more likely to appear in the east.
 Comparing the performance of Win11 and Win10 systems, which one is better?
Mar 27, 2024 pm 05:09 PM
Comparing the performance of Win11 and Win10 systems, which one is better?
Mar 27, 2024 pm 05:09 PM
The Windows operating system has always been one of the most widely used operating systems on personal computers, and Windows 10 has long been Microsoft's flagship operating system until recently when Microsoft launched the new Windows 11 system. With the launch of Windows 11 system, people have become interested in the performance differences between Windows 10 and Windows 11 systems. Which one is better between the two? First, let’s take a look at W
 Must read before purchasing a system: Analysis of the advantages and disadvantages of Win11 and Win10
Mar 28, 2024 pm 01:33 PM
Must read before purchasing a system: Analysis of the advantages and disadvantages of Win11 and Win10
Mar 28, 2024 pm 01:33 PM
In today's information age, personal computers play an important role as an indispensable tool in our daily lives. As one of the core software of computers, the operating system affects our usage experience and work efficiency. In the market, Microsoft's Windows operating system has always occupied a dominant position, and now people face the choice between the latest Windows 11 and the old Windows 10. For ordinary consumers, when choosing an operating system, they do not just look at the version number, but also understand its advantages and disadvantages.
 Tutorial on how to turn off the payment sound on WeChat
Mar 26, 2024 am 08:30 AM
Tutorial on how to turn off the payment sound on WeChat
Mar 26, 2024 am 08:30 AM
1. First open WeChat. 2. Click [+] in the upper right corner. 3. Click the QR code to collect payment. 4. Click the three small dots in the upper right corner. 5. Click to close the voice reminder for payment arrival.
 Detailed steps to install Go language on Win7 computer
Mar 27, 2024 pm 02:00 PM
Detailed steps to install Go language on Win7 computer
Mar 27, 2024 pm 02:00 PM
Detailed steps to install Go language on Win7 computer Go (also known as Golang) is an open source programming language developed by Google. It is simple, efficient and has excellent concurrency performance. It is suitable for the development of cloud services, network applications and back-end systems. . Installing the Go language on a Win7 computer allows you to quickly get started with the language and start writing Go programs. The following will introduce in detail the steps to install the Go language on a Win7 computer, and attach specific code examples. Step 1: Download the Go language installation package and visit the Go official website
 How to install Go language under Win7 system?
Mar 27, 2024 pm 01:42 PM
How to install Go language under Win7 system?
Mar 27, 2024 pm 01:42 PM
Installing Go language under Win7 system is a relatively simple operation. Just follow the following steps to successfully install it. The following will introduce in detail how to install Go language under Win7 system. Step 1: Download the Go language installation package. First, open the Go language official website (https://golang.org/) and enter the download page. On the download page, select the installation package version compatible with Win7 system to download. Click the Download button and wait for the installation package to download. Step 2: Install Go language
