How to remotely manage the server using deepin20 terminal
Linux system is mainly used for servers. As operation and maintenance personnel, you have to log in to the server through SSH every day for server management. It will be troublesome to enter the SSH command every time. The terminal interface of deepin20 provides SSH remote management. Server functions, let’s take a look at the detailed tutorial below.

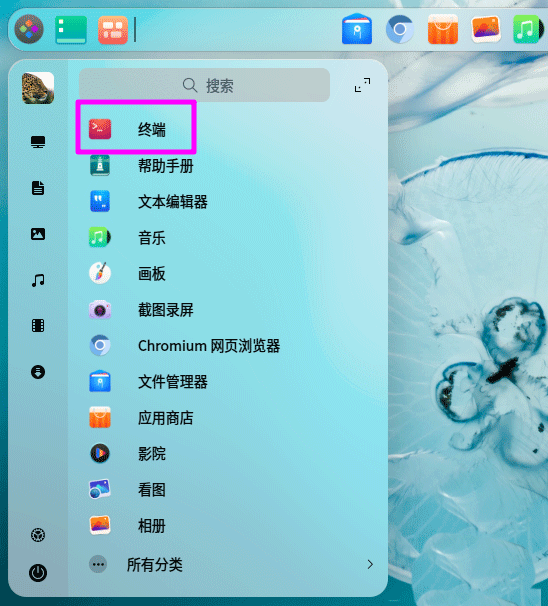
1. Click the launcher on the taskbar, find and click to open the terminal.
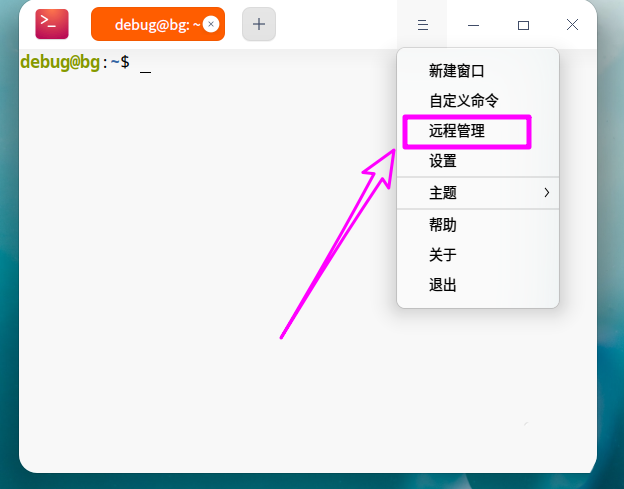
2. Click the menu button in the upper right corner of the terminal and click [Remote Management] in the drop-down menu.
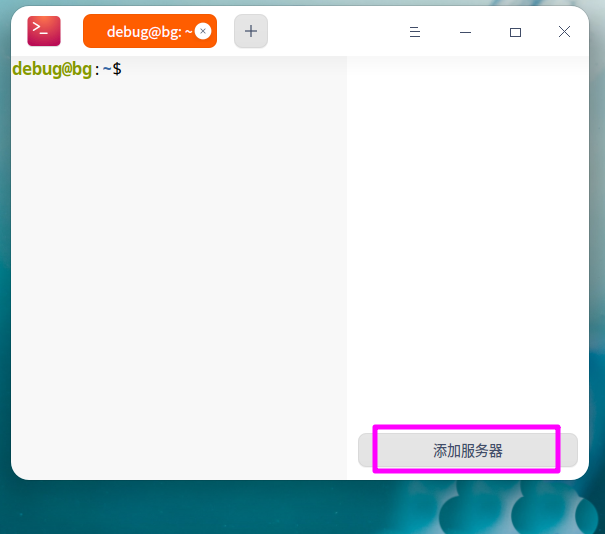
3. Then click [Add Server].
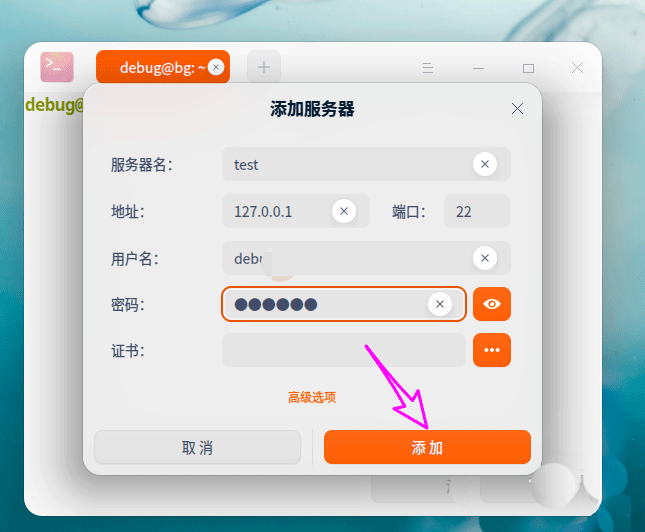
4. Set the IP address and port number of the ssh server, as well as the login username and password. If you use a certificate, click the [Certificate] column to add the certificate. If you want to manage multiple servers at the same time, pay attention to distinguishing it from other servers when setting [server name].
5. After the addition is completed, you can see that the remote management server will be automatically added to the remote management list. In the future, the user only needs to open [Remote Management] and click on the remote server to automatically realize the link.
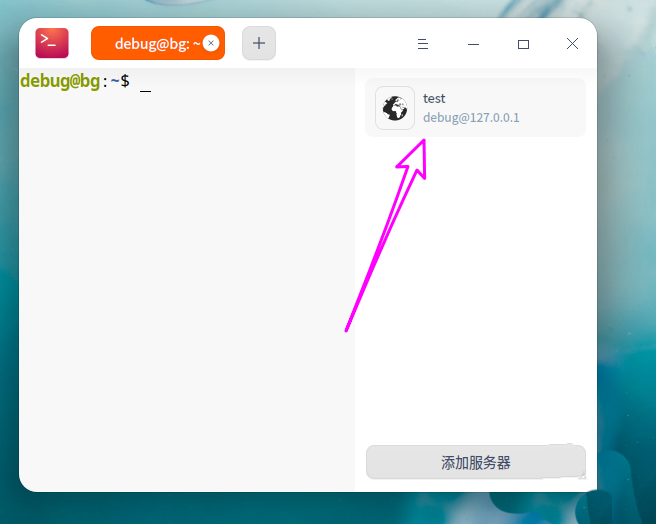
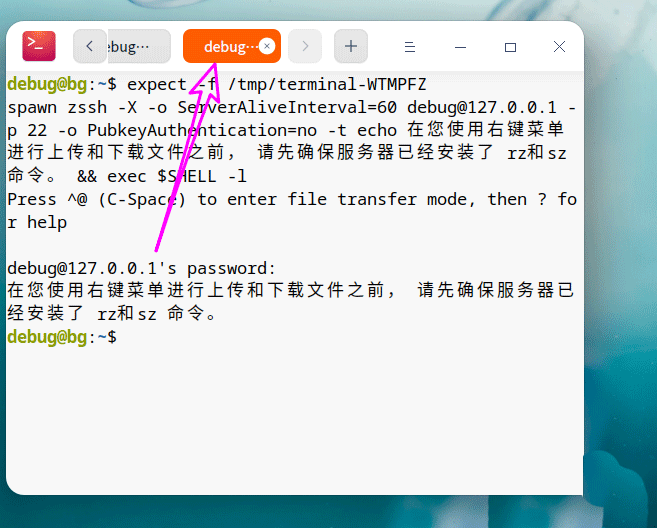
6, Remote Management Click the remote server and the connection is successful, as shown in the figure below.
The above is the detailed content of How to remotely manage the server using deepin20 terminal. For more information, please follow other related articles on the PHP Chinese website!

Hot AI Tools

Undresser.AI Undress
AI-powered app for creating realistic nude photos

AI Clothes Remover
Online AI tool for removing clothes from photos.

Undress AI Tool
Undress images for free

Clothoff.io
AI clothes remover

AI Hentai Generator
Generate AI Hentai for free.

Hot Article

Hot Tools

Notepad++7.3.1
Easy-to-use and free code editor

SublimeText3 Chinese version
Chinese version, very easy to use

Zend Studio 13.0.1
Powerful PHP integrated development environment

Dreamweaver CS6
Visual web development tools

SublimeText3 Mac version
God-level code editing software (SublimeText3)

Hot Topics
 How to solve the problem that eMule search cannot connect to the server
Jan 25, 2024 pm 02:45 PM
Solution: 1. Check the eMule settings to make sure you have entered the correct server address and port number; 2. Check the network connection, make sure the computer is connected to the Internet, and reset the router; 3. Check whether the server is online. If your settings are If there is no problem with the network connection, you need to check whether the server is online; 4. Update the eMule version, visit the eMule official website, and download the latest version of the eMule software; 5. Seek help.
 Detailed explanation of CentOS installation fuse and CentOS installation server
Feb 13, 2024 pm 08:40 PM
As a LINUX user, we often need to install various software and servers on CentOS. This article will introduce in detail how to install fuse and set up a server on CentOS to help you complete the related operations smoothly. CentOS installation fuseFuse is a user space file system framework that allows unprivileged users to access and operate the file system through a customized file system. Installing fuse on CentOS is very simple, just follow the following steps: 1. Open the terminal and Log in as root user. 2. Use the following command to install the fuse package: ```yuminstallfuse3. Confirm the prompts during the installation process and enter `y` to continue. 4. Installation completed
 Solution to the inability to connect to the RPC server and the inability to enter the desktop
Feb 18, 2024 am 10:34 AM
What should I do if the RPC server is unavailable and cannot be accessed on the desktop? In recent years, computers and the Internet have penetrated into every corner of our lives. As a technology for centralized computing and resource sharing, Remote Procedure Call (RPC) plays a vital role in network communication. However, sometimes we may encounter a situation where the RPC server is unavailable, resulting in the inability to enter the desktop. This article will describe some of the possible causes of this problem and provide solutions. First, we need to understand why the RPC server is unavailable. RPC server is a
 Best Practice Guide for Building IP Proxy Servers with PHP
Mar 11, 2024 am 08:36 AM
In network data transmission, IP proxy servers play an important role, helping users hide their real IP addresses, protect privacy, and improve access speeds. In this article, we will introduce the best practice guide on how to build an IP proxy server with PHP and provide specific code examples. What is an IP proxy server? An IP proxy server is an intermediate server located between the user and the target server. It acts as a transfer station between the user and the target server, forwarding the user's requests and responses. By using an IP proxy server
 What should I do if the deepin taskbar does not show up? What should I do if the deepin taskbar disappears?
Feb 29, 2024 am 11:01 AM
When our computer system is updated, some computer novices can't wait to install and use the new system, but they don't know that new computer systems often have many bugs. For example, the new system deepin system, many friends found that the taskbar was missing during the process of downloading and using it! So how do we find the taskbar? The editor will take you to take a look at it below! Method 1: 1. Turn off taskbar synchronization in cloud synchronization. 2. Delete the rm~/.config/dconf or rm~/.config/dconf-rf folder. 3. Restart to solve the problem. Method 2: 1. Press "ctrl+alt+t" to enter the terminal. 2. Then enter the command: sudoapt-getu
 How to configure Dnsmasq as a DHCP relay server
Mar 21, 2024 am 08:50 AM
The role of a DHCP relay is to forward received DHCP packets to another DHCP server on the network, even if the two servers are on different subnets. By using a DHCP relay, you can deploy a centralized DHCP server in the network center and use it to dynamically assign IP addresses to all network subnets/VLANs. Dnsmasq is a commonly used DNS and DHCP protocol server that can be configured as a DHCP relay server to help manage dynamic host configurations in the network. In this article, we will show you how to configure dnsmasq as a DHCP relay server. Content Topics: Network Topology Configuring Static IP Addresses on a DHCP Relay D on a Centralized DHCP Server
 How to set the screen resolution in deepin system? How to set the resolution in deepin
Jan 06, 2024 pm 09:30 PM
It is very common to set the resolution in deepin. How to set it? Let’s take a look at the detailed tutorial below. Method 1. Setting under graphics 1. Click "Control Center" on the taskbar. 2. Select "Display" in the Control Center. 3. In the display, click "Resolution". 4. In the pop-up window, you can see the resolutions supported by the current system, and select the corresponding resolution to set. Method 2. Command setting method 1. You can set the screen resolution through the xrandr command. First query the current resolution and currently supported resolutions. The current resolution of xrandr-q is 1680x10502, you can pass the -s parameter
 What should I do if I can't enter the game when the epic server is offline? Solution to why Epic cannot enter the game offline
Mar 13, 2024 pm 04:40 PM
What should I do if I can’t enter the game when the epic server is offline? This problem must have been encountered by many friends. When this prompt appears, the genuine game cannot be started. This problem is usually caused by interference from the network and security software. So how should it be solved? The editor of this issue will explain I would like to share the solution with you, I hope today’s software tutorial can help you solve the problem. What to do if the epic server cannot enter the game when it is offline: 1. It may be interfered by security software. Close the game platform and security software and then restart. 2. The second is that the network fluctuates too much. Try restarting the router to see if it works. If the conditions are OK, you can try to use the 5g mobile network to operate. 3. Then there may be more


