 System Tutorial
 LINUX
LINUX
 Detailed explanation of dual network card master and backup mode configuration under CentOS
Detailed explanation of dual network card master and backup mode configuration under CentOS
1 Brief description
Set the active and backup mode through dual network cards, so that when one network card fails, the other network card can automatically replace the failed network card to ensure normal network access.
2 Implementation
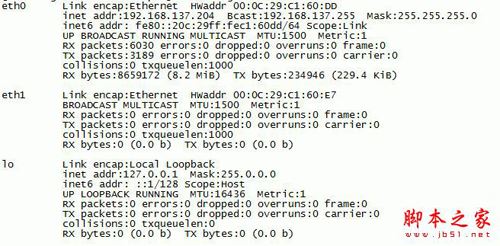
2.1. View network card information
Execute ifconfig -a command

2.2. Modify the network card configuration file
Switch working directory
cd /etc/sysconfig/network-scripts/
Modify the network card configuration file ifcfg-eth0 and ensure that the following contents are correct:
TYPE=Ethernet
BOOTPROTO=dhcp
ONBOOT=yes
MASTER=bond0
SLAVE=yes
Modify the network card configuration file ifcfg-eth1. If it is not created, ensure that the following contents are correct (same as above):
DEVICE=eth1
TYPE=Ethernet
BOOTPROTO=dhcp
ONBOOT=yes
MASTER=bond0
SLAVE=yes
2.3. Virtual network card file configuration
Create a file
touch ifcfg-bond0
Edit the file and add the following content:
DEVICE=bond0
TYPE= Ethernet
ONBOOT=yes
BOOTPROTO=none
IPADDR="192.168.137.243"
NETMASK="255.255.255.0"
GATEWAY="192.168.137.1"
DNS="192.168.137.1"
NAME=bond0
BONDING_OPTS=”miimon=100 mode=1”
Note: If BONDING_OPTS is in a virtual machine, you need to add fail_over_mac=1 such as BONDING_OPTS=”miimon=100 mode=1 fail_over_mac=1”
The following items should be set according to the network environment:
IPADDR="192.168.137.243"
NETMASK="255.255.255.0"
GATEWAY="192.168.137.1"
DNS="192.168.137.1"
PREFIX=24
2.4. Restart the service
implement :
service network restart
Or reboot to restart the server
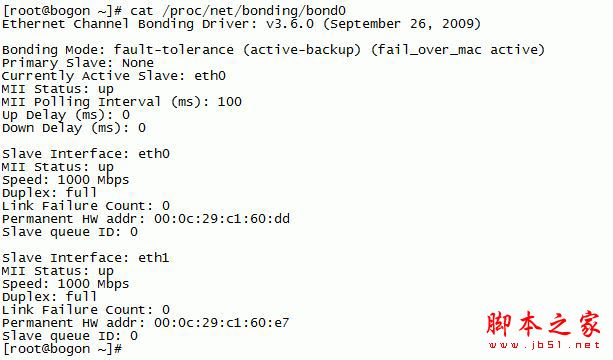
2.5. Check status
ifconfig

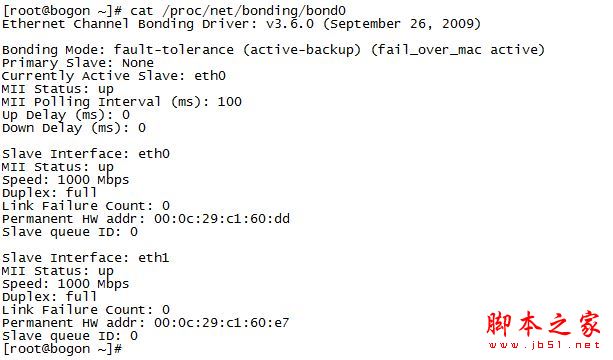
View active and backup information:

2.6. Test
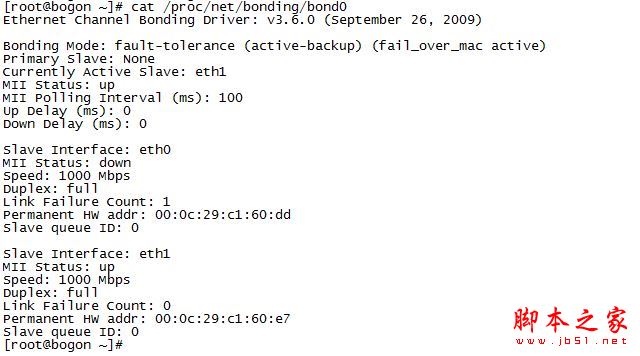
Close the network card eth0
ifconfig eth0 down
Ping the ip to see if it can be connected.
Check whether the primary and secondary switches are switched:

Finish
The above is the detailed content of Detailed explanation of dual network card master and backup mode configuration under CentOS. For more information, please follow other related articles on the PHP Chinese website!

Hot AI Tools

Undresser.AI Undress
AI-powered app for creating realistic nude photos

AI Clothes Remover
Online AI tool for removing clothes from photos.

Undress AI Tool
Undress images for free

Clothoff.io
AI clothes remover

Video Face Swap
Swap faces in any video effortlessly with our completely free AI face swap tool!

Hot Article

Hot Tools

Notepad++7.3.1
Easy-to-use and free code editor

SublimeText3 Chinese version
Chinese version, very easy to use

Zend Studio 13.0.1
Powerful PHP integrated development environment

Dreamweaver CS6
Visual web development tools

SublimeText3 Mac version
God-level code editing software (SublimeText3)

Hot Topics
 1386
1386
 52
52
 How to optimize CentOS HDFS configuration
Apr 14, 2025 pm 07:15 PM
Improve HDFS performance on CentOS: A comprehensive optimization guide to optimize HDFS (Hadoop distributed file system) on CentOS requires comprehensive consideration of hardware, system configuration and network settings. This article provides a series of optimization strategies to help you improve HDFS performance. 1. Hardware upgrade and selection resource expansion: Increase the CPU, memory and storage capacity of the server as much as possible. High-performance hardware: adopts high-performance network cards and switches to improve network throughput. 2. System configuration fine-tuning kernel parameter adjustment: Modify /etc/sysctl.conf file to optimize kernel parameters such as TCP connection number, file handle number and memory management. For example, adjust TCP connection status and buffer size
 Centos stops maintenance 2024
Apr 14, 2025 pm 08:39 PM
CentOS will be shut down in 2024 because its upstream distribution, RHEL 8, has been shut down. This shutdown will affect the CentOS 8 system, preventing it from continuing to receive updates. Users should plan for migration, and recommended options include CentOS Stream, AlmaLinux, and Rocky Linux to keep the system safe and stable.
 What are the backup methods for GitLab on CentOS
Apr 14, 2025 pm 05:33 PM
Backup and Recovery Policy of GitLab under CentOS System In order to ensure data security and recoverability, GitLab on CentOS provides a variety of backup methods. This article will introduce several common backup methods, configuration parameters and recovery processes in detail to help you establish a complete GitLab backup and recovery strategy. 1. Manual backup Use the gitlab-rakegitlab:backup:create command to execute manual backup. This command backs up key information such as GitLab repository, database, users, user groups, keys, and permissions. The default backup file is stored in the /var/opt/gitlab/backups directory. You can modify /etc/gitlab
 How to check CentOS HDFS configuration
Apr 14, 2025 pm 07:21 PM
Complete Guide to Checking HDFS Configuration in CentOS Systems This article will guide you how to effectively check the configuration and running status of HDFS on CentOS systems. The following steps will help you fully understand the setup and operation of HDFS. Verify Hadoop environment variable: First, make sure the Hadoop environment variable is set correctly. In the terminal, execute the following command to verify that Hadoop is installed and configured correctly: hadoopversion Check HDFS configuration file: The core configuration file of HDFS is located in the /etc/hadoop/conf/ directory, where core-site.xml and hdfs-site.xml are crucial. use
 Centos shutdown command line
Apr 14, 2025 pm 09:12 PM
The CentOS shutdown command is shutdown, and the syntax is shutdown [Options] Time [Information]. Options include: -h Stop the system immediately; -P Turn off the power after shutdown; -r restart; -t Waiting time. Times can be specified as immediate (now), minutes ( minutes), or a specific time (hh:mm). Added information can be displayed in system messages.
 What is the CentOS MongoDB backup strategy?
Apr 14, 2025 pm 04:51 PM
Detailed explanation of MongoDB efficient backup strategy under CentOS system This article will introduce in detail the various strategies for implementing MongoDB backup on CentOS system to ensure data security and business continuity. We will cover manual backups, timed backups, automated script backups, and backup methods in Docker container environments, and provide best practices for backup file management. Manual backup: Use the mongodump command to perform manual full backup, for example: mongodump-hlocalhost:27017-u username-p password-d database name-o/backup directory This command will export the data and metadata of the specified database to the specified backup directory.
 What steps are required to configure CentOS in HDFS
Apr 14, 2025 pm 06:42 PM
Building a Hadoop Distributed File System (HDFS) on a CentOS system requires multiple steps. This article provides a brief configuration guide. 1. Prepare to install JDK in the early stage: Install JavaDevelopmentKit (JDK) on all nodes, and the version must be compatible with Hadoop. The installation package can be downloaded from the Oracle official website. Environment variable configuration: Edit /etc/profile file, set Java and Hadoop environment variables, so that the system can find the installation path of JDK and Hadoop. 2. Security configuration: SSH password-free login to generate SSH key: Use the ssh-keygen command on each node
 Centos install mysql
Apr 14, 2025 pm 08:09 PM
Installing MySQL on CentOS involves the following steps: Adding the appropriate MySQL yum source. Execute the yum install mysql-server command to install the MySQL server. Use the mysql_secure_installation command to make security settings, such as setting the root user password. Customize the MySQL configuration file as needed. Tune MySQL parameters and optimize databases for performance.


