

How to set win11ipv4 address

Generally speaking, our computer can only browse the Internet if it has an ipv4 address. If it is not set up properly, it cannot surf the Internet. So how should we set the ipv4 address in win11? Let’s take a look. Bar.
How to set the win11ipv4 address:
1. First, we click on the network icon in the lower right corner and click.
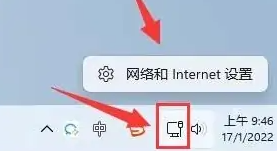
2. Then click "Ethernet".

3. Then click "ip allocation".

4. Change the ip setting to manual.

5. Finally, turn on the ipv4 button, enter the address and click save.

Extension: Where to find the address
The above is the detailed content of How to set win11ipv4 address. For more information, please follow other related articles on the PHP Chinese website!

Hot AI Tools

Undresser.AI Undress
AI-powered app for creating realistic nude photos

AI Clothes Remover
Online AI tool for removing clothes from photos.

Undress AI Tool
Undress images for free

Clothoff.io
AI clothes remover

AI Hentai Generator
Generate AI Hentai for free.

Hot Article
Hot Tools

Notepad++7.3.1
Easy-to-use and free code editor

SublimeText3 Chinese version
Chinese version, very easy to use

Zend Studio 13.0.1
Powerful PHP integrated development environment

Dreamweaver CS6
Visual web development tools

SublimeText3 Mac version
God-level code editing software (SublimeText3)
Hot Topics


 How to set the scheduled time for publishing works on Douyin? How does it set the video duration?
Mar 27, 2024 pm 06:11 PM
How to set the scheduled time for publishing works on Douyin? How does it set the video duration?
Mar 27, 2024 pm 06:11 PM
Publishing works on Douyin can attract more attention and likes, but sometimes it may be difficult for us to publish works in real time. In this case, we can use Douyin's scheduled release function. Douyin’s scheduled release function allows users to automatically publish works at a scheduled time, which can better plan the release plan and increase the exposure and influence of the work. 1. How to set the scheduled time for publishing works on Douyin? To set a scheduled release time, first go to Douyin's personal homepage, find the "+" button in the upper right corner, and click to enter the release page. There is a clock icon in the lower right corner of the publishing page. Click to enter the scheduled publishing interface. In the interface, you can choose the type of work you want to publish, including short videos, long videos, and live broadcasts. Next, you need to set a time for your work to be published. TikTok provides
 Where is the Douyin tag set? How can it be tagged so that it can be pushed accurately?
Mar 27, 2024 am 11:01 AM
Where is the Douyin tag set? How can it be tagged so that it can be pushed accurately?
Mar 27, 2024 am 11:01 AM
As one of the most popular short video platforms in the world, Douyin allows everyone to become a creator and share every moment of life. For Douyin users, tags are a very important function. It can help users better classify and retrieve content, and also allows the platform to push appropriate content to users more accurately. So, where are the Douyin tags set? This article will explain in detail how to set up and use tags on Douyin. 1. Where is the Douyin tag set? Using tags on Douyin can help users better classify and label their works, making it easier for other users to find and follow them. The method to set the label is as follows: 1. Open the Douyin APP and log in to your account. 2. Click the "+" sign at the bottom of the screen and select the "Publish" button. 3.
 How to use shortcut keys to take screenshots in Win8?
Mar 28, 2024 am 08:33 AM
How to use shortcut keys to take screenshots in Win8?
Mar 28, 2024 am 08:33 AM
How to use shortcut keys to take screenshots in Win8? In our daily use of computers, we often need to take screenshots of the content on the screen. For users of Windows 8 system, taking screenshots through shortcut keys is a convenient and efficient operation method. In this article, we will introduce several commonly used shortcut keys to take screenshots in Windows 8 system to help you take screenshots more quickly. The first method is to use the "Win key + PrintScreen key" key combination to perform full
 Comparing the performance of Win11 and Win10 systems, which one is better?
Mar 27, 2024 pm 05:09 PM
Comparing the performance of Win11 and Win10 systems, which one is better?
Mar 27, 2024 pm 05:09 PM
The Windows operating system has always been one of the most widely used operating systems on personal computers, and Windows 10 has long been Microsoft's flagship operating system until recently when Microsoft launched the new Windows 11 system. With the launch of Windows 11 system, people have become interested in the performance differences between Windows 10 and Windows 11 systems. Which one is better between the two? First, let’s take a look at W
 Win11 Tips Sharing: Skip Microsoft Account Login with One Trick
Mar 27, 2024 pm 02:57 PM
Win11 Tips Sharing: Skip Microsoft Account Login with One Trick
Mar 27, 2024 pm 02:57 PM
Win11 Tips Sharing: One trick to skip Microsoft account login Windows 11 is the latest operating system launched by Microsoft, with a new design style and many practical functions. However, for some users, having to log in to their Microsoft account every time they boot up the system can be a bit annoying. If you are one of them, you might as well try the following tips, which will allow you to skip logging in with a Microsoft account and enter the desktop interface directly. First, we need to create a local account in the system to log in instead of a Microsoft account. The advantage of doing this is
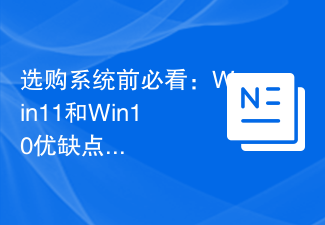 Must read before purchasing a system: Analysis of the advantages and disadvantages of Win11 and Win10
Mar 28, 2024 pm 01:33 PM
Must read before purchasing a system: Analysis of the advantages and disadvantages of Win11 and Win10
Mar 28, 2024 pm 01:33 PM
In today's information age, personal computers play an important role as an indispensable tool in our daily lives. As one of the core software of computers, the operating system affects our usage experience and work efficiency. In the market, Microsoft's Windows operating system has always occupied a dominant position, and now people face the choice between the latest Windows 11 and the old Windows 10. For ordinary consumers, when choosing an operating system, they do not just look at the version number, but also understand its advantages and disadvantages.
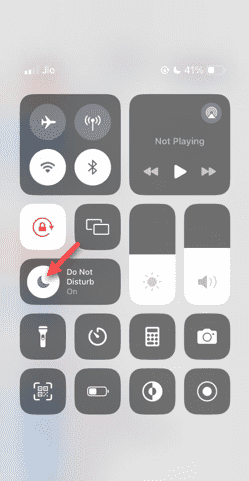 Do Not Disturb Mode Not Working in iPhone: Fix
Apr 24, 2024 pm 04:50 PM
Do Not Disturb Mode Not Working in iPhone: Fix
Apr 24, 2024 pm 04:50 PM
Even answering calls in Do Not Disturb mode can be a very annoying experience. As the name suggests, Do Not Disturb mode turns off all incoming call notifications and alerts from emails, messages, etc. You can follow these solution sets to fix it. Fix 1 – Enable Focus Mode Enable focus mode on your phone. Step 1 – Swipe down from the top to access Control Center. Step 2 – Next, enable “Focus Mode” on your phone. Focus Mode enables Do Not Disturb mode on your phone. It won't cause any incoming call alerts to appear on your phone. Fix 2 – Change Focus Mode Settings If there are some issues in the focus mode settings, you should fix them. Step 1 – Open your iPhone settings window. Step 2 – Next, turn on the Focus mode settings
 How to set the watermark in the middle on Weibo_How to set the watermark in the middle on Weibo
Mar 29, 2024 pm 03:31 PM
How to set the watermark in the middle on Weibo_How to set the watermark in the middle on Weibo
Mar 29, 2024 pm 03:31 PM
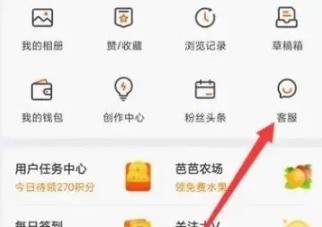
1. First enter Weibo, then click on me in the lower right corner and select [Customer Service]. 2. Then enter [Watermark] in the search box and select [Set Weibo Image Watermark]. 3. Then click [Link] in the interface. 4. Then click [Image Watermark Settings] in the newly opened window. 5. Finally, check [Picture Center] and click [Save].
