
 System Tutorial
LINUX
Installing maven under centos6.x How to automatically install Maven on CentOS
System Tutorial
LINUX
Installing maven under centos6.x How to automatically install Maven on CentOS
Installing maven under centos6.x How to automatically install Maven on CentOS

centos6.x下安装maven
1.下载maven包
首先从官网上 https://www.php.cn/link/4e4551a346eb4ca8e91a4651036c5aa9 下载最新版Maven。
本人下载包为apache-maven-3.2.1-bin.tar.gz

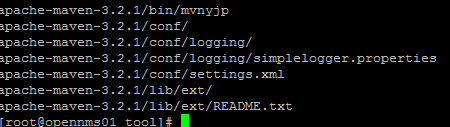
执行tar -zxvf apache-maven-3.2.1-bin.tar.gz
 下图为减压成功页面
 3.放在期望目录下(可选)
把减压好的文件放在/opt目录下
执行sudo mv apache-maven-3.2.1 /opt

执行 ln -s apache-maven-3.2.1 apache-maven

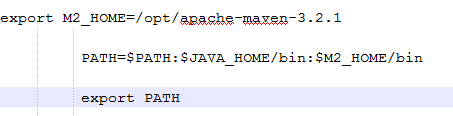 6.改动生效
执行source /etc/profile是profile文件生效
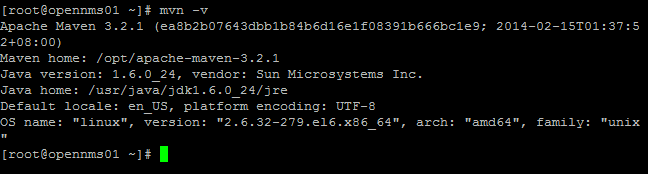
 7.查看是否配置成功
执行mvn –v
2. 设置环境变量
3. 配置mirror
安装:下载 maven.rar 按照 readme 执行即可
mirror配置:
<mirror>
<id>alimaven</id>
<name>aliyun maven</name>
<url>http://maven.aliyun.com/nexus/content/groups/public/</url>
<mirrorOf>central</mirrorOf>
</mirror>
<mirror>
<id>central</id>
<name>Maven Repository Switchboard</name>
<url>http://repo1.maven.org/maven2/</url>
<mirrorOf>central</mirrorOf>
</mirror>
<mirror>
<id>repo2</id>
<mirrorOf>central</mirrorOf>
<name>Human Readable Name for this Mirror.</name>
<url>http://repo2.maven.org/maven2/</url>
</mirror>
<mirror>
<id>ibiblio</id>
<mirrorOf>central</mirrorOf>
<name>Human Readable Name for this Mirror.</name>
<url>http://mirrors.ibiblio.org/pub/mirrors/maven2/</url>
</mirror>
<mirror>
<id>jboss-public-repository-group</id>
<mirrorOf>central</mirrorOf>
<name>JBoss Public Repository Group</name>
<url>http://repository.jboss.org/nexus/content/groups/public</url>
</mirror>
<mirror>
<id>maven.net.cn</id>
<name>oneof the central mirrors in china</name>
<url>http://maven.net.cn/content/groups/public/</url>
<mirrorOf>central</mirrorOf>
</mirror>
#!/bin/sh

#关闭进程
killpids(){
pids=($(ps -ef | grep $1 | awk '{print $2}'))
for pid in ${pids[@]}; do
echo "关闭进程: pid ${pid}"
kill -9 ${pid}
done
}
killpids maven

#删除旧版maven
echo "删除旧版maven"
rm -rf /usr/local/apache-maven-*

#install maven
srcPath=$(find /usr/maven -maxdepth 1 -type f|grep '.*maven.*.tar.gz$')
if [[ $srcPath =~ "maven" ]]
then
echo "安装包:$srcPath"
rpm -ivh $srcPath
else
#下载maven
yum -y install wget
echo -e "Download Maven"
wget http://mirrors.tuna.tsinghua.edu.cn/apache/maven/maven-3/3.3.9/binaries/apache-maven-3.3.9-bin.tar.gz -P /usr/maven/
srcPath=$(find /usr/maven -maxdepth 1 -type f|grep '.*maven.*.tar.gz$')
fi

#解压
echo "解压..."
tar -xf $srcPath -C /usr/local

path=$(find /usr/local -maxdepth 1 -type d|grep 'apache-maven-.*')
dir_name=${path##*/}
echo $path
echo $dir_name

#赋予权限
chmod -R 755 $path

#设置环境变量
sed -i '/M2_HOME/d' /etc/profile
echo "设置环境变量"
echo "export M2_HOME=$path" >> /etc/profile
echo 'export PATH=$PATH:$M2_HOME/bin' >> /etc/profile
source /etc/profile

echo "建立软链接 $path -> apache-maven"
ln -s $path apache-maven

echo "配置 mirrors"

IFSBAK=$IFS #备份原来的值
IFS=#
mirror="
# <mirror>
# <id>alimaven</id>
# <name>aliyun maven</name>
# <url>http://maven.aliyun.com/nexus/content/groups/public/</url>
# <mirrorOf>central</mirrorOf>
# </mirror>
# <mirror>
# <id>central</id>
# <name>Maven Repository Switchboard</name>
# <url>http://repo1.maven.org/maven2/</url>
# <mirrorOf>central</mirrorOf>
# </mirror>
# <mirror>
# <id>repo2</id>
# <mirrorOf>central</mirrorOf>
# <name>Human Readable Name for this Mirror.</name>
# <url>http://repo2.maven.org/maven2/</url>
# </mirror>
# <mirror>
# <id>ibiblio</id>
# <mirrorOf>central</mirrorOf>
# <name>Human Readable Name for this Mirror.</name>
# <url>http://mirrors.ibiblio.org/pub/mirrors/maven2/</url>
# </mirror>
# <mirror>
# <id>jboss-public-repository-group</id>
# <mirrorOf>central</mirrorOf>
# <name>JBoss Public Repository Group</name>
# <url>http://repository.jboss.org/nexus/content/groups/public</url>
# </mirror>
# <mirror>
# <id>maven.net.cn</id>
# <name>oneof the central mirrors in china</name>
# <url>http://maven.net.cn/content/groups/public/</url>
# <mirrorOf>central</mirrorOf>
# </mirror>
# '
"

#循环写入文件
for line in $mirror;
do
sed -i "/<\/mirrors>/i\ $line" $path/conf/settings.xml
done
IFS=$IFSBAK #还原


echo "mvn -v"
mvn -v
echo ""The above is the detailed content of Installing maven under centos6.x How to automatically install Maven on CentOS. For more information, please follow other related articles on the PHP Chinese website!

Hot AI Tools

Undresser.AI Undress
AI-powered app for creating realistic nude photos

AI Clothes Remover
Online AI tool for removing clothes from photos.

Undress AI Tool
Undress images for free

Clothoff.io
AI clothes remover

AI Hentai Generator
Generate AI Hentai for free.

Hot Article
Hot Tools

Notepad++7.3.1
Easy-to-use and free code editor

SublimeText3 Chinese version
Chinese version, very easy to use

Zend Studio 13.0.1
Powerful PHP integrated development environment

Dreamweaver CS6
Visual web development tools

SublimeText3 Mac version
God-level code editing software (SublimeText3)
Hot Topics
 1377
1377
 52
52

 How to input Chinese in centos
Apr 07, 2024 pm 08:21 PM
How to input Chinese in centos
Apr 07, 2024 pm 08:21 PM
Methods for using Chinese input in CentOS include: using the fcitx input method: install and enable fcitx, set shortcut keys, press the shortcut keys to switch input methods, and input pinyin to generate candidate words. Use iBus input method: Install and enable iBus, set shortcut keys, press the shortcut keys to switch input methods, and input pinyin to generate candidate words.
 How to read USB disk files in centos7
Apr 07, 2024 pm 08:18 PM
How to read USB disk files in centos7
Apr 07, 2024 pm 08:18 PM
To read U disk files in CentOS 7, you need to first connect the U disk and confirm its device name. Then, use the following steps to read the file: Mount the USB flash drive: mount /dev/sdb1 /media/sdb1 (replace "/dev/sdb1" with the actual device name) Browse the USB flash drive file: ls /media/sdb1; cd /media /sdb1/directory; cat file name
 SCP usage tips-recursively exclude files
Apr 22, 2024 am 09:04 AM
SCP usage tips-recursively exclude files
Apr 22, 2024 am 09:04 AM
One can use the scp command to securely copy files between network hosts. It uses ssh for data transfer and authentication. Typical syntax is: scpfile1user@host:/path/to/dest/scp -r/path/to/source/user@host:/path/to/dest/scp exclude files I don't think you can when using scp command Filter or exclude files. However, there is a good workaround to exclude the file and copy it securely using ssh. This page explains how to filter or exclude files when copying directories recursively using scp. How to use rsync command to exclude files The syntax is: rsyncav-essh-
 What to do if you forget your password to log in to centos
Apr 07, 2024 pm 07:33 PM
What to do if you forget your password to log in to centos
Apr 07, 2024 pm 07:33 PM
Solutions for forgotten CentOS passwords include: Single-user mode: Enter single-user mode and reset the password using passwd root. Rescue Mode: Boot from CentOS Live CD/USB, mount root partition and reset password. Remote access: Use SSH to connect remotely and reset the password with sudo passwd root.
 How to enable root permissions in centos7
Apr 07, 2024 pm 08:03 PM
How to enable root permissions in centos7
Apr 07, 2024 pm 08:03 PM
CentOS 7 disables root permissions by default. You can enable it by following the following steps: Temporarily enable it: Enter "su root" on the terminal and enter the root password. Permanently enabled: Edit "/etc/ssh/sshd_config", change "PermitRootLogin no" to "yes", and restart the SSH service.
 Java Maven build tool advancement: optimizing compilation speed and dependency management
Apr 17, 2024 pm 06:42 PM
Java Maven build tool advancement: optimizing compilation speed and dependency management
Apr 17, 2024 pm 06:42 PM
Optimize Maven build tools: Optimize compilation speed: Take advantage of parallel compilation and incremental compilation. Optimize dependencies: Analyze dependency trees and use BOM (bill of materials) to manage transitive dependencies. Practical case: illustrate optimizing compilation speed and dependency management through examples.
 How to obtain root permissions in centos7
Apr 07, 2024 pm 07:57 PM
How to obtain root permissions in centos7
Apr 07, 2024 pm 07:57 PM
There are several ways to gain root privileges in CentOS 7: 1. Run the command using "su". 2. Use "sudo" to run a single command. 3. Enable the root user and set a password. NOTE: Be cautious when using root privileges as they may damage the system.
 How to enter root permissions in centos
Apr 07, 2024 pm 08:06 PM
How to enter root permissions in centos
Apr 07, 2024 pm 08:06 PM
There are two ways to perform tasks with root privileges in CentOS: 1) Use the sudo command to temporarily obtain root privileges; 2) Log in directly using the root user password. Extreme caution should be used when using root privileges and it is recommended to only use them when necessary.
