

HTML5 SVG 2D Introduction 4—Stroke and Fill_html5 Tutorial Skills

Earlier we focused on summarizing various shapes, texts and pictures. Next, we will summarize the color processing, that is, the fill and border effects, just like we discussed canvas. You will find that the content here is basically the same as that of canvas. Consistent. These attributes can be written in the element as attributes or saved in CSS (this is different from canvas).
Fill color - fill attribute
This attribute uses the set color to fill the inside of the graphic. It is very simple to use. Just assign the color value to this attribute directly. Look at the example:
In the above example, a rectangle with red and blue edges is drawn. Note a few points:
1. If the fill attribute is not provided, black fill will be used by default. If you want to cancel the filling, you need to set it to none.
2. You can set the fill transparency, which is fill-opacity. The value range is 0 to 1.
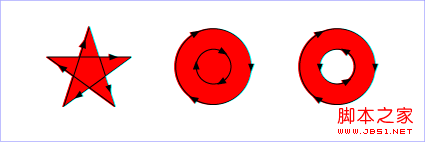
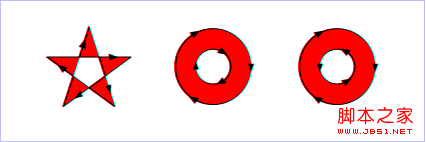
3. A little more complicated is the fill-rule attribute. This attribute defines the algorithm for judging whether a point belongs to the filling range; in addition to the value inherit, there are two values: nonzero: The algorithm used for this value is: launch a line from the point to be determined in any direction, and then calculate the direction of the intersection of the graph and the line segment; the calculation result starts from 0, and every intersection If the line segment at the intersection is from left to right, add 1; for each intersection point where the line segment is from right to left, decrease 1; after calculating all the intersection points, if the result of this calculation is not equal to 0, then the If the point is within the graphic, it needs to be filled; if the value is equal to 0, it is outside the graphic and does not need to be filled. Look at the example below:
Border color - stroke attribute
The stroke attribute has been used in the above example. This attribute uses the set value to draw the border of the graphic. It is also very straightforward to use. Just assign the color value to it. Note:
1. If the stroke attribute is not provided, the graphic border will not be drawn by default.
2. You can set the transparency of the edge, which is stroke-opacity. The value range is 0 to 1.
Actually, the edge situation is a little more complicated than inside the graph, because in addition to the color, the edge also has a "shape" that needs to be defined.
Endpoint of the line - stroke-linecap attribute
This attribute defines the style of the endpoint of the line segment. This attribute can use butt, square, round Three values. Look at the example:
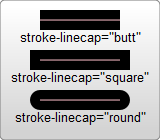
This code draws 3 lines using different style line endpoints,
From the picture on the left, we can easily see the differences in the 3 styles.
Line connection - stroke-linejoin attribute
This attribute defines the style of the line segment connection. This attribute can use three miter, round, bevel value. Look at the example:
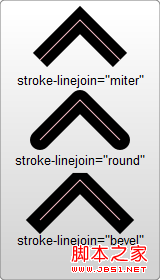
From the picture on the left, we can easily see the difference in the 3 styles.
The virtual and solid line - stroke-dasharray attribute
This attribute can set the virtual and solid line used for the line segment. Look at the example:
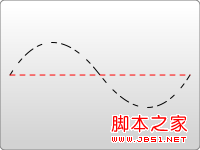
This attribute sets a series of numbers, but these numbers must be separated by commas.
Attributes can of course contain spaces, but spaces do not serve as separators. Each number
defines the length of the solid line segment, which is cycled in the order of drawing and not drawing.
So the line drawn in the example on the left is a solid line of 5 units, leaving 5 units of space,
Draw another 5 units of solid line...and continue like this.
In addition to these commonly used attributes, there are also the following attributes that can be set:
stroke-miterlimit: This is the same as in canvas. It handles the miter effect at the connection between when drawing and not drawing lines. .
stroke-dashoffset: This attribute sets the position where the dashed line starts to be drawn.
Use CSS to display data
HTML5 strengthens the idea of DIV CSS, so the data display part can also be left to CSS. Compared with ordinary HTML elements, it is just that background-color and border are replaced by fill and stroke. Most others are pretty much the same. Let’s take a simple example:
#MyRect:hover {
stroke: black;
fill: blue;
}
Isn’t it familiar? It’s that simple.
Practical reference:
Script index: http://msdn.microsoft.com/zh-cn/library/ff971910(v=vs.85).aspx
Development Center: https://developer.mozilla.org/en/SVG
Popular Reference: http://www.chinasvg.com/
Official documentation: http://www.w3.org/TR/SVG11/

Hot AI Tools

Undresser.AI Undress
AI-powered app for creating realistic nude photos

AI Clothes Remover
Online AI tool for removing clothes from photos.

Undress AI Tool
Undress images for free

Clothoff.io
AI clothes remover

AI Hentai Generator
Generate AI Hentai for free.

Hot Article
Hot Tools

Notepad++7.3.1
Easy-to-use and free code editor

SublimeText3 Chinese version
Chinese version, very easy to use

Zend Studio 13.0.1
Powerful PHP integrated development environment

Dreamweaver CS6
Visual web development tools

SublimeText3 Mac version
God-level code editing software (SublimeText3)
Hot Topics
 1384
1384
 52
52

 How to make an image look transparent in Microsoft Word
May 29, 2023 pm 02:01 PM
How to make an image look transparent in Microsoft Word
May 29, 2023 pm 02:01 PM
Changing the transparency of an image or fading an image into the background can also be done using Microsoft Word. It lets you adjust color and transparency, apply background effects, and more. In this article, we will see how easy and simple it is to make an image transparent in Word. How to make an image look transparent Step 1: Open Microsoft Word and click on the Insert option at the top Step 2: Click on the Shape drop-down menu and select the shape of your choice. Here I'm going to select the rectangle. Step 3: Draw a rectangle to select an area on the word page, then right-click on it. Step 4: Click the "Fill" drop-down menu from the options that appear and select "Picture" to add an image. Step 5: Click Stock
 Let's talk about how to use SVG to achieve image mosaic effect
Sep 01, 2022 am 11:05 AM
Let's talk about how to use SVG to achieve image mosaic effect
Sep 01, 2022 am 11:05 AM
How to use SVG to achieve image mosaic effect without using Javascript? The following article will give you a detailed understanding, I hope it will be helpful to you!
 Cannot use PS shortcut keys to fill
Feb 19, 2024 am 09:18 AM
Cannot use PS shortcut keys to fill
Feb 19, 2024 am 09:18 AM
With the development of the digital age, image processing software has become an indispensable part of our life and work. Among them, Photoshop (PS for short) developed by Adobe is one of the most famous image processing software. It has powerful functions and flexible operation, and is deeply loved by users. However, when using PS, some users reported that the shortcut key "Fill" cannot be used normally, which brings troubles to the user experience. Shortcut keys are a quick operation method provided in the software to avoid tedious mouse click operations.
 How to convert svg to jpg format
Nov 24, 2023 am 09:50 AM
How to convert svg to jpg format
Nov 24, 2023 am 09:50 AM
svg can be converted to jpg format by using image processing software, using online conversion tools, and using the Python image processing library. Detailed introduction: 1. Image processing software includes Adobe Illustrator, Inkscape and GIMP; 2. Online conversion tools include CloudConvert, Zamzar, Online Convert, etc.; 3. Python image processing library, etc.
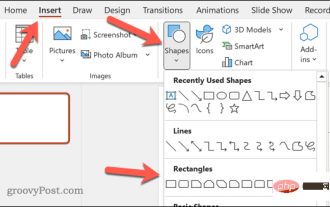 How to insert an image into a shape in PowerPoint
Apr 17, 2023 pm 02:28 PM
How to insert an image into a shape in PowerPoint
Apr 17, 2023 pm 02:28 PM
How to Insert an Image into a Shape in PowerPoint Inserting an image into a shape is useful for creating visual elements that stand out in your presentation. It could be an arrow, a heart, or a cross, but each of these shapes provides a purpose or emotion that can help your image pack a punch. If you're not sure how to insert an image into a shape in PowerPoint, follow these steps: Open your PowerPoint presentation. Click the Insert tab in the ribbon. Click the shape. Select the desired shape and draw it on the slide. Next, select the shape you drew and select the Format Shape tab on the ribbon bar. Click the shape fill. Fill dropdown menu from shape
 An in-depth analysis of how to use svg icons in vue3+vite
Apr 28, 2022 am 10:48 AM
An in-depth analysis of how to use svg icons in vue3+vite
Apr 28, 2022 am 10:48 AM
svg images are widely used in projects. The following article will introduce how to use svg icons in vue3 + vite. I hope it will be helpful to everyone!
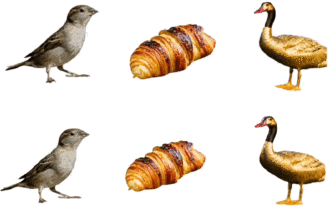 Produced by Peking University: The latest SOTA with texture quality and multi-view consistency, achieving 3D conversion of one image in 2 minutes
Jan 10, 2024 pm 11:09 PM
Produced by Peking University: The latest SOTA with texture quality and multi-view consistency, achieving 3D conversion of one image in 2 minutes
Jan 10, 2024 pm 11:09 PM
It only takes two minutes to convert pictures into 3D! It is also the kind with high texture quality and high consistency in multiple viewing angles. No matter what species it is, the single-view image when input is still like this: Two minutes later, the 3D version is completed: △ Upper, Repaint123 (NeRF); Lower, Repaint123 (GS) The new method is called Repaint123. The core idea is to combine 2D The powerful image generation capabilities of the diffusion model are combined with the texture alignment capabilities of the redraw strategy to generate high-quality, consistent images across multiple views. In addition, this study also introduces a visibility-aware adaptive repaint intensity method for overlapping regions. Repaint123 solves the problems of previous methods such as large multi-view deviation, texture degradation, and slow generation in one fell swoop. Current item
 Users can now select 'Verify when using Autofill' in Microsoft Edge Canary for Android
Nov 24, 2023 pm 11:05 PM
Users can now select 'Verify when using Autofill' in Microsoft Edge Canary for Android
Nov 24, 2023 pm 11:05 PM
Is Copilot the best AI companion out there? Help us find out by answering a few quick questions! Microsoft Edge Canary for Android adds a new security option called "Always verify when using Autofill." This option will require users to authenticate themselves before automatically filling in payment information. In my opinion, this seems to be a valuable addition to the browser, as it will help protect users from unauthorized access to their stored payment credentials. When the "Always verify when using autofill" option is enabled, users will be prompted to enter their fingerprint, PIN, or password before autofilling payment information. This will help ensure that only authorized users have access to their payment credentials. this function
