
 System Tutorial
LINUX
Debian 9.4 system installation and installation steps for Jdk and other tools
System Tutorial
LINUX
Debian 9.4 system installation and installation steps for Jdk and other tools
Debian 9.4 system installation and installation steps for Jdk and other tools

Installing Debian9.0.4 under Vmware
Create a new Vmware virtual machine
is relatively simple, skip this part
Install Debian9.0.4 in Vmware
Select the ISO image in the newly created virtual machine
Of course you can also refer to this article: https://www.jb51.net/os/619150.html
Start the virtual machine and see the following installation interface
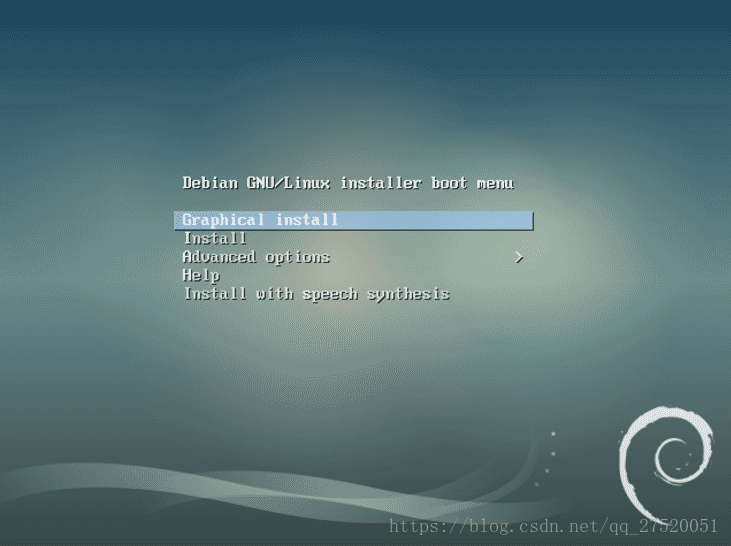
These options are:
- Graphical interface installation
- Install
- advanced options
- help
- Speech synthesis installation
We choose intall (if you need to install a graphical interface, you can choose the first one), and you will enter the language selection interface
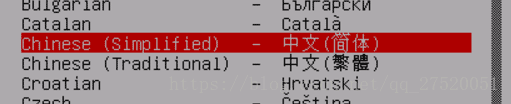
Select "Yes" for the next operation, and then continue to the next step.
If you need to enter a domain name, you can enter your own domain name. If not, you can use localhost or leave it empty.
Set root account password and user account password
Choose options according to your needs when dividing disks. For this installation, "Use the entire disk" is selected.
Next, you can choose to install it according to your needs. Such as whether to use network mirroring, etc.
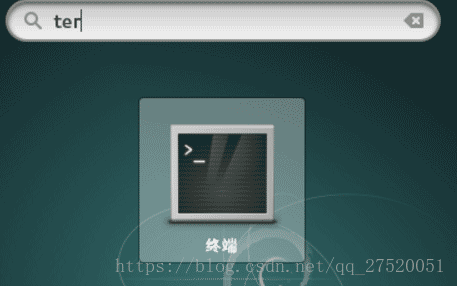
After the installation is complete, restart the virtual machine and enter the login interface. At this time, the graphical interface is used by default. After entering the system, click "Activities" in the upper left corner
Enter terminal in the search bar and click Terminal to enter the terminal
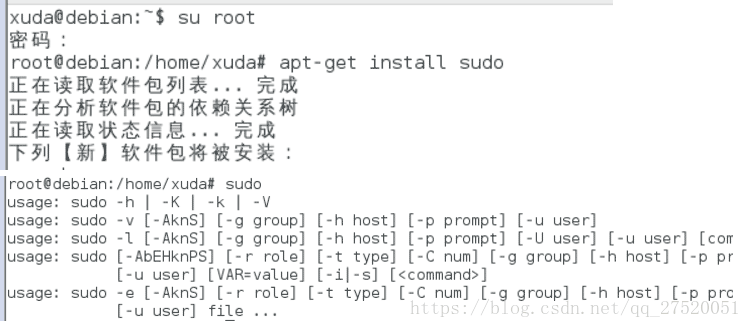
After the installation is successful, the following prompt will appear when using the sudo command:

This error occurs because: the basic operating system does not come with sudo, so we need to solve it ourselves.
The solution is as follows:
Use $su rootcommand to enter administrator privileges
Use apt-get install sudoInstall sudo
Resolve "xxx is not in the sudoers file. This matter will be reported".
When an ordinary user enters sudo XXX on the command line, the following error will appear:

The meaning of the sudo command is to allow the current user to execute commands as root. In fact, not all users can execute sudo, because users with permissions are in /etc/sudoers. So we can add permissions to users by editing the /etc/sudoers file.
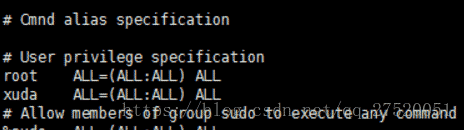
Because the file is 0440 and has read-only permission, use :wq! to force save after modification.
Opening and closing the graphical interface
After successful installation, the graphical interface will be entered by default. Our next operation hopes to be performed on the command line interface. Therefore, if you need to close the graphical interface, please refer to
for the specific closing process.It really can’t be hurt to play a virtual machine under 32-bit XP. The memory occupied by Linux is also increasing by leaps and bounds these days. If you want to have gnome and kde... just open two virtual machine systems and you will need more than 2G of memory. It starts to crawl into the virtual memory and becomes stuck. Fortunately, when I first learned Linux, I started from the command line. If Debian boots up and enters the command line directly, the memory of about 128M will be more than enough.
Linux under the redhat system can be easily switched through init 3 and init 5. Today I found that init2~5 under the debian system seem to open gdm3 by default, so this method does not work.
The first thing that comes to mind is
/etc/init.d/gdm3 stop
, but this is still not streamlined enough.
The second idea is to turn off the gdm3 service and use the command
update-rc.d gdm3 -f remove
Delete all gdm3 related scripts in the rcX.d folder, so that there will be no graphical menu after booting up
The final method is to change grub and modify /etc/default/grub
GRUB_CMDLINE_LINUX_DEFAULT="quiet [b]text[/b]"
after that
update-grub2
In this way, ordinary user login is logged in in command mode
If you suddenly want to use a graphical interface, then
/etc/init.d/gdm3 start
Install SSH Server
In the debian command line, enter $ sudo apt-get install ssh openssh-server to install SSH. After installing SSH, we can use putty or xshell to connect to debian in the virtual machine .
To connect to a virtual machine, you need to know the IP address of the virtual machine. You can use ifconfig under Linux to check the IP of the machine, but when you use it for the first time under Debian, the following error will occur:

This is because the Debian system does not come with its own network package, so you need to install it yourself. By using the following command:
$ sudo apt-get install net-tools
Complete input

Install JDK
Download JDK
You can first download using a physical machine and then upload using tools such as FileZilla
You can also use the wget command to download directly from the Internet. This tutorial uses the second method.

Install JDK
Unzip jdk

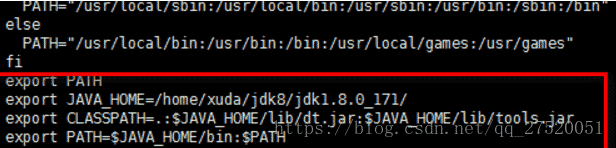
Configure environment variables
The path to the bin directory of jdk is: /home/xuda/jdk8/jdk1.8.0_171/bin. Next, you need to add environment variables
- Edit system environment variables
$ vi /etc/profile
//Append the following information to the file (root permissions are required)
export JAVA_HOME=/home/xuda/jdk8/jdk1.8.0_171/
export CLASSPATH=.:$JAVA_HOME/lib/dt.jar:$JAVA_HOME/lib/tools.jar
export PATH=$JAVA_HOME/bin:$PATH
- Load the previous configuration
$ source /etc/profile

- Verify configuration results
$ java -version

Install GCC compilation environment
Download gcc source code
Download this tutorial and use the following source code
http://ftp.tsukuba.wide.ad.jp/software/gcc/snapshots/8-20180504/
You can download it to the physical machine first, and then upload it to the virtual machine using tools such as FileZilla.
Install dependent libraries
$ apt install build-essential libgmp-dev libmpfr-dev libmpc-dev
Compile GCC
Unzip XXX.tar.xz
Because the downloaded package ends with .tar.xz, you can know that this compressed package has undergone two layers of compression, the outer layer is xz compression method, and the inner layer is tar compression method. So it needs to go through two layers of decompression.
//Decompress the first layer
$ xz -d gcc-8-20180504.tar.xz
//Decompress the second layer
$ tar -xvf gcc-8-20180504.tar.xz
At this point we will get the decompressed file

Compile and install
//1. Enter the directory
$ cd gcc-8-20180504/
//2. Compile and automatically generate makefile
$ ./configure --disable-multilib
//3. Run the following commands
$ make
//4. Wait for a while and then run
$ make install
//5. Restart and enter
$ gcc -version
In addition, there are many ways to install
1.apt-get install gcc
2.apt-get install make
3.apt-get install gdb
4.apt-get install build-essential
- Installation reference address
Install MySQL
In fact, this step can be installed directly using the apt-get toolkit. The purpose of the apt-get toolkit is to simplify the operation of Linux, and the usage effect is the same
Download the installation package
This tutorial is to install Mysql
download
$ wget https://cdn.mysql.com//Downloads/MySQL-8.0/mysql-8.0.11-linux-glibc2.12-x86_64.tar.gz
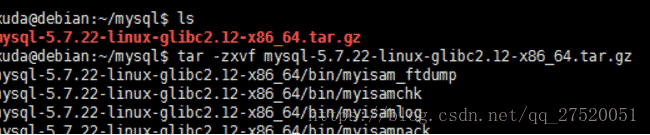
Unzip
$ tar -zxvf mysql-5.7.22-linux-glibc2.12-x86_64.tar.gz
Add user combination user
//Add user group
$ groupadd mysql
//Add user mysql to user group mysql
$ useradd -g mysql mysql

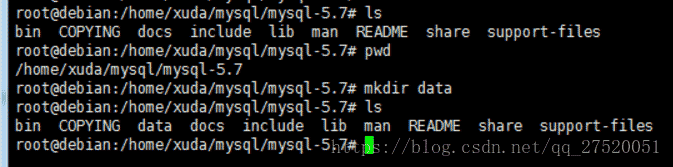
Install
Create a new data folder in the mysql directory to store data
$ mkdir data
In some tutorials, mysql_install_db may be used for installation. After 5.7, mysql_install_db was abandoned and replaced by mysqld --initialize
$ mysqld --initialize --basedir=/home/xuda/mysql/mysql-5.7 --datadir=/home/xuda/mysql/mysql-5.7/data/<br>

An error occurred during the installation process: /usr/local/mysql/bin/mysqld: error while loading shared libraries: libaio.so.1: cannot open shared object file: No such file or directory
Solution: $ apt-get -f install
- Modify directory permissions
$ chown -R root .
//Mysql user only needs to be the owner of all files in the mysql-5.7.20/data/ directory
$ chown -R mysql data
Copy startup files
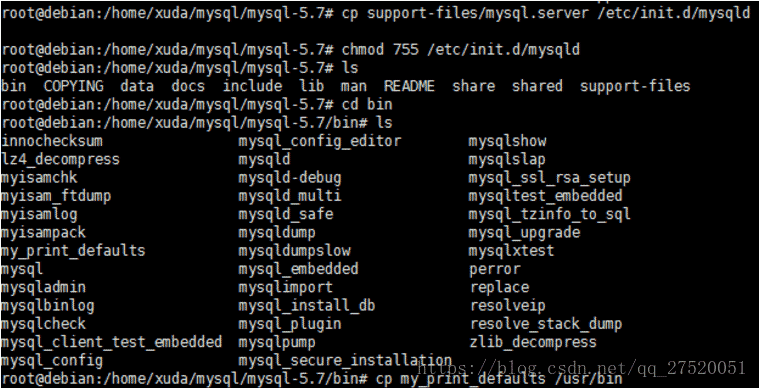
$ cp support-files/mysql.server /etc/init.d/mysqld
$ chmod 755 /etc/init.d/mysqld
$ cp my_print_defaults /usr/bin
- Edit /etc/init.d/mysqld
//Modify the following content:
basedir=/usr/local/mysql-5.7.20/
datadir=/usr/local/mysql-5.7.20/data
port=3306
//You can use Nodepadd's ftp plug-in when modifying files, which is more convenient
Start service
$ service mysqld start
Log in
$mysql -u root -p
There is no password for the first login. You can use the following command to change the password later
mysql>use mysql;
>mysql>update user set authentication_string=password("new password") where user='root';

Summarize
Because Debian is a very simple system, many tools are not pre-installed, so you will encounter many pitfalls during the installation process. Many tutorials on the Internet may not apply to you, so you have to explore it yourself.
If you have any questions please contact me.
The above is the detailed content of Debian 9.4 system installation and installation steps for Jdk and other tools. For more information, please follow other related articles on the PHP Chinese website!

Hot AI Tools

Undresser.AI Undress
AI-powered app for creating realistic nude photos

AI Clothes Remover
Online AI tool for removing clothes from photos.

Undress AI Tool
Undress images for free

Clothoff.io
AI clothes remover

AI Hentai Generator
Generate AI Hentai for free.

Hot Article
Hot Tools

Notepad++7.3.1
Easy-to-use and free code editor

SublimeText3 Chinese version
Chinese version, very easy to use

Zend Studio 13.0.1
Powerful PHP integrated development environment

Dreamweaver CS6
Visual web development tools

SublimeText3 Mac version
God-level code editing software (SublimeText3)
Hot Topics
 1377
1377
 52
52

 How to install Snap on Debian 12
Mar 20, 2024 pm 08:51 PM
How to install Snap on Debian 12
Mar 20, 2024 pm 08:51 PM
Snap is an external package manager designed for Linux systems that provides you with a convenient way to install containerized applications. Snap allows you to easily download and install packages without worrying about installing additional dependencies. The manager automatically resolves the dependencies required by the package, ensuring that the package runs smoothly on your system. Snap complements the native apt package manager, giving you another option for installing and running applications on your system. In this guide, you will find a complete guide on how to install Snap on Debian12. Outline: How to install Snap on Debian12 How to find package availability on Snap How to find information about packages on Snap
 How to install Steam on Debian 12
Mar 21, 2024 pm 10:10 PM
How to install Steam on Debian 12
Mar 21, 2024 pm 10:10 PM
STEAM is a popular gaming platform developed by Valve Corporation that allows you to buy, download, install and play games. It provides features such as automatic updates, matchmaking, and a community forum to resolve software-related issues. In addition to this, you can also use Steam to interact with other players and developers as it has extensive community support. In this guide you will learn: How to install Steam on Debian12 How to run Steam on Debian12 How to remove Steam from Debian12 Conclusion How to install Steam on Debian12 You can install Steam on Debian12: Debian Official Repository deb packages
 Debian installation of Wine and Debian installation of Wine tutorial
Feb 12, 2024 am 10:36 AM
Debian installation of Wine and Debian installation of Wine tutorial
Feb 12, 2024 am 10:36 AM
Wine is a compatibility layer that can run Windows applications on Linux systems. It allows users to seamlessly run Windows applications on Linux systems without the need for dual-system installation or virtual machine setup. This article will introduce how to run Windows applications on Debian systems. Install Wine and provide some related tutorials. Installing Wine Installing Wine on a Debian system is very simple, just use the apt command, open a terminal, and enter the following command: ```shellsudoapt-getupdatesudoapt-getinstallwine```This will update your package list and install Wine , after the installation is complete, you can
 A complete guide to installing Debian and deb files under Windows
Feb 14, 2024 pm 11:03 PM
A complete guide to installing Debian and deb files under Windows
Feb 14, 2024 pm 11:03 PM
Installing Debian in Windows systems and installing deb files directly in Windows are ways for many Linux enthusiasts to explore dual systems or try new software. This article will detail the steps and precautions for these two installation methods. Installing Debian under Windows To install Debian in a Windows system, you usually need to use virtual machine software, such as VirtualBox. The following are the specific steps: 1. Download and install VirtualBox, which is a free virtualization software that can run on the same computer. Multiple operating systems. 2. Download the Debian ISO image file. You can find the download link on the Debian official website. 3. in
 Detailed guide to installing GCC and GCC10 on Debian
Feb 10, 2024 pm 03:57 PM
Detailed guide to installing GCC and GCC10 on Debian
Feb 10, 2024 pm 03:57 PM
Debian is a popular Linux distribution, widely used in servers and desktop systems. GCC (GNUCompilerCollection) is an open source compiler suite used to compile C, C++, Fortran and other programming languages. In the Debian system, Installing GCC and GCC10 is very simple. This article will provide you with a detailed installation guide. Install GCC1. Open Terminal and use the following command to update the package list: ```shellsudoaptupdate``` 2. Install GCC and its related tools: sudoaptinstallbuild-essential This command will install
 How to log out or shut down the system in Debian 11
Dec 27, 2023 pm 02:22 PM
How to log out or shut down the system in Debian 11
Dec 27, 2023 pm 02:22 PM
How to shut down the system in Debian11? Let’s take a look at the specific operations with the editor. Method 1: Click [All Apps] - [Log Out]. In the pop-up interface, click [Shut Down]. Method 2: Execute the following command in the terminal: sudoshutdown-hnow
 How to add desktop shortcut icon on Debian11
Jan 09, 2024 am 10:06 AM
How to add desktop shortcut icon on Debian11
Jan 09, 2024 am 10:06 AM
How to create application shortcuts on the desktop in Debian11? Windows system installation programs generally create application shortcuts on the desktop. How to create them in Debian11? Let’s take a look at the detailed tutorial below. Right-click on a blank space on the desktop and select [Create Launcher]. In the pop-up interface, set the program to create a shortcut in [Command]. The editor takes the terminal emulator as an example. The user can set the icon by himself. After the setting is completed, click [Create]. Then you can see the shortcut, as shown in the picture below. When the shortcut is no longer needed, right-click on the icon and select [Delete].
 How to install Zig programming language 12 on Debian
Feb 19, 2024 pm 08:39 PM
How to install Zig programming language 12 on Debian
Feb 19, 2024 pm 08:39 PM
Zig is an emerging programming language that focuses on security, performance and maintainability. Its easy-to-learn syntax, powerful standard library, and advanced compile-time features give it great potential in systems programming. Installing Zig Programming Language 12Bookworm on Debian Keeping your system up to date is a crucial best practice in system administration. Before installing new software, run the command to make sure your Debian system is up to date. sudoaptupdatesudoaptupgrade This command will update the package list for upgrades and new package installations. Step 2. Install Zig Programming Language on Debian 12. There are two main ways to install Zig on Debian 12: One is through AP
