 System Tutorial
 Windows Series
 Detailed explanation of the solution to Win 11 upgrade requiring secure boot support
Detailed explanation of the solution to Win 11 upgrade requiring secure boot support
When upgrading win11, many friends encountered prompts that the computer must support full boot. This is actually because our computer does not have secure boot turned on. We only need to enter the bios settings and then turn it on. Follow below. Let’s open it up together.

What should I do if it prompts that secure boot must be supported when upgrading win11?
1. ASUS motherboard
1. First, we switch to Chinese, and then follow the prompts Press "F7" on your keyboard to open advanced settings.

2. Find and click "Secure Boot Menu"
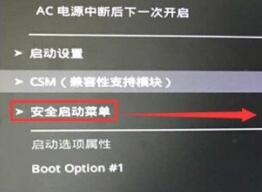
3. Then select "Password" Key Management"

4. Finally, click "Install Default Secure Boot Key".

2. Lenovo computers
1. For Lenovo computer models before 2020, you need to use "F2" to enter the bios settings, and then select "security" above ”
2. On the security tab, change “secure boot” to “Enabled”.
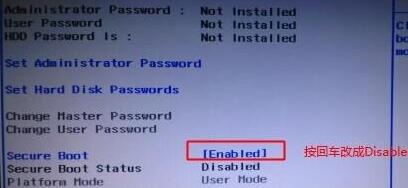
3. For Lenovo computers after 2020, use the same method to enter the bios. Find the "Security Menu" in the left column and open it on the right.

3. HP Computer
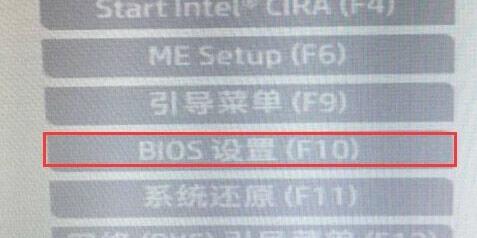
1. Restart the computer, press "Esc" on the keyboard to enter the selection interface, and then press "F10" to enter bios.
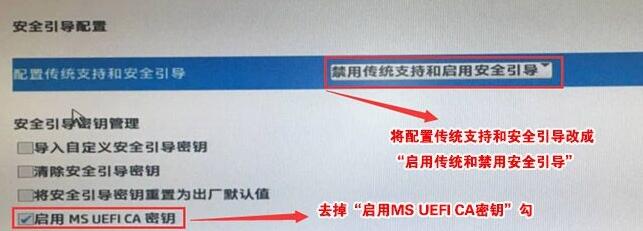
2. Click the "Advanced" tab above and find the "Secure Boot Configuration"
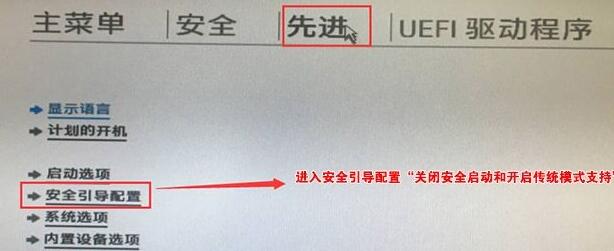
3. Rhythm change configuration support and secure boot, then uncheck "Enable MS UEFI CA key".
4. Dell Computer
1. Restart the computer, and then continuously press "F2" on the keyboard to enter the BIOS settings.
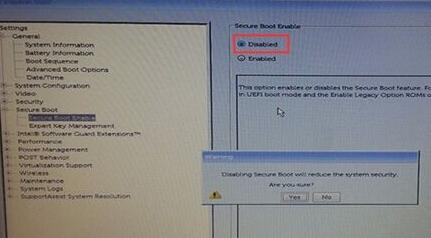
2. Click the "BOOT" option in the left column, find secure Boot below and press Enter to change it to "enabled".
3. Finally, press "F10" to save and select "Yes" in the pop-up window.
The above is the detailed content of Detailed explanation of the solution to Win 11 upgrade requiring secure boot support. For more information, please follow other related articles on the PHP Chinese website!

Hot AI Tools

Undresser.AI Undress
AI-powered app for creating realistic nude photos

AI Clothes Remover
Online AI tool for removing clothes from photos.

Undress AI Tool
Undress images for free

Clothoff.io
AI clothes remover

AI Hentai Generator
Generate AI Hentai for free.

Hot Article

Hot Tools

Notepad++7.3.1
Easy-to-use and free code editor

SublimeText3 Chinese version
Chinese version, very easy to use

Zend Studio 13.0.1
Powerful PHP integrated development environment

Dreamweaver CS6
Visual web development tools

SublimeText3 Mac version
God-level code editing software (SublimeText3)

Hot Topics
 Acer PD163Q Dual Portable Monitor Review: I Really Wanted to Love This
Mar 18, 2025 am 03:04 AM
The Acer PD163Q Dual Portable Monitor: A Connectivity Nightmare I had high hopes for the Acer PD163Q. The concept of dual portable displays, conveniently connecting via a single cable, was incredibly appealing. Unfortunately, this alluring idea quic
 win11 activation key permanent 2024
Mar 18, 2025 pm 05:56 PM
Article discusses reliable sources for permanent Windows 11 activation keys in 2024, legal implications of third-party keys, and risks of using unofficial keys.
 win11 activation key permanent 2025
Mar 18, 2025 pm 05:57 PM
Article discusses sources for a permanent Windows 11 key valid until 2025, legal issues, and risks of using unofficial keys. Advises caution and legality.
 Top 3 Windows 11 Gaming Features That Outshine Windows 10
Mar 16, 2025 am 12:17 AM
Upgrade to Windows 11: Enhance Your PC Gaming Experience Windows 11 offers exciting new gaming features that significantly improve your PC gaming experience. This upgrade is worth considering for any PC gamer moving from Windows 10. Auto HDR: Eleva
 Mozilla Thunderbird 136 Is Here, Switching to Monthly Updates by Default
Mar 07, 2025 am 01:19 AM
Firefox 136 and Thunderbird 136: Enhanced Security and Performance The latest releases of Firefox and Thunderbird bring significant improvements in video playback smoothness, browsing security, and overall user experience. Let's delve into the key u
 How to Create a Dynamic Table of Contents in Excel
Mar 24, 2025 am 08:01 AM
A table of contents is a total game-changer when working with large files – it keeps everything organized and easy to navigate. Unfortunately, unlike Word, Microsoft Excel doesn’t have a simple “Table of Contents” button that adds t
 This Wild Ultra-Wide Alienware Monitor is $300 Off Today
Mar 13, 2025 pm 12:21 PM
Alienware AW3225QF: The best curved 4K display, is it worth buying? The Alienware AW3225QF is known as the best curved 4K display, and its powerful performance is unquestionable. The fast response time, stunning HDR effects and unlimited contrast, coupled with excellent color performance, are the advantages of this monitor. Although it is mainly aimed at gamers, if you can accept the shortcomings of OLED, it is also suitable for office workers who pursue high efficiency. Widescreen monitors are not only loved by gamers, but also favored by users who value productivity improvement. They are great for work and enhance anyone’s desktop experience. This Alienware monitor is usually expensive, but is currently enjoying it
 The Best Monitor Light Bars of 2025
Mar 08, 2025 am 03:02 AM
Reduce eye strain and brighten your workspace with a monitor light bar! These handy gadgets adjust brightness and color temperature, some even offering auto-dimming. This updated review (03/04/2025) highlights top picks across various needs. BenQ


