
 Web Front-end
H5 Tutorial
Introduction to SVG 2D in HTML5 9—Introduction and application of masks and mask elements_html5 tutorial skills
Web Front-end
H5 Tutorial
Introduction to SVG 2D in HTML5 9—Introduction and application of masks and mask elements_html5 tutorial skills
Introduction to SVG 2D in HTML5 9—Introduction and application of masks and mask elements_html5 tutorial skills

SVG supported masks
SVG supports a variety of mask effects. Using these features, we can create many cool effects. As for whether mask is called "mask" or "mask" in Chinese, we won't distinguish it. Here we call it mask.
Mask types supported by SVG:
1. Clipping path (clipping path)
The clipping path is a graphic composed of path, text or basic graphics. All graphics within the clipping path are visible, and all graphics outside the clipping path are invisible.
2. Mask/mask
A mask is a container that defines a set of shapes and uses them as a semi-transparent medium that can be used to combine foreground objects and background.
An important difference between the clipping path and other masks is that the clipping path is a 1-bit mask, which means that the object covered by the clipping path is either fully transparent (visible, located inside the clipping path), or fully opaque (Invisible, outside the clipping path). The mask can specify the transparency at different locations.
Clip path of the window - overflow and clip properties
The overflow attribute and clip attribute of the HTML element jointly set the clipping behavior of the content of the element. Similarly, in SVG, these two attributes can also be used.
overflow = visible | hidden | scroll | auto | inherit
The overflow attribute defines the behavior to be taken when the content of the element exceeds the element's border.
This attribute can be used for elements that can create new windows (svg, symbol, image, foreignObject), pattern and marker elements. The value meaning of this attribute is as follows:
visible: Display all content, even if the content is already outside the element's border, this is the default value.
hidden: Hide content beyond the clipping path. The clipping path is specified by the clip property.
scroll: Use the form of a scroll bar to present excess content.
auto: Use browser-defined behavior, this seems unreliable.
This attribute is basically the same as the attribute of the same name in CSS2, except that in SVG, there are some different processing processes:
1. The overflow attribute is for elements other than creating new windows (svg, symbol, image, foreignObject) , elements other than pattern and marker elements have no effect.
2. The clipping path corresponds to the window. When a new window is created, a new clipping path is created. The default clipping path is the viewport boundary.
clip =
This attribute can be used for elements that can create new windows (svg, symbol, image, foreignObject), pattern and marker elements. This property has the same parameters as the CSS2 property of the same name. auto means that the clipping path is consistent with the window border. When using graphics as parameters (setting the top, right, bottom and left values of the cropping rectangle), you can use user coordinate values (that is, coordinates without units). For example:
P { clip: rect(5px , 10px, 10px, 5px); }
Note here that by default (both overflow and clip have default values), the clipping path is consistent with the border of the window. When viewBox and preserveAspectRatio are set, it is usually necessary to map the four sides of the clipping path to the four sides of the viewBox, so as to ensure that some display effects are still the same (of course, if they are all default values, there is no need to set them).
The clipping path of the object - clipPath element
The clipping path is defined using the clipPath element and then referenced using the clip-path attribute.
clipPath can contain path elements, text elements, basic graphic elements (circle, etc.) and use elements. If it is a use element, it must directly reference path, text or basic graphic elements, and cannot reference other elements.
Note that the clipping path is just a one-bit mask layer, the path is the union of all the elements it contains. Objects in this collection can be displayed, objects not in this range will not be displayed. The algorithm that determines whether the specific decision point is within the range is specified by the "clip-rule" attribute.
For graphic objects, the clipping path is equal to the union of the clipping path set by its own clip-path and the clipping paths of all outer elements (including the clipping paths set by clip-path and overflow). Note a few points:
1. The clipPath element itself does not inherit the clipping path defined by clipPath from the outer node.
2. The clipPath element itself can set the clip-path attribute. The effect is the intersection of two paths.
3. The child elements of the clipPath element can set the clip-path attribute: the effect is the union of the two paths.
4. An empty clipping path will cut off all content within the element.
Let’s take a look at several important attributes:
clipPathUnits = "userSpaceOnUse(Default value) | objectBoundingBox"
This attribute defines the coordinates used by the clipPath element System, these two values we are all familiar with, are the user coordinate system of the element that refers to the current clipping path and the bounding box scale value.
The clipPath element is never rendered directly, but is referenced through clip-path, so setting the display attribute of the clipPath element has no effect.
clip-path = "
Needless to say, this attribute is used to reference the clipping path , it should be noted here that all container elements, basic graphic elements and clipPath elements can use this attribute.
clip-rule = "nonzero(Default value) | evenodd | inherit"
This attribute is used to determine which points belong to the points inside the clipping path. For simple closed shapes, this is easy to determine, but for complex shapes with holes inside, there is a difference. The value of this attribute has the same meaning as the value of fill-rule:
nonzero: The algorithm used for this value is: emit a line in any direction from the point to be determined, and then calculate the direction of the intersection of the graph and the line segment. ; The calculation result starts from 0, and every time a line segment at an intersection is from left to right, add 1; every time a line segment at an intersection is from right to left, decrease 1; after calculating all intersections, If the result of this calculation is not equal to 0, then the point is within the graph and needs to be filled; if the value is equal to 0, then the point is outside the graph and does not need to be filled. Look at the example below:
evenodd: The algorithm used for this value is: launch a line in any direction from the point to be determined, and then calculate the number of intersections between the graph and the line segment. If the number is an odd number, change the point within the graph. Filling is required; if the number is an even number, the points are outside the graphic and do not need to be filled. Look at the example below:
The clip-rule attribute can only be used on internal graphic elements of the clipPath element. For example, the following settings work:
It will not work if the element is not in the clipPath. For example, the following settings will not work:
Finally look at a small example of the clipping path:
Only the 10*10 area in the upper left corner of the rectangle is visible.
Mask - mask element
In SVG, you can specify any graphic element or g element as a mask for the rendered object to combine the rendered objects. into the background.
The mask is defined with the mask element. When using the mask, you only need to reference the mask in the mask attribute of the object.
The mask element can contain any graphic elements and container elements (such as g).
In fact, everyone knows the effect of the mask. It basically calculates a final transparency based on the color and transparency of each point in the mask, and then when rendering the object, mask this with different transparency on the object. The mask layer reflects the blocking effect of the mask. For rendering objects, only the parts within the mask will be rendered according to the transparency of the points on the mask, and the parts not within the mask will not be displayed. Look at the example below:
xmlns="http://www.w3.org/2000/svg" xmlns:xlink="http:/ /www.w3.org/1999/xlink">
Masked text
< rect x="0" y="0" width="800" height="300" fill="#FF8080" />

Hot AI Tools

Undresser.AI Undress
AI-powered app for creating realistic nude photos

AI Clothes Remover
Online AI tool for removing clothes from photos.

Undress AI Tool
Undress images for free

Clothoff.io
AI clothes remover

AI Hentai Generator
Generate AI Hentai for free.

Hot Article
Hot Tools

Notepad++7.3.1
Easy-to-use and free code editor

SublimeText3 Chinese version
Chinese version, very easy to use

Zend Studio 13.0.1
Powerful PHP integrated development environment

Dreamweaver CS6
Visual web development tools

SublimeText3 Mac version
God-level code editing software (SublimeText3)
Hot Topics
 1384
1384
 52
52

 Let's talk about how to use SVG to achieve image mosaic effect
Sep 01, 2022 am 11:05 AM
Let's talk about how to use SVG to achieve image mosaic effect
Sep 01, 2022 am 11:05 AM
How to use SVG to achieve image mosaic effect without using Javascript? The following article will give you a detailed understanding, I hope it will be helpful to you!
 How to convert svg to jpg format
Nov 24, 2023 am 09:50 AM
How to convert svg to jpg format
Nov 24, 2023 am 09:50 AM
svg can be converted to jpg format by using image processing software, using online conversion tools, and using the Python image processing library. Detailed introduction: 1. Image processing software includes Adobe Illustrator, Inkscape and GIMP; 2. Online conversion tools include CloudConvert, Zamzar, Online Convert, etc.; 3. Python image processing library, etc.
 An in-depth analysis of how to use svg icons in vue3+vite
Apr 28, 2022 am 10:48 AM
An in-depth analysis of how to use svg icons in vue3+vite
Apr 28, 2022 am 10:48 AM
svg images are widely used in projects. The following article will introduce how to use svg icons in vue3 + vite. I hope it will be helpful to everyone!
 Produced by Peking University: The latest SOTA with texture quality and multi-view consistency, achieving 3D conversion of one image in 2 minutes
Jan 10, 2024 pm 11:09 PM
Produced by Peking University: The latest SOTA with texture quality and multi-view consistency, achieving 3D conversion of one image in 2 minutes
Jan 10, 2024 pm 11:09 PM
It only takes two minutes to convert pictures into 3D! It is also the kind with high texture quality and high consistency in multiple viewing angles. No matter what species it is, the single-view image when input is still like this: Two minutes later, the 3D version is completed: △ Upper, Repaint123 (NeRF); Lower, Repaint123 (GS) The new method is called Repaint123. The core idea is to combine 2D The powerful image generation capabilities of the diffusion model are combined with the texture alignment capabilities of the redraw strategy to generate high-quality, consistent images across multiple views. In addition, this study also introduces a visibility-aware adaptive repaint intensity method for overlapping regions. Repaint123 solves the problems of previous methods such as large multi-view deviation, texture degradation, and slow generation in one fell swoop. Current item
 VUE3 introductory tutorial: Use Vue.js plug-in to play with SVG
Jun 16, 2023 am 09:48 AM
VUE3 introductory tutorial: Use Vue.js plug-in to play with SVG
Jun 16, 2023 am 09:48 AM
With the continuous development of modern Web front-end development, more and more technologies are widely used in actual development. Among them, Vue.js is currently one of the most popular JavaScript frameworks. It is based on the MVVM model and provides a rich API and component library, making it easier to develop responsive, reusable, and efficient web applications. The latest version of Vue.js3 has better performance and richer features than the old version, which has attracted widespread attention and research. This article will introduce to you a
 Detailed explanation of using SVG to add logo to favicon
Sep 07, 2022 am 10:30 AM
Detailed explanation of using SVG to add logo to favicon
Sep 07, 2022 am 10:30 AM
How to add logo to favicon using SVG? The following article will introduce to you how to use SVG to generate favicon with logo. I hope it will be helpful to you!
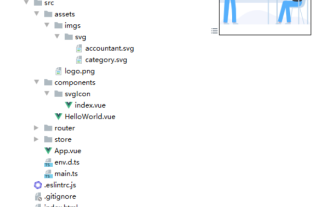 How to use svg method in vue3+vite2
May 11, 2023 pm 05:55 PM
How to use svg method in vue3+vite2
May 11, 2023 pm 05:55 PM
1. Install vite-plugin-svg-icons. You also need to install fast-glob related dependencies. Otherwise, when vite runs npmrundev, it will report the Cannotfindmodule'fast-glob' error npmifast-glob@3.x-Dnpmivite-plugin-svg. -icons@2.x-D 2. Create a new component index.vueimport{computed}from'vue';cons under src/components/svgIcon
 Draw SVG files on HTML5 canvas
Sep 15, 2023 pm 03:09 PM
Draw SVG files on HTML5 canvas
Sep 15, 2023 pm 03:09 PM
To draw HTMLImageElements on a canvas element, use the drawImage() method. This method defines an Image variable using src="mySVG.svg" and uses drawImage when loading. varmyImg=newImage();myImg.onload=function(){ ctx.drawImage(myImg,0,0);}img.src="http://www.example.com/files/sample.svg";
