
 System Tutorial
Windows Series
The problem of being unable to start occurs after the Win7 system is upgraded.
System Tutorial
Windows Series
The problem of being unable to start occurs after the Win7 system is upgraded.
The problem of being unable to start occurs after the Win7 system is upgraded.

Starting from January 14, 2020, Microsoft announced that it will officially stop supporting the win7 system, and there will be no security fixes or updates for the win7 system in the future. Continuing to use the win7 system will greatly increase the risk of virus and malware attacks. There are many problems that cannot be started after the upgrade. Today, the editor has brought detailed solutions. Let’s take a look at the details.

Solution to the problem that the win7 system cannot start after upgrading
The first method is to reset the system
1. The win7 system is with For automatic restore points, if you encounter problems during startup, shut down and restart the computer, then press and hold the F8 key on the keyboard.
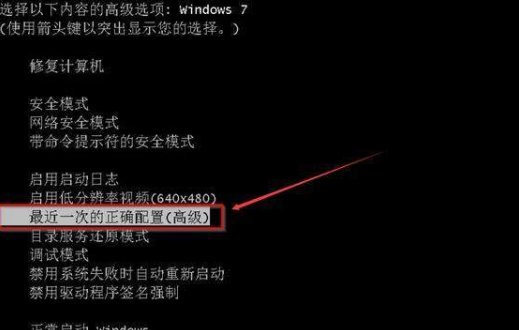
2. Keep pressing F8 until the computer enters "Advanced Startup Options"; hold down the ↑↓ keys on the keyboard, select "Perform Last Known Good Configuration" and press Enter
3. After performing this restore operation, the system can boot normally. Generally, the problem of not starting normally will be solved. This has been verified several times.
Second method, disable the graphics card driver
1. If the update service of your win7 system is not turned off, the system will update and install the corresponding drivers and patches for you in the background. Sometimes It will also cause the computer to fail to boot. If the updated graphics card driver is incompatible, it will also cause Win7 to fail to start normally. The solution is to press F8 on boot to enter the advanced startup options.
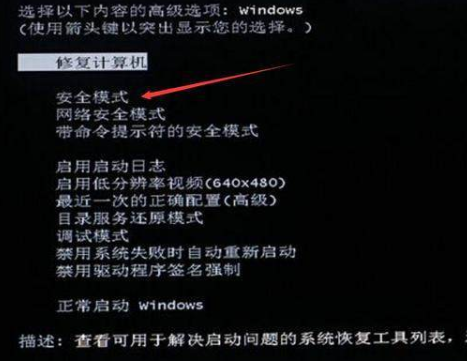
#2. After entering the advanced startup options, hold down the ↑↓ keys on the keyboard, select "Safe Mode" and press Enter to enter safe mode.
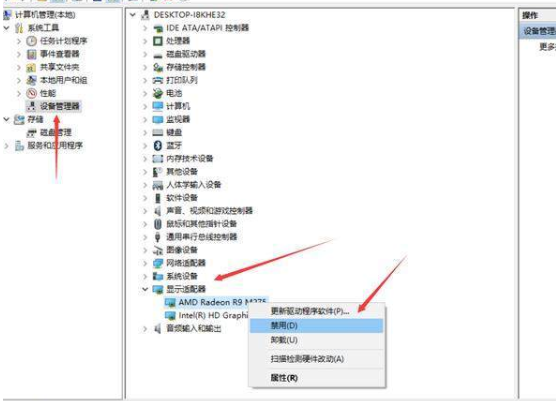
3. After entering the system, right-click Computer-Management-Device Manager, find the display adapter, right-click the mouse, and disable
The third method Method, redo win7 system
Download link
>>>Deep Technology GHOST win7 stable ultimate version x86 v2020.01##> >>Deep Technology GHOST WIN7 SP1 Welcomes the Year of the Rat Edition ;
>>>Deep Technology GHOST WIN7 Classic Pure Edition X64-bit v2020.01System installation related issuesHow to use U disk Reinstall win10 system>>>Free upgrade win10 tutorial from win7>>>Is it free to upgrade win7 to win10 system>>>The above is the detailed content of The problem of being unable to start occurs after the Win7 system is upgraded.. For more information, please follow other related articles on the PHP Chinese website!

Hot AI Tools

Undresser.AI Undress
AI-powered app for creating realistic nude photos

AI Clothes Remover
Online AI tool for removing clothes from photos.

Undress AI Tool
Undress images for free

Clothoff.io
AI clothes remover

AI Hentai Generator
Generate AI Hentai for free.

Hot Article
Hot Tools

Notepad++7.3.1
Easy-to-use and free code editor

SublimeText3 Chinese version
Chinese version, very easy to use

Zend Studio 13.0.1
Powerful PHP integrated development environment

Dreamweaver CS6
Visual web development tools

SublimeText3 Mac version
God-level code editing software (SublimeText3)
Hot Topics
 1377
1377
 52
52

 Several methods for upgrading Python version in Conda
Feb 18, 2024 pm 08:56 PM
Several methods for upgrading Python version in Conda
Feb 18, 2024 pm 08:56 PM
Several methods for Conda to upgrade the Python version require specific code examples. Overview: Conda is an open source package manager and environment management system for managing Python packages and environments. During development using Python, in order to use a new version of Python, we may need to upgrade from an older Python version. This article will introduce several methods of using Conda to upgrade the Python version and provide specific code examples. Method 1: Use the condainstall command
 Detailed explanation of the steps to obtain Win11 system administrator permissions
Mar 08, 2024 pm 09:09 PM
Detailed explanation of the steps to obtain Win11 system administrator permissions
Mar 08, 2024 pm 09:09 PM
Windows 11, as the latest operating system launched by Microsoft, is deeply loved by users. In the process of using Windows 11, sometimes we need to obtain system administrator rights in order to perform some operations that require permissions. Next, we will introduce in detail the steps to obtain system administrator rights in Windows 11. The first step is to click "Start Menu". You can see the Windows icon in the lower left corner. Click the icon to open the "Start Menu". In the second step, find and click "
 What should I do if wps cannot start the source application of this object?
Mar 13, 2024 pm 09:13 PM
What should I do if wps cannot start the source application of this object?
Mar 13, 2024 pm 09:13 PM
WPS is a very widely used office software, including documents, forms and PPT, and supports multi-terminal synchronization. If the prompt "The source application for this object cannot be launched" appears when editing wps, how to solve it? This problem may occur because you are trying to open a link or file, but its source application no longer exists or has been deleted. Here are some fixes: 1. Reinstall WPS software: Try reinstalling WPSOffice to fix the problem and make sure you are using the latest version. 2. Manually change the default program: Try to change the default program to WPS. You can right-click the file you want to open, select "Open with", and then
 Upgrading numpy versions: a detailed and easy-to-follow guide
Feb 25, 2024 pm 11:39 PM
Upgrading numpy versions: a detailed and easy-to-follow guide
Feb 25, 2024 pm 11:39 PM
How to upgrade numpy version: Easy-to-follow tutorial, requires concrete code examples Introduction: NumPy is an important Python library used for scientific computing. It provides a powerful multidimensional array object and a series of related functions that can be used to perform efficient numerical operations. As new versions are released, newer features and bug fixes are constantly available to us. This article will describe how to upgrade your installed NumPy library to get the latest features and resolve known issues. Step 1: Check the current NumPy version at the beginning
 Tutorial on how to solve the problem of being unable to access the Internet after upgrading win10 system
Mar 27, 2024 pm 02:26 PM
Tutorial on how to solve the problem of being unable to access the Internet after upgrading win10 system
Mar 27, 2024 pm 02:26 PM
1. Use the win+x shortcut key to open the menu and select [Command Prompt (Administrator) (A)], as shown below: 2. After entering the command prompt interface, enter the [ipconfig/flushdns] command and press Enter , as shown in the figure below: 3. Then enter the [netshwinsockresetcatalog] command and press Enter, as shown in the figure below: 4. Finally enter the [netshintipreset] command and press Enter, restart the computer and you can access the Internet, as shown in the figure below:
 Which one to choose when starting wallpaperengine?
Mar 19, 2024 am 08:49 AM
Which one to choose when starting wallpaperengine?
Mar 19, 2024 am 08:49 AM
When wallpaperengine starts, there are 4 different options. Many users don't know which one to choose when starting wallpaperengine. Generally, when wallpaperengine starts, choose the first one: start 32-bit. Which one to choose when starting wallpaperengine? Answer: Start 32-bit. 1. Generally, when wallpaperengine starts, select the first one: start 32-bit. 2. When wallpaperengine starts, there are 4 different options: start 32-bit; start 64-bit. 3. Start 32-bit: This is a generally recommended option and suitable for most users. 4. Start 64-bit: If the system supports 64-bit, you can choose this option
 How to set the boot priority of Apple dual system
Feb 19, 2024 pm 06:49 PM
How to set the boot priority of Apple dual system
Feb 19, 2024 pm 06:49 PM
As technology continues to develop, the need to use different operating systems is becoming more and more common. For Apple users, sometimes you may need to install and use two different operating systems on one device, such as macOS and Windows. In this case, it is particularly important to set the startup sequence of the dual system. This article will introduce how to set up Apple devices to start the dual system first when turning on the device. First, we need to make sure that both operating systems have been successfully installed on the Apple device. You can use BootCamp this Apple
 How to upgrade Xiaohongshu to a professional account
Mar 01, 2024 pm 04:00 PM
How to upgrade Xiaohongshu to a professional account
Mar 01, 2024 pm 04:00 PM
Many friends expressed that they want to know how to upgrade to a professional account in Xiaohongshu. Here I will introduce the operation method. If you are interested, come and take a look with me. Open the "Little Red Book" APP on your mobile phone, click the "My" option in the lower right corner after entering it, then find the "three horizontal lines" icon in the upper left corner of the My page and click to open it. 2. A menu page will pop up, in which click to select the "Creation Center" item to enter. 3. Next, find "More Services" in the options under "Creation Services" on the page you enter, and click on it to enter. 4. After the page jumps, click "Open a Professional Account" in the options under "Author Capabilities". 5. Finally, the Xiaohongshu Professional Account will be introduced on the entered page. Click "
