

Tips and tutorials for solving win11 installation issues

Since the win11 system was leaked, many friends want to install and experience this new system. However, some friends have prompted that the installation cannot be performed during installation. At this time, we can solve the problem by changing the relevant files. Let’s take a look at it together.
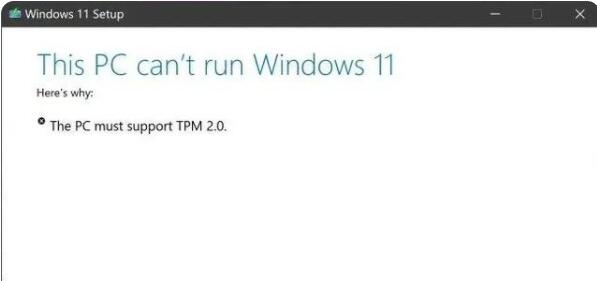
What should I do if win11 prompts that it cannot be installed?
1: Installation package error
1. First of all, it is possible that the downloaded installation package has Question, we can re-download a win11 image file.
2. Click the link above to download. The image files provided by this site have undergone extensive testing and are guaranteed to be installed normally.
2. System rejection
1. If you still cannot install using the above system, it may be that the original system has rejection. We can solve the rejection by changing related files.
2. First, you need to download a win10 system image.
3. After the download is complete, load the file and open the "source" folder in it.
4. Find the "install.wim" file in the folder and replace it with the file of the same name in the previously downloaded win11 mirror system.
5. After the replacement is completed, re-run the win11 installation program "setup.exe" to install normally.
The above is the detailed content of Tips and tutorials for solving win11 installation issues. For more information, please follow other related articles on the PHP Chinese website!

Hot AI Tools

Undresser.AI Undress
AI-powered app for creating realistic nude photos

AI Clothes Remover
Online AI tool for removing clothes from photos.

Undress AI Tool
Undress images for free

Clothoff.io
AI clothes remover

AI Hentai Generator
Generate AI Hentai for free.

Hot Article
Hot Tools

Notepad++7.3.1
Easy-to-use and free code editor

SublimeText3 Chinese version
Chinese version, very easy to use

Zend Studio 13.0.1
Powerful PHP integrated development environment

Dreamweaver CS6
Visual web development tools

SublimeText3 Mac version
God-level code editing software (SublimeText3)
Hot Topics


 How to solve the problem of stuck installation of dx9 components in win11
Dec 26, 2023 am 08:37 AM
How to solve the problem of stuck installation of dx9 components in win11
Dec 26, 2023 am 08:37 AM
The dx9 component is a very good program that can help us play games. It can improve the picture quality and smoothness of our various games. However, many users get stuck when installing the dx9 component on the win11 system. In fact, we can install it on win11 Install dx12 on the computer, let’s take a look below. What should I do if the dx9 component is stuck when installing win11? 1. The win11 system supports dx12, not dx9, so we cannot install dx9 normally. 2. Of course, it may also be because there is a problem with our dx9 installation package. You can re-download a dx9 and give it a try. 3. As the latest DirectX program, dx12 has better performance and effects than dx9, and can improve more games.
 LOL crash problem solving tutorial, Win11 version
Jan 04, 2024 pm 01:58 PM
LOL crash problem solving tutorial, Win11 version
Jan 04, 2024 pm 01:58 PM
After updating the win11 system, many lol players found that they often crashed during the game. Generally speaking, this problem does not occur, so it is probably because our graphics card driver does not meet the requirements of win11 and needs to be updated, or the directx component is missing. Let’s solve it together. What to do if win11 crashes while playing lol: Method 1: 1. First click on the start menu, search and open "Device Manager" at the top 2. Find "Display Adapters" in the device manager, expand the device, right-click to select it, and select "Update driver" 3. Select "Automatically search for driver" in the pop-up window and then install the latest driver to solve the lol crash problem. method
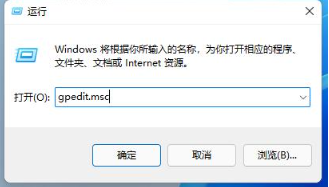 The IT administrator has restricted access to win11 in some areas. Please refer to the solution.
Jan 29, 2024 pm 02:03 PM
The IT administrator has restricted access to win11 in some areas. Please refer to the solution.
Jan 29, 2024 pm 02:03 PM
Many users will find that when running some programs, the system prompts that your IT administrator has restricted access to some areas of the application. So what is going on? Let this site provide users with a detailed introduction to the solution to the win11 error message that your IT administrator has restricted access to some areas of this application. Win11 error message: Your IT administrator has restricted access to some areas of this application. Solution tutorial 1. Press win+R to open Run, then enter gpedit.msc to open the Local Group Policy Editor. 3. In the security options, find User Account Control: Run all administrators in administrator approval mode.
 Share methods to improve Win11 boot speed
Jan 02, 2024 pm 03:12 PM
Share methods to improve Win11 boot speed
Jan 02, 2024 pm 03:12 PM
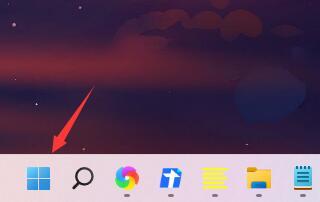
The boot speed of Windows system is a very important part when we use computers. It has a great impact on our system usage experience. If you feel that your win11 boot speed is slow, you can speed up the boot speed by turning off the startup items. , let’s solve it together. What to do if win11 is slow to boot: 1. First, we click the "Windows button" to enter the start menu. 2. Then open the "Settings" 3. Then click to enter the "Apps" option on the left. 4. Then click on the "Startup" setting at the bottom on the right. 5. Then change the sorting basis to "Status" and turn off all unnecessary startup items.
 Tutorial to solve the problem of win11 not being able to run lol
Dec 29, 2023 pm 09:22 PM
Tutorial to solve the problem of win11 not being able to run lol
Dec 29, 2023 pm 09:22 PM
League of Legends is a very popular MOBA game at the moment, but recently many friends found that after updating and upgrading the win11 system, they found that they could not play LoL, either crashing or getting stuck. In fact, we can solve the problem by changing the system area. Here is the solution Let’s take a look. What to do if win11 cannot play lol? Method 1: 1. First, go to "Settings" through the start menu 2. Then select "Time & Language" in the left column 3. Then click "Countries and Regions" in the right area 4. Then click "Change system locale" below 5. Then in the regional settings, change the current system locale to "Chinese". Method 2: 1. Find this computer, right-click to select it, click "Manage", and in
 How to solve the problem of overlapping icons on the right side of the Win11 taskbar
Jan 01, 2024 pm 11:39 PM
How to solve the problem of overlapping icons on the right side of the Win11 taskbar
Jan 01, 2024 pm 11:39 PM
Recently, a friend discovered that after turning on the computer, the icons in the lower right corner of win11 overlapped. This may be because our program in the lower right corner is incompatible. You can try not to put it in the lower right corner or launch the program, or you can try changing the input method. , let’s take a look at it together. What to do if the icons on the right side of the win11 taskbar overlap 1. Because win11 is currently only a preview version of the system, there are many applications that cannot run perfectly in it. 2. Therefore, the icons on the right side may overlap as shown in the picture above. You can try to solve the problem by closing the icons. 3. First click on a blank space on the taskbar, and click "Taskbar Settings" 4. Expand "Taskbar Corner Overflow" and uncheck all overlapping application icons.
 Tutorial to solve the problem of continuous rotation of the right mouse button in Windows 10
Dec 31, 2023 pm 04:57 PM
Tutorial to solve the problem of continuous rotation of the right mouse button in Windows 10
Dec 31, 2023 pm 04:57 PM
Many users have encountered this situation when using win10 system. When they right-click the mouse, the mouse will keep spinning in circles, and then they have to wait for a long time to open it. So how to solve this problem? Come and take a look at the details. Tutorial on how to solve the issue where the right mouse button keeps spinning in circles in win10~ What to do if the right mouse button keeps spinning in circles in win10: 1. Press the key combination "win+r" to open run, and then enter: regedit to open the registry. 2. Then expand the folders in sequence; HKEY_CLASSES_ROOT\Directory\Background\shellex\ContextMenuHandlers3, and then delete ContextMenuHa
 Methods and tutorials to solve the problem of Simplified Chinese installation in win11
Dec 22, 2023 am 10:09 AM
Methods and tutorials to solve the problem of Simplified Chinese installation in win11
Dec 22, 2023 am 10:09 AM
Some users found that the win11 system they installed was not the Chinese version, and did not want to reinstall the system. They wanted to install a simplified Chinese package directly, but found that the installation failed. This may be because when downloading and installing the Simplified Chinese package, it was blocked by the system firewall. You can install it normally by temporarily turning it off. What to do if win11 fails to install Simplified Chinese: 1. First press the "win+r" key combination on the keyboard to call up run, enter "regedit" and press Enter to confirm. 2. Then enter the "Computer\HKEY_LOCAL_MACHINE\SOFTWARE\Policies\Microsoft\WindowsDefender" path. 3. Right-click on the blank space on the right side.
