 System Tutorial
 Windows Series
 How to solve the problem of network icon disappearing after win7 optimization
How to solve the problem of network icon disappearing after win7 optimization
Recently, some friends reported that after optimizing the win7 system, they found that the network icon was gone. This is most likely because the icon was turned off during the optimization process. We only need to re-enable it in the system settings. Okay, let’s take a look below.
Solution to the problem that the network icon is gone after win7 optimization
1. First, enter the "Control Panel" in the start menu
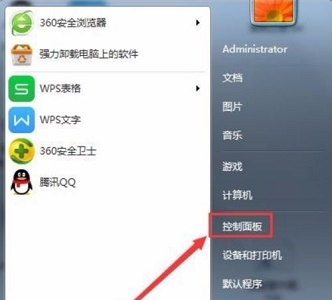
2. Change the view mode in the upper right corner to "Large Icons"
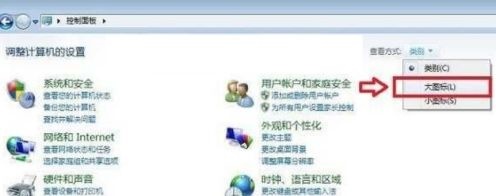
3. Click "Notification Area Icon"
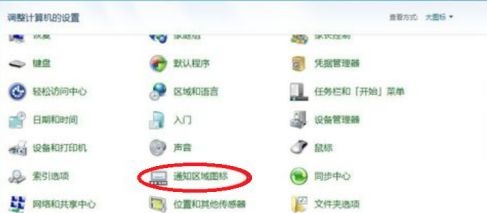
4 , click "Turn system icons on or off"
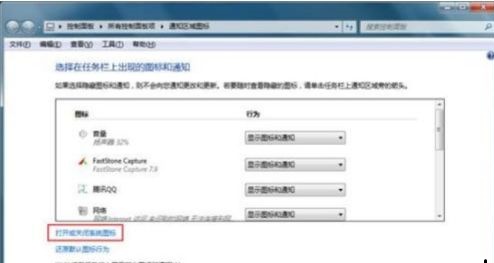
5. Set the network icon to "On".
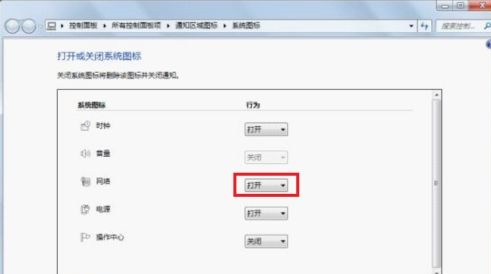
The above is the detailed content of How to solve the problem of network icon disappearing after win7 optimization. For more information, please follow other related articles on the PHP Chinese website!

Hot AI Tools

Undresser.AI Undress
AI-powered app for creating realistic nude photos

AI Clothes Remover
Online AI tool for removing clothes from photos.

Undress AI Tool
Undress images for free

Clothoff.io
AI clothes remover

AI Hentai Generator
Generate AI Hentai for free.

Hot Article

Hot Tools

Notepad++7.3.1
Easy-to-use and free code editor

SublimeText3 Chinese version
Chinese version, very easy to use

Zend Studio 13.0.1
Powerful PHP integrated development environment

Dreamweaver CS6
Visual web development tools

SublimeText3 Mac version
God-level code editing software (SublimeText3)

Hot Topics
 What should I do if the steam game icon cannot be displayed?
Sep 04, 2023 pm 02:25 PM
Steps to solve the problem that the steam game icon cannot be displayed: 1. Right-click the icon and select Properties; 2. Click Change Icon - Browse; 3. Find steam to the game folder, usually in the steamapps folder - common; 4. Find the corresponding game folder; 5. Select the game application and then confirm.
 Why does Ubuntu have network connection but cannot access the Internet?
Dec 20, 2023 pm 05:26 PM
The reasons why Ubuntu has a network connection but cannot access the Internet: 1. DNS configuration problem; 2. Proxy server setting problem; 3. Network firewall setting problem; 4. Router or modem setting problem; 5. Network driver problem; 6. Network configuration file Questions; 7. Other questions. Detailed introduction: 1. DNS configuration problem. Make sure the network connection is normal. You can test whether the network connection is normal by entering "ping 8.8.8.8" in the terminal. If a normal result is returned, the network connection is stable, etc.
 How to solve the problem that win11 virtual machine cannot connect to the network
Jan 04, 2024 pm 07:00 PM
Many users have installed virtual machines on the win11 system after updating it, but many of them will be unable to connect to the network. So today I will bring you the solution to the problem that the win11 virtual machine cannot connect to the network. Come and see how to solve it. . What to do if the win11 virtual machine cannot connect to the network 1. First open the virtual machine and click "Edit - Virtual Network Editor - Restore Default Settings" in order. After doing this, it can be used. 2. In fact, in many cases it is due to changes in the network driver that the network cannot operate normally. You only need to reinstall the network module once! 3. If you encounter the problem that the network is suddenly cut off during use, even if the adapter has been configured correctly, the network will still be displayed.
 What's going on when the network can't connect to the wifi?
Apr 03, 2024 pm 12:11 PM
1. Check the wifi password: Make sure the wifi password you entered is correct and pay attention to case sensitivity. 2. Confirm whether the wifi is working properly: Check whether the wifi router is running normally. You can connect other devices to the same router to determine whether the problem lies with the device. 3. Restart the device and router: Sometimes, there is a malfunction or network problem with the device or router, and restarting the device and router may solve the problem. 4. Check the device settings: Make sure the wireless function of the device is turned on and the wifi function is not disabled.
 What to do if the network connection folder is empty
Mar 13, 2024 am 11:27 AM
1. First click [Start Menu], then click the [Settings] button. 2. In the [Settings] interface, click the [Network and Internet] option. 3. Scroll down to the bottom of the page, find the [Network Reset] option, and click the [Reset Now] option.
 How to Fix Roblox 403 Forbidden Error on Google Chrome
May 19, 2023 pm 01:49 PM
Many Windows users have recently encountered an unusual error called Roblox403 Forbidden Error while trying to access website URLs in Google Chrome browser. Even after restarting the Chrome app multiple times, they were unable to do anything. There could be several potential causes for this error, some of which we've outlined and listed below. Browsing history and other cache of Chrome and corrupted data Unstable internet connection Incorrect website URLs Extensions installed from third-party sources After considering all the above aspects, we have come up with some fixes that can help users resolve this issue. If you encounter the same problem, check out the solutions in this article. Fix 1
 What to do if there is an Xbox network connection error? Solution to Xbox network connection abnormality
Mar 15, 2024 am 09:00 AM
In Xbox, players can experience a large number of games, and various types of games can be found. However, many players also report that a network connection error is prompted in Xbox. How to solve the Xbox network connection error? Let’s take a look at some reliable solutions. Solution 1: Check the network connection status. According to the error message details sent by the Xbox host system, the problem may be that the player's local network connection is not normal. The editor recommends that you open the network list of Xbox first, check the network status, reconnect to the network, confirm that the network is normal, and then start the game on the Xbox console. Solution 2: Use acceleration tools If players have determined that the Xbox console is connected to the Internet
 How to Troubleshoot WiFi Issues in Win11 Network and Internet Settings
Dec 22, 2023 pm 12:33 PM
In the previous system, we could find and connect to the wifi network in the network and internet settings, but after updating the system, we found that there was no wifi in the win11 network and internet settings. This may be due to a device or driver problem. There is no wifi in win11 network and internet settings: 1. Device 1. First, make sure you have a wireless network card. 2. Laptops basically come with it, but many desktop computers don’t. 3. We can right-click "This Computer" and open "Management" 4. Then enter "Device Manager" on the left 5. Then right-click "Network Adapter" and click "Scan for hardware changes" 6. After the scan is completed, expand the network adapter , check if there is a "WLAN" setting below.


