How to solve win11 DNS server error
We need to use the correct dns when connecting to the Internet to access the Internet. In the same way, if we use the wrong dns settings, it will prompt a dns server error. At this time, we can try to solve the problem by selecting to automatically obtain dns in the network settings. Let’s take a look at the specific solutions.
What to do if win11 network dns server error
Method 1: Reset DNS
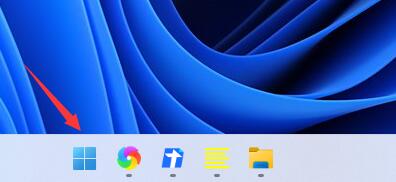
1. First, click Start in the taskbar, find and click " Settings icon button.

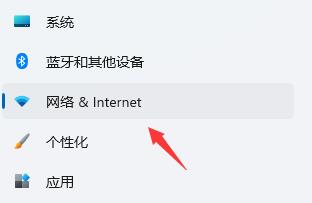
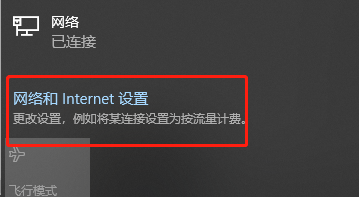
2. Then click the "Network & Internet" option command in the left column.
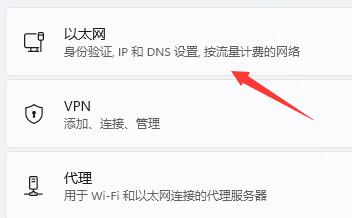
3. Then find the "Ethernet" option on the right and click to enter.
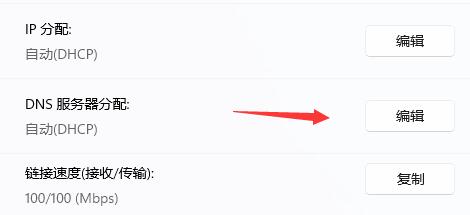
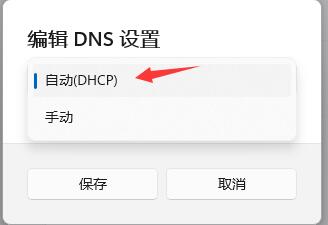
4. After that, click "Edit" in the DNS server assignment, and finally set DNS to "Automatic (DHCP)"
Method 2: Network Troubleshooting
Search for "Network Troubleshooting" on the "Settings" page , and then use this function to detect the network condition. If there is a problem, click "Automatic Repair".
Method 3: Refresh the DNS cache
1. Press the "Win R" key, enter "cmd", and press OK or Enter. The command prompt window page will open.
2. Enter "ipconfig /flushdns". If successful, there will be a prompt message "DNS resolution cache has been successfully refreshed"
3. After clearing all DNS cache information, enter the following again Command to check
ipconfig /displaydns Display the contents of the DNS resolver cache
ipconfig /flushdns Clear the DNS resolver cache
ipconfig /renew Update the IPv4 address of the specified adapter
ipconfig /registerdns Refresh all DHCP leases and re-register DNS names
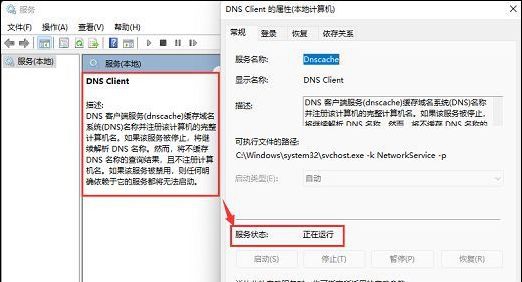
4. If the message "Unable to refresh DNS resolution cache" is prompted. During execution, if there is a function problem, it is usually because the local DNS Client service did not start normally.
5. We only need to open "Service-DNS Client" during operation and restart it.
The above is the detailed content of How to solve win11 DNS server error. For more information, please follow other related articles on the PHP Chinese website!

Hot AI Tools

Undresser.AI Undress
AI-powered app for creating realistic nude photos

AI Clothes Remover
Online AI tool for removing clothes from photos.

Undress AI Tool
Undress images for free

Clothoff.io
AI clothes remover

Video Face Swap
Swap faces in any video effortlessly with our completely free AI face swap tool!

Hot Article

Hot Tools

Notepad++7.3.1
Easy-to-use and free code editor

SublimeText3 Chinese version
Chinese version, very easy to use

Zend Studio 13.0.1
Powerful PHP integrated development environment

Dreamweaver CS6
Visual web development tools

SublimeText3 Mac version
God-level code editing software (SublimeText3)

Hot Topics
 Solution to the problem that Win11 system cannot install Chinese language pack
Mar 09, 2024 am 09:48 AM
Solution to the problem that Win11 system cannot install Chinese language pack With the launch of Windows 11 system, many users began to upgrade their operating system to experience new functions and interfaces. However, some users found that they were unable to install the Chinese language pack after upgrading, which troubled their experience. In this article, we will discuss the reasons why Win11 system cannot install the Chinese language pack and provide some solutions to help users solve this problem. Cause Analysis First, let us analyze the inability of Win11 system to
 Solution for Win11 unable to install Chinese language pack
Mar 09, 2024 am 09:15 AM
Win11 is the latest operating system launched by Microsoft. Compared with previous versions, Win11 has greatly improved the interface design and user experience. However, some users reported that they encountered the problem of being unable to install the Chinese language pack after installing Win11, which caused trouble for them to use Chinese in the system. This article will provide some solutions to the problem that Win11 cannot install the Chinese language pack to help users use Chinese smoothly. First, we need to understand why the Chinese language pack cannot be installed. Generally speaking, Win11
 What should I do if the earth is displayed in the lower right corner of Windows 10 when I cannot access the Internet? Various solutions to the problem that the Earth cannot access the Internet in Win10
Feb 29, 2024 am 09:52 AM
This article will introduce the solution to the problem that the globe symbol is displayed on the Win10 system network but cannot access the Internet. The article will provide detailed steps to help readers solve the problem of Win10 network showing that the earth cannot access the Internet. Method 1: Restart directly. First check whether the network cable is not plugged in properly and whether the broadband is in arrears. The router or optical modem may be stuck. In this case, you need to restart the router or optical modem. If there are no important things being done on the computer, you can restart the computer directly. Most minor problems can be quickly solved by restarting the computer. If it is determined that the broadband is not in arrears and the network is normal, that is another matter. Method 2: 1. Press the [Win] key, or click [Start Menu] in the lower left corner. In the menu item that opens, click the gear icon above the power button. This is [Settings].
 Strategies to solve Win11's inability to install the Chinese language pack
Mar 08, 2024 am 11:51 AM
Strategies to deal with Win11’s inability to install the Chinese language pack. With the launch of Windows 11, many users can’t wait to upgrade to this new operating system. However, some users have encountered difficulties when trying to install the Chinese language pack, preventing them from using the Chinese interface properly. In this article, we will discuss the problem that Win11 cannot install the Chinese language pack and propose some countermeasures. First, let’s explore why there are problems installing Chinese language packs on Win11. This may be due to the system's
 Why NameResolutionError(self.host, self, e) from e and how to solve it
Mar 01, 2024 pm 01:20 PM
The reason for the error is NameResolutionError(self.host,self,e)frome, which is an exception type in the urllib3 library. The reason for this error is that DNS resolution failed, that is, the host name or IP address attempted to be resolved cannot be found. This may be caused by the entered URL address being incorrect or the DNS server being temporarily unavailable. How to solve this error There may be several ways to solve this error: Check whether the entered URL address is correct and make sure it is accessible Make sure the DNS server is available, you can try using the "ping" command on the command line to test whether the DNS server is available Try accessing the website using the IP address instead of the hostname if behind a proxy
 How to use shortcut keys to take screenshots in Win8?
Mar 28, 2024 am 08:33 AM
How to use shortcut keys to take screenshots in Win8? In our daily use of computers, we often need to take screenshots of the content on the screen. For users of Windows 8 system, taking screenshots through shortcut keys is a convenient and efficient operation method. In this article, we will introduce several commonly used shortcut keys to take screenshots in Windows 8 system to help you take screenshots more quickly. The first method is to use the "Win key + PrintScreen key" key combination to perform full
 What's going on when the network can't connect to the wifi?
Apr 03, 2024 pm 12:11 PM
1. Check the wifi password: Make sure the wifi password you entered is correct and pay attention to case sensitivity. 2. Confirm whether the wifi is working properly: Check whether the wifi router is running normally. You can connect other devices to the same router to determine whether the problem lies with the device. 3. Restart the device and router: Sometimes, there is a malfunction or network problem with the device or router, and restarting the device and router may solve the problem. 4. Check the device settings: Make sure the wireless function of the device is turned on and the wifi function is not disabled.
 Detailed explanation of obtaining administrator rights in Win11
Mar 08, 2024 pm 03:06 PM
Windows operating system is one of the most popular operating systems in the world, and its new version Win11 has attracted much attention. In the Win11 system, obtaining administrator rights is an important operation. Administrator rights allow users to perform more operations and settings on the system. This article will introduce in detail how to obtain administrator permissions in Win11 system and how to effectively manage permissions. In the Win11 system, administrator rights are divided into two types: local administrator and domain administrator. A local administrator has full administrative rights to the local computer


