
 Web Front-end
H5 Tutorial
html5 guide-3. How to implement the drag and drop function of html elements_html5 tutorial skills
Web Front-end
H5 Tutorial
html5 guide-3. How to implement the drag and drop function of html elements_html5 tutorial skills
html5 guide-3. How to implement the drag and drop function of html elements_html5 tutorial skills

The content of this article is about how to implement the drag and drop function of html elements in html5. Before html5, to implement drag and drop, you needed to use js. Now html5 supports the drag and drop function internally, but to implement slightly more complex functions, the help of js is still indispensable. Let's look at a few examples below.
1. Create a drag object
We can tell the browser which elements need to implement dragging function through the draggable attribute. draggable has three values: true: the element can be dragged; false: the element cannot be dragged; auto: the browser determines whether the element can be dragged.
The system default value is auto, but in the auto case, browsers have different support for the drag and drop function of different elements. For example, img objects are supported but div objects are not supported. Therefore, if you need to drag an element, it is best to set draggale to true. Let’s look at an example below:


drop here
<script> <br />var src = document.getElementById("src"); <br />var target = document.getElementById("target"); <br /></script>
Operation effect:

2. Handling drag events
Now let’s learn about drag-related events. There are two types of events, one is the event of the drag object, and the other is the event of the drop area event. Drag events include: dragstart: triggered when the element dragging starts; drag: triggered during the element dragging process; dragend: triggered when the element dragging ends. Let’s look at an example below:

drop here
<script> <br />var src = document.getElementById("src"); <br />var target = document.getElementById("target"); <br />var msg = document.getElementById("msg"); <br />src.ondragstart = function (e) { <br />e.target.classList.add("dragged"); <br />} <br />src. ondragend = function (e) { <br />e.target.classList.remove("dragged"); <br />msg.innerHTML = "drop here"; <br />} <br />src.ondrag = function (e) { <br />msg.innerHTML = e.target.id; <br />} <br /></script>
Operating effect:
3. Create a drop area
Let’s look at the events related to the drop area: dragenter: triggered when the drag object enters the drop area; dragover: triggered when the drag object moves within the drop area ; dragleave: Triggered when the drag object is not placed in the drop area and leaves the drop area; drop: Triggered when the drag object is placed in the drop area.
Let’s look at an example:
< ;img draggable="true" id="car2" src="img/2.jpg" alt="car2" />

drop here
<script> <br />var src = document.getElementById("src"); <br />var target = document.getElementById("target"); <br />var msg = document.getElementById("msg"); <br />var draggedID; <br />target.ondragenter = handleDrag; <br />target.ondragover = handleDrag; <br />function handleDrag(e) { <br />e.preventDefault(); <br />} <br />target.ondrop = function (e) { <br />var newElem = document.getElementById(draggedID).cloneNode(false); <br />target.innerHTML = "" ; <br />target.appendChild(newElem); <br />e.preventDefault(); <br />} <br />src.ondragstart = function (e) { <br />draggedID = e.target.id; <br /> e.target.classList.add("dragged"); <br />} <br />src.ondragend = function (e) { <br />var elems = document.querySelectorAll(".dragged"); <br />for ( var i = 0; i < elems.length; i ) { <br />elems[i].classList.remove("dragged"); <br />} <br />} <br /></script>
Run result:

4. Use DataTransfer
We use DataTransfer to transfer data from the drag object to the drop area. DataTransfer has the following properties and methods: types: returns the format of the data; getData(
Let’s look at the following example, which achieves the same effect as Example 3:
drop here
<script> <br />var src = document.getElementById("src"); <br />var target = document.getElementById("target"); <br />target.ondragenter = handleDrag; <br />target.ondragover = handleDrag; <br />function handleDrag(e) { <br />e.preventDefault(); <br />} <br />target.ondrop = function (e) { <br />var droppedID = e.dataTransfer.getData("Text"); <br />var newElem = document.getElementById(droppedID).cloneNode(false); <br />target.innerHTML = ""; <br />target.appendChild(newElem); <br />e.preventDefault(); <br />} <br />src.ondragstart = function (e) { <br />e.dataTransfer.setData("Text", e.target.id); <br />e.target.classList.add("dragged"); <br />} <br />src.ondragend = function (e) { <br />var elems = document.querySelectorAll(".dragged"); <br />for (var i = 0; i < elems.length; i ) { <br />elems[i].classList.remove("dragged"); <br />} <br />} <br /></script>
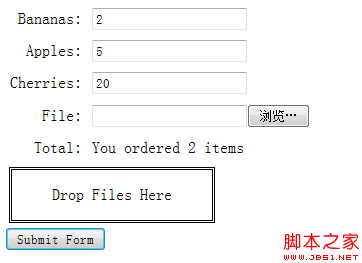
5.拖拽文件
html5支持file api,可以让我们操作本地文件。一般我们不直接使用file api,我们可以结合其他特性一起使用,比如结合拖拽特效,如下例:
Drop Files Here
<script> <br />var target = document.getElementById("target"); <br />target.ondragenter = handleDrag; <br />target.ondragover = handleDrag; <br />function handleDrag(e) { <br />e.preventDefault(); <br />} <br />target.ondrop = function (e) { <br />var files = e.dataTransfer.files; <br />var tableElem = document.getElementById("data"); <br />tableElem.innerHTML = "<tr><th>Name<th>Type<th>Size"; <br />for (var i = 0; i < files.length; i ) { <br />var row = "<tr><td>" files[i].name "<td>" files[i].type "<td>" files[i].size ""; <br />tableElem.innerHTML = row; <br />} <br />e.preventDefault(); <br />} <br /></script>
DataTransfer returns a FileList object, which we can regard as a file array object. file contains the following attributes: name: file name; type: file type (MIME type); size: file size.
Operating effect:

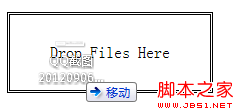

6. Upload files
The following is an example of uploading files by dragging ajax.
Effect:
Demo download address: Html5Guide.draggable.rar

Hot AI Tools

Undresser.AI Undress
AI-powered app for creating realistic nude photos

AI Clothes Remover
Online AI tool for removing clothes from photos.

Undress AI Tool
Undress images for free

Clothoff.io
AI clothes remover

Video Face Swap
Swap faces in any video effortlessly with our completely free AI face swap tool!

Hot Article
Hot Tools

Notepad++7.3.1
Easy-to-use and free code editor

SublimeText3 Chinese version
Chinese version, very easy to use

Zend Studio 13.0.1
Powerful PHP integrated development environment

Dreamweaver CS6
Visual web development tools

SublimeText3 Mac version
God-level code editing software (SublimeText3)
Hot Topics
 1386
1386
 52
52

 Execute PHP function using onclick
Feb 29, 2024 pm 04:31 PM
Execute PHP function using onclick
Feb 29, 2024 pm 04:31 PM
We will also cover another way to execute a PHP function through the onclick() event using the Jquery library. This method calls a javascript function, which will output the content of the php function in the web page. We will also demonstrate another way to execute a PHP function using the onclick() event, calling the PHP function using pure JavaScript. This article will introduce a way to execute a PHP function, use the GET method to send the data in the URL, and use the isset() function to check the GET data. This method calls a PHP function if the data is set and the function is executed. Using jQuery to execute a PHP function through the onclick() event we can use
 How to read excel data in html
Mar 27, 2024 pm 05:11 PM
How to read excel data in html
Mar 27, 2024 pm 05:11 PM
How to read excel data in html: 1. Use JavaScript library to read Excel data; 2. Use server-side programming language to read Excel data.
 The difference between appendChild and append in JS
Feb 20, 2024 pm 06:57 PM
The difference between appendChild and append in JS
Feb 20, 2024 pm 06:57 PM
The difference between appendChild and append in JS requires specific code examples. In JavaScript, when we need to dynamically add child elements to the DOM (Document Object Model), we usually use the appendChild and append methods. Although their purpose is to add child elements to parent elements, there are some differences in their use. 1. appendChild method The appendChild method is one of the methods of the DOM node object. Use
 What is dreamweaver line break?
Apr 08, 2024 pm 09:54 PM
What is dreamweaver line break?
Apr 08, 2024 pm 09:54 PM
Use the <br> tag in Dreamweaver to create line breaks, which can be inserted through the menu, shortcut keys or direct typing. Can be combined with CSS styles to create empty rows of specific heights. In some cases, it is more appropriate to use the <p> tag instead of the <br> tag because it automatically creates blank lines between paragraphs and applies style control.
 Use CSS Transform to transform elements
Feb 24, 2024 am 10:09 AM
Use CSS Transform to transform elements
Feb 24, 2024 am 10:09 AM
Usage of Transform in CSS The Transform property of CSS is a very powerful tool that can perform operations such as translation, rotation, scaling and tilting of HTML elements. It can dramatically change the appearance of elements and make web pages more creative and dynamic. In this article, we will introduce the various uses of Transform in detail and provide specific code examples. 1. Translate (Translate) Translate refers to moving an element a specified distance along the x-axis and y-axis. Its syntax is as follows: tran
 jQuery implements a simple method to determine whether there are child elements within an element
Feb 28, 2024 pm 03:21 PM
jQuery implements a simple method to determine whether there are child elements within an element
Feb 28, 2024 pm 03:21 PM
jQuery is a widely used JavaScript library that provides many convenient methods to manipulate HTML elements. In the process of developing web pages, we often encounter situations where we need to determine whether there are sub-elements within an element. In this article, we will introduce how to use jQuery to achieve this function and provide specific code examples. To determine whether there are child elements within an element, we can use jQuery's children() method. The children() method is used to obtain matches
 What does ridge mean in css
Apr 28, 2024 pm 04:06 PM
What does ridge mean in css
Apr 28, 2024 pm 04:06 PM
Ridge is a border style in CSS that is used to create a 3D border with an embossed effect, which is manifested as a raised ridge-like line.
 How to use hover in css
Feb 23, 2024 pm 12:06 PM
How to use hover in css
Feb 23, 2024 pm 12:06 PM
The hover pseudo-class in CSS is a very commonly used selector that allows us to change the style of an element when the mouse is hovering over it. This article will introduce the usage of hover and provide specific code examples. 1. Basic Usage To use hover, we need to first define a style for the element, and then use the :hover pseudo-class to specify the corresponding style when the mouse is hovering. For example, we have a button element. When the mouse hovers over the button, we want the background color of the button to change to red and the text color to white.
