

| Introduction | We know the advantages of Kotlin, a new language, and have also been exposed to some common syntax and its simple usage. I believe you will be very interested in it, so let’s understand it as being interested in it. So, how do we apply this new language in Android? |
Today’s article will help you learn to use Kotlin to develop Android applications, and compare it with our traditional language Java, so that you can truly feel its beauty and elegance.
ConfigurationProject gradle file
apply plugin: 'com.android.application'
apply plugin:'kotlin-android'
apply plugin:'kotlin-android-extensions'

dependencies {
    classpath 'org.jetbrains.kotlin:kotlin-gradle-plugin:1.1.1'
}app Gradle file:
compile 'org.jetbrains.kotlin:kotlin-stdlib:1.1.1'
compile 'org.jetbrains.anko:anko-sdk25:0.10.0-beta-1'// sdk15, sdk19, sdk21, sdk23 are also available
compile 'org.jetbrains.anko:anko-appcompat-v7:0.10.0-beta-1'
Through the above configuration, you will find that the dependency of anko is introduced. Anko is a powerful library developed by JetBrains. Speaking of JetBrains, it is awesome. The Kotlin language was developed by them. The most popular development tool intellij idea was also developed by them. AS is also based on IDEA. Okay, back to the topic, Anko is a Kotlin library officially developed by Kotlin that makes developing Android applications faster and easier, and can make the code we write simpler, clearer and easier to read. It includes multiple parts, as follows
Anko Commons: a lightweight library full of helpers for intents, dialogs, logging and so on;
Anko Layouts: a fast and type-safe way to write dynamic Android layouts;
Anko SQLite: a query DSL and parser collection for Android SQLite;
Anko Coroutines: utilities based on the kotlinx.coroutines library
Then next, we will understand the advantages of Kotlin language development for Android through code.
No need to findViewById anymoreAnyone who has done Android development knows that writing a lot of layout files, findViewById is also a huge workload, and you must first declare variables, findViewById and then force it into our control. The usage is generally as follows
TextView username;
username=(TextView)findViewById(R.id.user);

username.setText("我是一个TextView");Sometimes I feel like vomiting when I write it. Some people may say that there are some annotation libraries now, such as butterknife. When we use annotations, we don’t need to findViewById. The usage method is as follows
@BindView(R.id.user)
TextView username;

username.setText("我是一个TextView");This is indeed the case. Using annotations does save us some workload, but it is still not the simplest. The simplest thing is that we can directly assign values to the control with the id of user. Maybe you will find this a bit incredible. . But Kotlin does it. We can write directly like this
user.text="我是一个TextView"
When you see this, do you feel like you are late for meeting me? It’s so concise. user is the id declared in our layout file, and .text is treated as setText(). In the Kotlin language, we cannot see the set/get method like in Java. It should be noted that when we want to use it in this way (without findViewById, directly using the xml control we need to add apply plugin: ‘kotlin-android-extensions’ to gradle), we need to add the following code
//activity_login就是我们的布局
import kotlinx.android.synthetic.main.activity_login.*
Usually we use xml files to write our layout, but it has some shortcomings such as not type safety, not null safety, parsing xml files consumes more CPU and power, etc. Anko Layout can use DSL to dynamically create our UI, and it is much more convenient than using Java to dynamically create layouts. It is mainly more concise. It has a hierarchical relationship with xml to create layouts, making it easier for us to read.
verticalLayout {
            val textView=textView("我是一个TextView")
            val name = editText("EditText")
            button("Button") {
                onClick { toast("${name.text}!") }
            }
}We can remove setContentView in the OnCreate method, and then add the above code to display the effect as shown below, that is, a TextView, an EditText, and a Button are placed in a vertical linear layout. And there is a click event in Button. When clicked, the content of EditText will be
Displayed as toast.
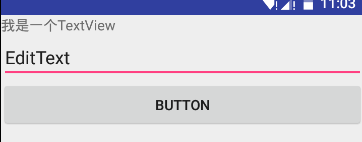
Is the above code very simple and easy to understand? Of course, the default controls cannot meet our needs. For example, we will change the color and size of the font, set the width and height, and set the margin and padding values. Then the How to implement it is of course very simple, because its logic and xml writing layout are the same routine. For example, the following implementation
val textView=textView("我是一个TextView"){
                textSize = sp(17).toFloat()
                textColor=context.resources.getColor(R.color.red)
            }.lparams{
                margin=dip(10)
                height= dip(40)
                width= matchParent
}I think I don’t need to explain the above code, you should be able to see the effect of the control. Because its attributes correspond to the names of the attributes we set in xml.
In the process of creating the UI above, we directly wrote the code to create the UI in the onCreate method. Of course, there is another way to write it. We create an inner class that implements the AnkoComponent interface and overrides the createView method, which returns a View, which is the layout we created. Modify as follows
inner class UI : AnkoComponent<loginactivity> {
        override fun createView(ui: AnkoContext<loginactivity>): View {
           return with(ui){
               verticalLayout {
                   val textView=textView("我是一个TextView"){
                       textSize = sp(17).toFloat()
                       textColor=context.resources.getColor(R.color.red)
                   }.lparams{
                       margin=dip(10)
                       height= dip(40)
                       width= matchParent
                   }
                   val name = editText("EditText")
                   button("Button") {
                        onClick { view ->
                            toast("Hello, ${name.text}!")
                        }
                   }
               }
           }
        }
}</loginactivity></loginactivity>Then add a line of code to the onCreate method to create our layout page. as follows
UI().setContentView(this@LoginActivity)
Now we compile and run, and find that the effect is the same as the interface written in the layout file. But its performance has advantages. In fact, I don't find any performance advantages. In any case, this DSL is indeed easy to read and easy to use. In the above code, you may have noticed dip(10), which means converting 10dp to pixels. It is an extension function of Anko. It is called an extension function. , if we read the source code of Anko, we find that it uses a large number of extension functions, which is also one of the advantages of the Kotlin language. It is indeed very powerful, such as dip extension (extract View extension)
inline fun View.dip(value: Int): Int = context.dip(value)
fun Context.dip(value: Int): Int = (value * resources.displayMetrics.density).toInt()
The resources.displayMetrics.density above is the same effect as our Java getResources().getDisplayMetrics().density, but you will see that it feels more comfortable than writing in Java. Anyway, that’s how I feel.
In the above we added a click event to Button, and we found that it supports lambda expressions. If we want to display a Toast, we only need toast ("content"). Isn't it very simple? In fact, it is also an extension function, implementing
inline fun AnkoContext.toast(message: CharSequence) = ctx.toast(message)
fun Context.toast(message: CharSequence) = Toast.makeText(this, message, Toast.LENGTH_SHORT).show()
Of course, creating a dialog is still very simple, as follows
            alert ("我是Dialog"){
                      yesButton { toast("yes")}
                      noButton {  toast("no")}
}.show()It really makes me feel more comfortable the more I watch it, haha. Here is another powerful yet very simple and concise code implementation.
        doAsync {
            //后台执行代码
            uiThread {
            //UI线程
            toast("线程${Thread.currentThread().name}") }
}该段代码实现的就是AsyncTask 的效果,但是你应该发现它比Java的实现简洁多了,当然除非是色盲,要不然你会看出简洁的。
如果你使用Kotlin开发Android一段时间后,会发现它给我们减少了很多的代码量,当然更多的优势及用法需要我们自己去探索。相信经过探索后它会让你大吃一惊。
实现一个简单的登录界面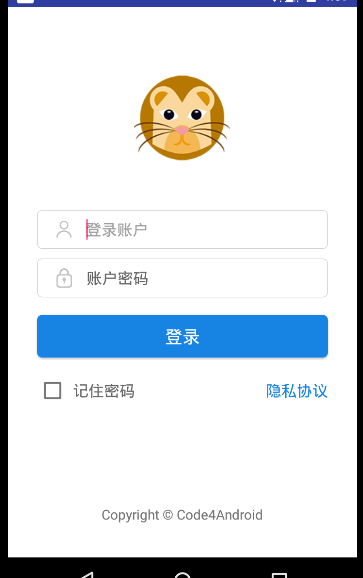
界面很简单,伪代码
<linearlayout>

<imageview></imageview>

<linearlayout> <imageview></imageview><edittext></edittext><linearlayout>

<linearlayout> <imageview></imageview><edittext></edittext><linearlayout>

<button></button>

<linearlayout> <checkbox></checkbox><textview></textview><linearlayout>

<textview></textview>

</linearlayout></linearlayout></linearlayout></linearlayout></linearlayout></linearlayout></linearlayout>
看着并不复杂的,那么xml实现的代码就不在这贴出了,如果你想看xml实现可看,那么接下来来只看Anko在Kotlin代码中实现这个布局。
  lateinit var et_account: EditText
    lateinit var et_password: EditText
    inner class LoginUi : AnkoComponent<loginactivity> {
        override fun createView(ui: AnkoContext<loginactivity>) = with(ui) {
            verticalLayout {
                backgroundColor = context.resources.getColor(android.R.color.white)
                gravity = Gravity.CENTER_HORIZONTAL
                imageView(R.mipmap.ic_launcher).lparams {
                    width = dip(100)
                    height = dip(100)
                    topMargin = dip(64)
                }

                linearLayout {
                    gravity = Gravity.CENTER_VERTICAL
                    orientation = HORIZONTAL
                    backgroundResource = R.drawable.bg_frame_corner
                    imageView {
                        image = resources.getDrawable(R.mipmap.ic_username)
                    }.lparams(width = wrapContent, height = wrapContent) {
                        leftMargin = dip(12)
                        rightMargin = dip(15)
                    }
                    et_account = editText {
                        hint = "登录账户"
                        hintTextColor = Color.parseColor("#666666")
                        textSize = 16f
                        background = null
                    }
                }.lparams(width = dip(300), height = dip(40)) {
                    topMargin = dip(45)
                }

                linearLayout {
                    orientation = HORIZONTAL
                    backgroundResource = R.drawable.bg_frame_corner
                    gravity = Gravity.CENTER_VERTICAL
                    imageView {
                        image = resources.getDrawable(R.mipmap.ic_password)
                    }.lparams {
                        leftMargin = dip(12)
                        rightMargin = dip(15)
                    }
                    et_password = editText {
                        hint = "登录密码"
                        hintTextColor = Color.parseColor("#666666")
                        textSize = 16f
                        background = null
                    }
                }.lparams {
                    width = dip(300)
                    height = dip(40)
                    topMargin = dip(10)

                }

                button("登录") {
                    gravity = Gravity.CENTER
                    background = resources.getDrawable(R.drawable.bg_login_btn)
                    textColor = Color.parseColor("#ffffff")
                    onClick {
                        if (et_account.text.toString().isNotEmpty() && et_password.text.toString().isNotEmpty())
                            startActivity<mainactivity>() else toast("请输入账户或者密码")
                    }
                }.lparams(width = dip(300), height = dip(44)) {
                    topMargin = dip(18)
                }
                linearLayout {
                    orientation = HORIZONTAL
                    gravity = Gravity.CENTER_VERTICAL
                    checkBox("记住密码") {
                        textColor = Color.parseColor("#666666")
                        textSize = 16f
                        leftPadding = dip(5)
                    }
                    textView("隐私协议") {
                        textColor = Color.parseColor("#1783e3")
                        gravity = Gravity.RIGHT
                        textSize = 16f
                    }.lparams(width = matchParent)
                }.lparams(width = dip(300)) {
                    topMargin = dip(18)
                }

                textView("Copyright © Code4Android") {
                    textSize = 14f
                    gravity = Gravity.CENTER or Gravity.BOTTOM

                }.lparams {
                    bottomMargin = dip(35)
                    weight = 1f
                }
            }
        }
}</mainactivity></loginactivity></loginactivity>看到上面的代码怎么样,看起来还不错吧,即使现在你不会写,但是你也能读懂它。在上面我们给登录按钮设置一个打开MainActivity的事件。startActivity的中写的是我们要跳转的Activity,如果给打开的界面传递参数,直接写在()中。例如我们将输入的账号和密码传到跳转的界面,则实现为
startActivity<mainactivity>("account" to et_account.text.toString(),"password" to et_password.text.toString())</mainactivity>The above is the detailed content of Some tips for developing Android applications using Kotlin. For more information, please follow other related articles on the PHP Chinese website!


![[Web front-end] Node.js quick start](https://img.php.cn/upload/course/000/000/067/662b5d34ba7c0227.png)


