

Tutorial on reinstalling win10 system on Dell laptop

Reinstalling the system is an important solution that we need to learn when we encounter system problems, and it can help us solve most of the problems. There are some minor differences in the reinstallation systems of various brands of computers. Today I will teach you how to reinstall the win10 system on Dell laptops.
Dell laptop reinstallation win10 system tutorial
Method 1:
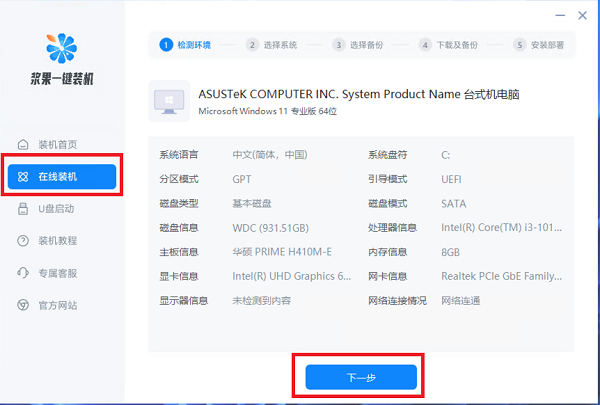
1. First download and install the Berry one-click reinstallation software and open it , open it and enter "Online Installation"
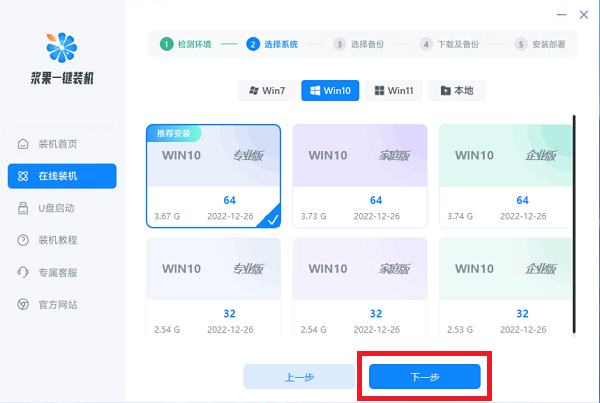
2. Then select the win10 system version you want to reinstall.
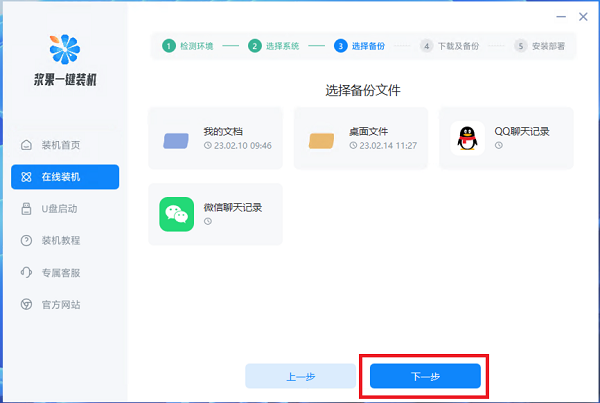
3. Then select the local files to be backed up.
4. After the selection is completed, just wait for the software to automatically download and install the system.

Method 2:
1. First prepare a USB disk of at least 8g and use the micrope toolbox to make it into a system disk.
2. Put a system that you want to install into the computer in the USB flash drive.
This system is specially optimized for Dell computers. It has undergone strict high-standard testing and has strong stability.
At the same time, this system supports multiple installation modes. The installation process is simple and convenient. It only takes 10 minutes to complete without any plug-ins.
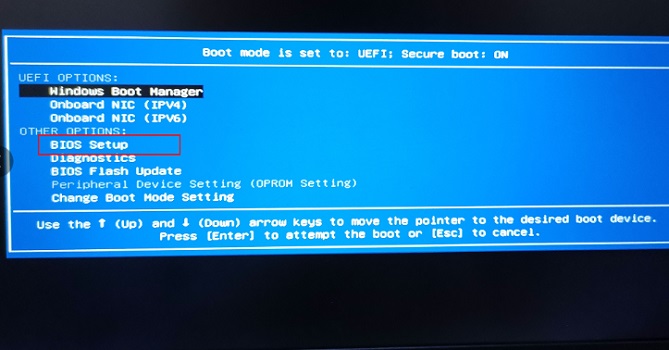
3. After the preparation is completed, insert the USB disk into the computer, turn on the computer, and press the F2 or Fn F2 key on the keyboard to enter the bios settings when booting.
4. If the USB disk cannot be found in the bios settings after inserting the USB disk, you need to enter the bios setup first.
5. After entering, set Secure Boot to Dlsabled, and then set Legacy Boot to Enabled.
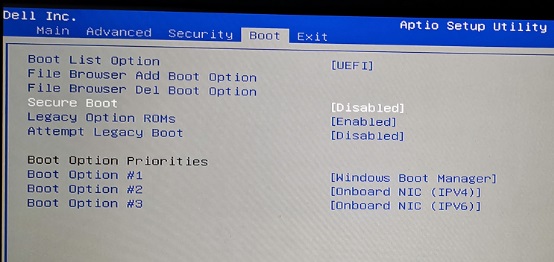
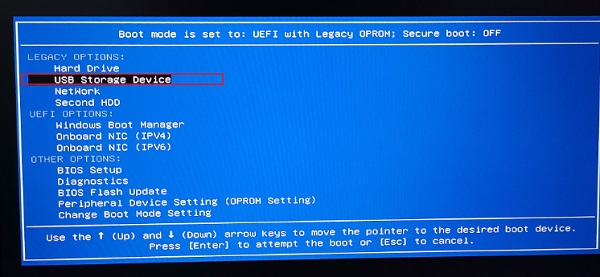
#6. After the settings are completed, press F10 to save the settings, then restart the computer, then press F12 or Fn F12 to enter Boot, and you will see the USB disk startup item.
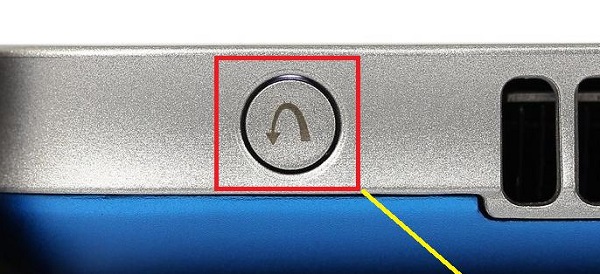
7. If the shortcut key cannot enter the Boot interface, you must use the novo key on the notebook. The location of different models is different, usually on the side or near the power button. as the picture shows.
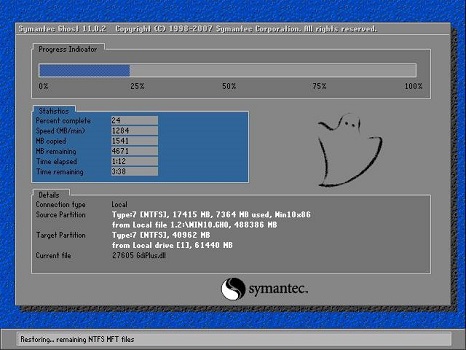
8. Select the USB disk to enter the pe system, then find the installed system downloaded before and run it.

9. Finally, wait for the installation to complete according to the steps. When the computer automatically restarts, just pull out the USB disk.
The above is the detailed content of Tutorial on reinstalling win10 system on Dell laptop. For more information, please follow other related articles on the PHP Chinese website!

Hot AI Tools

Undresser.AI Undress
AI-powered app for creating realistic nude photos

AI Clothes Remover
Online AI tool for removing clothes from photos.

Undress AI Tool
Undress images for free

Clothoff.io
AI clothes remover

Video Face Swap
Swap faces in any video effortlessly with our completely free AI face swap tool!

Hot Article
Hot Tools

Notepad++7.3.1
Easy-to-use and free code editor

SublimeText3 Chinese version
Chinese version, very easy to use

Zend Studio 13.0.1
Powerful PHP integrated development environment

Dreamweaver CS6
Visual web development tools

SublimeText3 Mac version
God-level code editing software (SublimeText3)
Hot Topics
 1389
1389
 52
52

 What is the warranty period for Dell laptops?
Apr 26, 2024 am 08:10 AM
What is the warranty period for Dell laptops?
Apr 26, 2024 am 08:10 AM
Dell’s after-sales maintenance warranty period for all three packages of Dell laptops is one year. The warranty time for different hardware is different. Specifically, hardware with a 36-month warranty includes: CPU, memory. Hardware with a 24-month warranty includes: motherboard, graphics card, LCD screen, hard drive, power adapter, keyboard, and mouse module. The warranty period for Dell notebooks is generally one to three years. Different models have different warranty periods. Generally, the entire machine has a one-year warranty, and specific parts have their own warranty periods. The warranty period for important parts is 3 years, such as memory and graphics card. The warranty period for minor components, such as hard drives, is two years. It should be noted that the higher-positioned Precision mobile workstation only supports basic warranty by default, but the warranty period is extended to 3 years. If you want to get professional
 Dell laptop black screen when booting
May 01, 2024 am 09:04 AM
Dell laptop black screen when booting
May 01, 2024 am 09:04 AM
Dell notebook has a black screen when it is turned on 1. If the notebook has a black screen when it is turned on, the indicator light is on, the main screen is black, and there is no wind when you place your hand on the fan of the host computer. Then it is a problem with the power adapter. At this time, it needs to be removed and replaced with a new one. Start switch problem. Black screen when booting, no self-test. Use the meter pin to short-circuit the startup terminal on the motherboard, and it will start normally. 2. Insufficient battery: Connect the power supply. Wait for a while and then restart. Graphics card failure: Replace the graphics card. If the laptop supports an external monitor, find a good monitor and connect it to your laptop. 3. Reason four: Monitor problem. If the power supply is normal, but the screen is still dark, try to connect another monitor to the computer (you can borrow one if necessary) to make sure it is not the monitor.
 How to use shortcut keys to take screenshots in Win8?
Mar 28, 2024 am 08:33 AM
How to use shortcut keys to take screenshots in Win8?
Mar 28, 2024 am 08:33 AM
How to use shortcut keys to take screenshots in Win8? In our daily use of computers, we often need to take screenshots of the content on the screen. For users of Windows 8 system, taking screenshots through shortcut keys is a convenient and efficient operation method. In this article, we will introduce several commonly used shortcut keys to take screenshots in Windows 8 system to help you take screenshots more quickly. The first method is to use the "Win key + PrintScreen key" key combination to perform full
 How to solve the problem of notebook CPU frequency reduction
Apr 14, 2024 pm 09:04 PM
How to solve the problem of notebook CPU frequency reduction
Apr 14, 2024 pm 09:04 PM
Notebook computer frequency reduction method 1. Open the control panel on the computer desktop. Click Power Options in Control Panel. Change the power plan in Power Options to Energy Saving. After changing to energy saving, you can see in the task manager that the notebook CPU operating frequency has been reduced. 2. The heat dissipation function is realized simply through the physical thermal conduction principle. Place a plastic or metal cooling base on the bottom of your notebook and raise it to promote air circulation and heat radiation, which can achieve cooling effects. Install several cooling fans on the heat dissipation base to improve heat dissipation performance. 3. When no program is running, the CPU automatically reduces the frequency to save power; when the CPU temperature or the operating environment temperature is too high, the CPU automatically reduces the frequency to prevent burning. You can also try the suggestions from friends on the first floor. Please refer to the setting method.
 Win11 Tips Sharing: Skip Microsoft Account Login with One Trick
Mar 27, 2024 pm 02:57 PM
Win11 Tips Sharing: Skip Microsoft Account Login with One Trick
Mar 27, 2024 pm 02:57 PM
Win11 Tips Sharing: One trick to skip Microsoft account login Windows 11 is the latest operating system launched by Microsoft, with a new design style and many practical functions. However, for some users, having to log in to their Microsoft account every time they boot up the system can be a bit annoying. If you are one of them, you might as well try the following tips, which will allow you to skip logging in with a Microsoft account and enter the desktop interface directly. First, we need to create a local account in the system to log in instead of a Microsoft account. The advantage of doing this is
 In summer, you must try shooting a rainbow
Jul 21, 2024 pm 05:16 PM
In summer, you must try shooting a rainbow
Jul 21, 2024 pm 05:16 PM
After rain in summer, you can often see a beautiful and magical special weather scene - rainbow. This is also a rare scene that can be encountered in photography, and it is very photogenic. There are several conditions for a rainbow to appear: first, there are enough water droplets in the air, and second, the sun shines at a low angle. Therefore, it is easiest to see a rainbow in the afternoon after the rain has cleared up. However, the formation of a rainbow is greatly affected by weather, light and other conditions, so it generally only lasts for a short period of time, and the best viewing and shooting time is even shorter. So when you encounter a rainbow, how can you properly record it and photograph it with quality? 1. Look for rainbows. In addition to the conditions mentioned above, rainbows usually appear in the direction of sunlight, that is, if the sun shines from west to east, rainbows are more likely to appear in the east.
 Comparing the performance of Win11 and Win10 systems, which one is better?
Mar 27, 2024 pm 05:09 PM
Comparing the performance of Win11 and Win10 systems, which one is better?
Mar 27, 2024 pm 05:09 PM
The Windows operating system has always been one of the most widely used operating systems on personal computers, and Windows 10 has long been Microsoft's flagship operating system until recently when Microsoft launched the new Windows 11 system. With the launch of Windows 11 system, people have become interested in the performance differences between Windows 10 and Windows 11 systems. Which one is better between the two? First, let’s take a look at W
 Must read before purchasing a system: Analysis of the advantages and disadvantages of Win11 and Win10
Mar 28, 2024 pm 01:33 PM
Must read before purchasing a system: Analysis of the advantages and disadvantages of Win11 and Win10
Mar 28, 2024 pm 01:33 PM
In today's information age, personal computers play an important role as an indispensable tool in our daily lives. As one of the core software of computers, the operating system affects our usage experience and work efficiency. In the market, Microsoft's Windows operating system has always occupied a dominant position, and now people face the choice between the latest Windows 11 and the old Windows 10. For ordinary consumers, when choosing an operating system, they do not just look at the version number, but also understand its advantages and disadvantages.
