

Fingerprint unlocking cannot be used in win10 home version

The Win10 operating system is equipped with a fingerprint login function, allowing you to easily identify your fingerprint and log in to the device conveniently and worry-free. Recently, many friends have been reporting that fingerprint recognition fails when the screen is locked and in standby mode, so what should I do?
Win10 Home Edition fingerprint unlocking cannot be used Solution
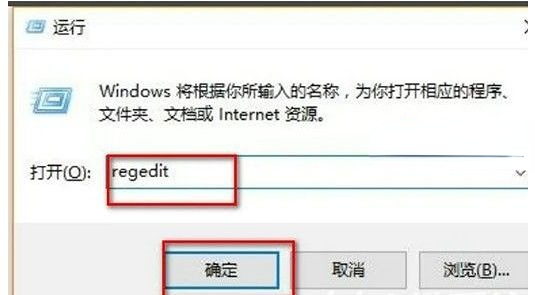
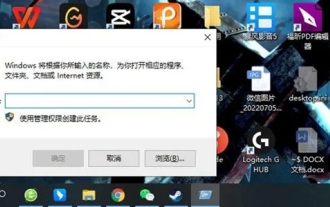
1. First we open the registry editor, then we press win R to open the run window, then we enter regedit here, and press Press the Enter key.
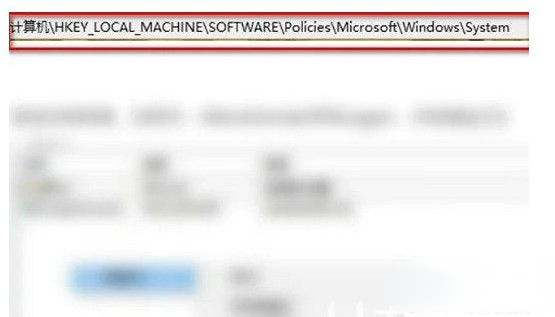
2. Then we need to locate the HKEY_LOCAL_MACHINE\SOFTWARE\Policies\Microsoft\Windows\System" registry key path.
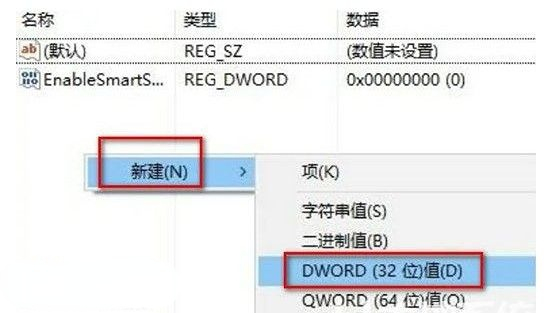
3. Here we create a new registry value named AllowDomainPINLogon, and we set it to 1.
4. We can see in the login options Add buttons for fingerprints and pins. At this time, we will find that they can be added normally. We only need to use them normally.

The above is the detailed content of Fingerprint unlocking cannot be used in win10 home version. For more information, please follow other related articles on the PHP Chinese website!

Hot AI Tools

Undresser.AI Undress
AI-powered app for creating realistic nude photos

AI Clothes Remover
Online AI tool for removing clothes from photos.

Undress AI Tool
Undress images for free

Clothoff.io
AI clothes remover

AI Hentai Generator
Generate AI Hentai for free.

Hot Article
Hot Tools

Notepad++7.3.1
Easy-to-use and free code editor

SublimeText3 Chinese version
Chinese version, very easy to use

Zend Studio 13.0.1
Powerful PHP integrated development environment

Dreamweaver CS6
Visual web development tools

SublimeText3 Mac version
God-level code editing software (SublimeText3)
Hot Topics


 How to use the windows10 activation tool 'A must-read for newbies: How to activate the win10 professional version after it expires'
Feb 06, 2024 pm 06:55 PM
How to use the windows10 activation tool 'A must-read for newbies: How to activate the win10 professional version after it expires'
Feb 06, 2024 pm 06:55 PM
Generally, there are two ways to activate the win10 system, one is to use the win10 product key, and the other is to use the win10 activation tool. Today we introduce the method of activation using product keys. I am using Windows 10 Professional Edition. The specific method is as follows: First, find the command prompt in the system start menu, and select Run as administrator in More. This is very important. If you are not running as an administrator, activation will not be successful. Activation method: After the system is installed, first open the CMD command line window as an administrator, press Win+X, and select Command Prompt (Administrator). Note: kms.03k.org is the kms server address and may be invalid. If activation fails, you can search for the kms server by yourself.
 Win10 Home Edition control panel does not have BitLocker
Feb 11, 2024 pm 06:54 PM
Win10 Home Edition control panel does not have BitLocker
Feb 11, 2024 pm 06:54 PM
The Bitlocker function can effectively improve computer performance and security quality, but many Win10 Home Edition users are struggling to find this setting in the control panel, resulting in inability to use it normally. In fact, it is very simple to solve this problem. The win10 home version control panel does not have BitLocker1. First, we need to use the shortcut key win+R to directly open the run window. 2. Then we enter services.msc and then press the Enter key. 3. After entering the policy editor, we find the path of BitLockerDriveEncryptionService and double-click to open it. 4. After opening, we can see the window and click to start. 5. Then we will
 What should I do if there is no offline option in Windows 10 Home Edition Disk Management?
Feb 20, 2024 am 08:39 AM
What should I do if there is no offline option in Windows 10 Home Edition Disk Management?
Feb 20, 2024 am 08:39 AM
Recently, many friends often encounter that the disk management tool does not display the two options of "offline" and "online", thinking that whether it is an external hard disk device connected to the computer or the built-in C or D drive, they cannot The solution to this operation is actually very simple. Win10 Home Edition Disk Management does not have an offline option. Solution 1. First, we click the Start button on the computer’s taskbar. 2. Then we enter the keyword of the service in the search box and select the option we need. 3. After entering the corresponding option interface, we use the mouse to double-click the OfflineFiles option. 4. After entering the OfflineFiles interface, we click the start button in the service status here. 5. Finally we
 Set password for shared folder in win10 home version
Jan 31, 2024 am 09:03 AM
Set password for shared folder in win10 home version
Jan 31, 2024 am 09:03 AM
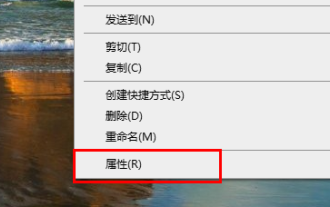
To protect the security of our shared folders, we can set a password. For those who are not familiar with the operation method, you only need to right-click on the folder, select Properties, and then set the password. The operation is very convenient. Set a password for a shared folder in Win10 Home Edition: 1. First, right-click on the folder that needs to be encrypted, and then click "Properties". 2. Then, select the "Share" option on the upper interface. 3. Then you can find the password protection option below and click "Network and Sharing Center". 4. Select "All Networks". 5. Finally, check the password protected option and click "Apply" to take effect.
 How to turn off boot disk check in Win10 Home Edition
Feb 15, 2024 pm 06:00 PM
How to turn off boot disk check in Win10 Home Edition
Feb 15, 2024 pm 06:00 PM
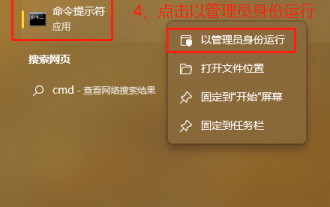
In fact, our Win10 has a built-in hard disk self-test function. When this function is enabled, the system will automatically perform a hard disk check during boot to confirm whether the hard disk is stable. However, this may cause the computer startup speed to be affected, so many friends hope to Turn this feature off but don't know how. How to turn off the startup disk check in Win10 Home Edition: Method 1: Command modification 1. First, we click the search icon in the taskbar in the lower left corner. After entering the search interface, we enter cmd, then we select the command prompt and right-click. In the pop-up window, we Select Run as administrator. 2. If we are sure to turn off the disk detection of the c drive, we need to check the disk first to see if it is faulty, and then enter in the command prompt window
 Win10 Home Edition wallpaper is locked and cannot be changed
Feb 14, 2024 pm 11:00 PM
Win10 Home Edition wallpaper is locked and cannot be changed
Feb 14, 2024 pm 11:00 PM
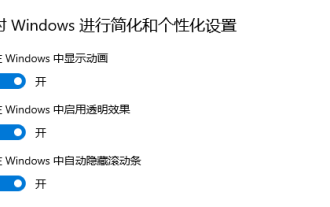
In most cases, Windows 10 wallpapers usually remain fixed if the user has not activated the operating system or made other specific settings. If the user wants to change the wallpaper at this time, he will inevitably face a certain degree of difficulty. In order to solve this problem, we have provided the following detailed steps and solutions for your reference. The wallpaper of Win10 Home Edition is locked and cannot be changed. 1. Turn off the three functional options of "Animation Effect", "Transparency Adjustment" and "Background Display" in the "Ease of Use" section in the settings. 2. Even if the problem is not solved after following the above steps, please press the "window+R" hotkey combination on the computer keyboard to activate the "Run" dialog box. 3. Execute the following command in the dialog box: "%prog
 How to use local account in Win10 Home Edition OOBE
Feb 15, 2024 am 09:57 AM
How to use local account in Win10 Home Edition OOBE
Feb 15, 2024 am 09:57 AM
After we successfully register a local account in the Windows 10 operating system, we can more conveniently perform various system management tasks, such as synchronizing personalized settings and E favorites, etc., but many of our friends do not know How to use a local account. Tutorial on using local account settings for Win10 Home Edition OOBE 1. First, we directly enter run in the search box on the taskbar, and then continue to select the best match. You can also directly use the shortcut key win+R to summon the run pop-up window. 2. Then we enter netplwiz in the pop-up run box, and then continue to click OK. 3. We find the Add button in the pop-up user account window and click Add. 4. In the interface that pops up, in the lower left corner of our single machine
 Windows 10 Home Edition public network changed to private network
Feb 12, 2024 pm 10:27 PM
Windows 10 Home Edition public network changed to private network
Feb 12, 2024 pm 10:27 PM
In order to use our computer, in addition to some hardware, it also needs to be connected to a stable network. Many friends have discovered that the network in the computer is divided into public network and private network. Many people are curious about how to convert the public network into a private network. . Win10 Home Edition public network is changed to a private network 1. Advanced settings of the Advanced Sharing Center 1. First, we directly press the win+R shortcut key combination to summon the run pop-up window, then enter "control panel" here, and click OK to open the control panel . 2. Then we select Network and Internet--Network and Sharing Center--Change advanced sharing settings. 3. Then we click on the dedicated option in the more advanced sharing settings interface and check the "Enable
