The lens and hardware of Apple mobile phones can restore the original colors and take real and beautiful photos, so many people like to take more photos. However, the problem that comes with it is that there are more and more photos on the phone, causing the phone to run out of space and become sluggish.
#In order to free up phone memory, we can choose to transfer some photos to the computer. Usually, people give priority to transferring photos through social software such as WeChat and QQ. However, this method has an obvious disadvantage, that is, the transferred photos will be compressed, resulting in a decrease in photo quality. In order to ensure that the photo quality is not affected, we can choose to use a data cable or cloud storage service to transfer the photos, which can maintain the original quality of the photos.
The following will introduce you to several correct methods of migrating live photos taken by Apple mobile phones to your computer. You can try it if necessary.
Method 1: Use Migrate Photos to Computer
With the help of the import and export function, you can easily migrate the original photos to your computer.
#Step 1: Download and install the latest version by connecting your iPhone to your computer.
Step 2: Open [My Device]-[Photos] and select the live photo to import and export.

Method 2: Use iTunes to import photos to your computer
iTunes It is a device content management software officially provided by Apple, which can help you manage and synchronize data on the device, and synchronize photos, videos and other content on the mobile phone to the computer. The following are the specific steps of this method:
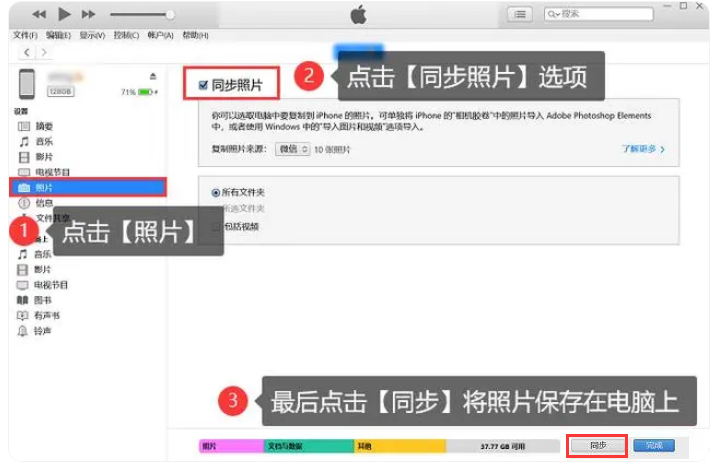
Step 1: Open the latest version of iTunes, and then ensure that the iPhone has been successfully connected to the computer.
#Step 2: Click the iPhone icon on the page and select the [Photos] option.
Step 3: Check [Sync Photos], select the photo folder that needs to be synchronized, and then click [Sync] on the lower right to transfer the photos.

Method 3: Upload photos via iCloud synchronization
Turn on [Photos 】iCloud synchronization function, using the computer iCloud to import iPhone photos to the computer, this is also a feasible method.
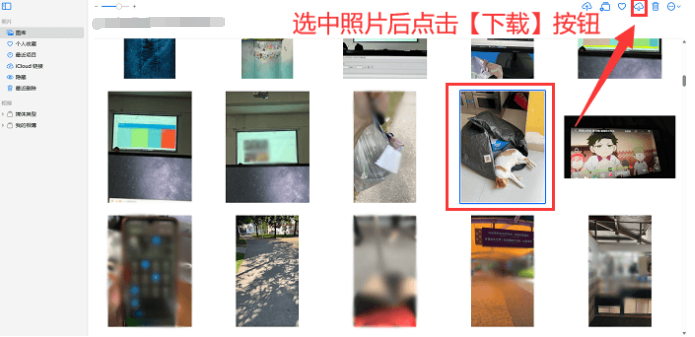
Step 1: Search the iCloud official website on your computer and enter your account password to log in.

Step 2: Open the [Photo] software and long press the Ctrl key to edit the photo Select in batches and click [Download] after checking to save the photos to your computer.

Method 4: Use the [AirDrop] function to transfer iPhone photos to Mac with one click
If you are using a Mac computer, transferring photos is even easier.
(In order to ensure the clarity of the photos and ensure that the photos transferred to the computer are full analysis rate photos, please first enter [Photos] in [Settings] on the iPhone and select [Transfer to Mac or PC]. Change the option to [Keep Original], then change the camera's [Format] to [Best Compatibility] in [Settings] before proceeding.)
Steps 1: First, make sure that both the iPhone and the Mac computer are on the same network, and that both the iPhone and the computer have the [AirDrop] function turned on.
Step 2: Select the photos to be transferred in batches on your mobile phone, click [Share] - [AirDrop] - [Your Mac] to transfer the photos Transfer to computer with one click.
The above is the detailed content of How to transfer live photos from Apple phone to computer?. For more information, please follow other related articles on the PHP Chinese website!


