How to Fix Realtek HD Audio Manager Stopped Working Issue
When we use the computer, we sometimes encounter a message that the computer's built-in sound card realtek high-definition audio manager has stopped working. For this kind of problem, I think you can use third-party software to troubleshoot and repair the computer driver.
realtek High Definition Audio Manager has stopped working:
1. First, you need to download the driver wizard, install it and open it
2, and then update the driver.
The installation is very fast and has been completed. We start updating the computer driver.
There is no Realtek High Definition Audio Manager in the control panel. The main sound card driver needs to be updated. Click: Detect now

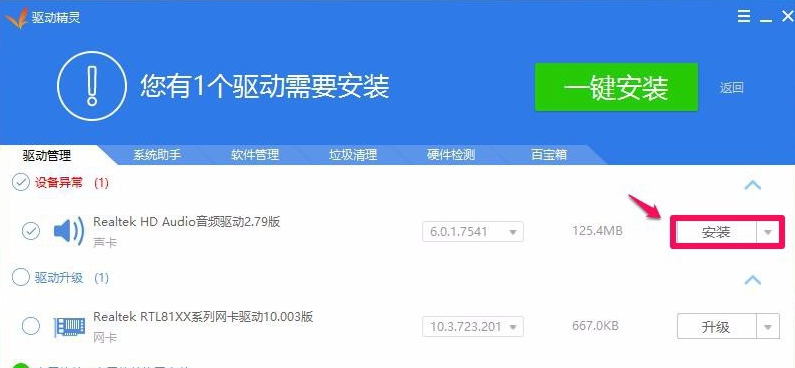
3. Install the driver in the open window window, click "Install" of the Realtek HD Audio audio driver.
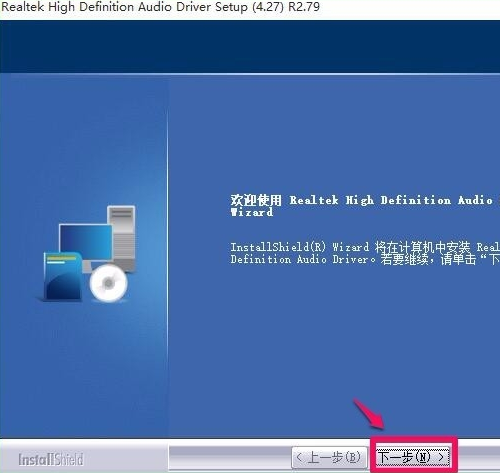
4. In the driver installation window that opens, we click Next.
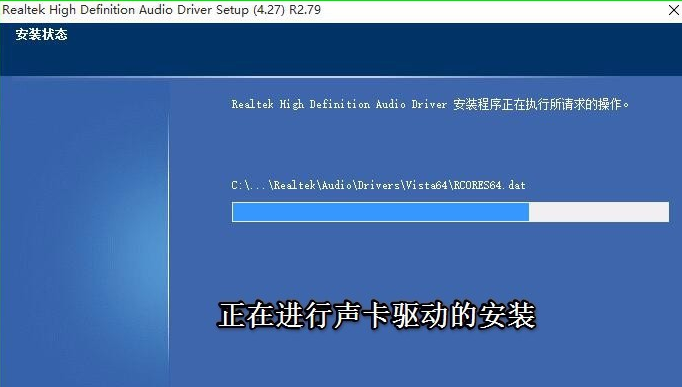
5. The sound card driver is being installed, please wait.
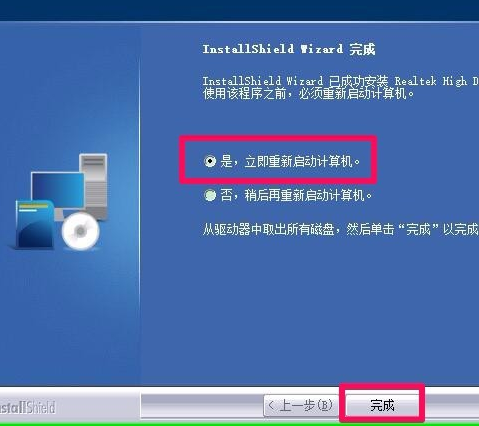
6. The system's sound card driver has been successfully installed. The installation program asks to restart the computer. We click Finish to restart the computer.
7. Restart the computer and enter the system desktop, click to open the control panel
It can be seen that the Realtek High Definition Audio Manager item is already displayed in the control panel. Double left click on Realtek High Definition Audio Manager.
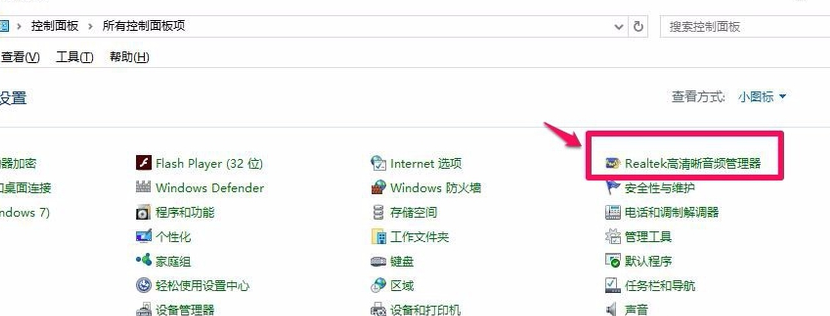
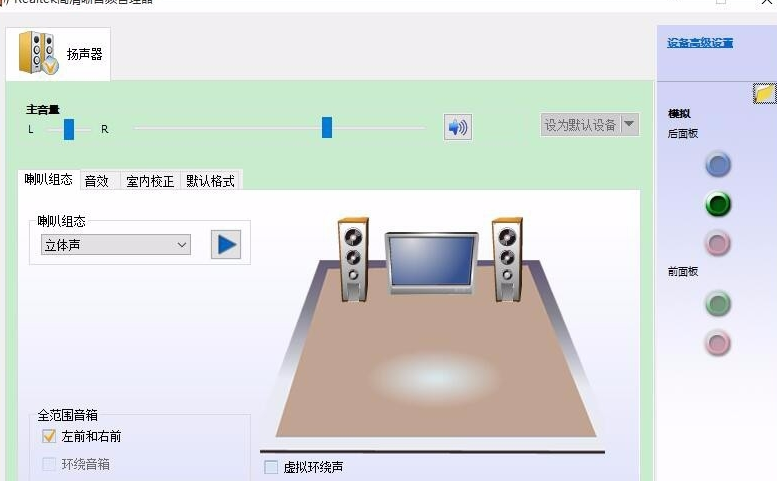
8. Then double-click the Realtek High Definition Audio Manager item with the left button to open the Realtek High Definition Audio Manager window.
More related: win10 control panel hardware and sound without realtek
The above is the detailed content of How to Fix Realtek HD Audio Manager Stopped Working Issue. For more information, please follow other related articles on the PHP Chinese website!

Hot AI Tools

Undresser.AI Undress
AI-powered app for creating realistic nude photos

AI Clothes Remover
Online AI tool for removing clothes from photos.

Undress AI Tool
Undress images for free

Clothoff.io
AI clothes remover

AI Hentai Generator
Generate AI Hentai for free.

Hot Article

Hot Tools

Notepad++7.3.1
Easy-to-use and free code editor

SublimeText3 Chinese version
Chinese version, very easy to use

Zend Studio 13.0.1
Powerful PHP integrated development environment

Dreamweaver CS6
Visual web development tools

SublimeText3 Mac version
God-level code editing software (SublimeText3)

Hot Topics
 Effective methods to solve win11 system update failure
Jan 02, 2024 pm 12:15 PM
Although win11 has reduced the update frequency, some update patches will still be released. Some users will have the problem of win11 system update failure. At this time, they can try to manually download or modify settings to solve the problem. Tutorial for printing directly by right-clicking on the win11 desktop: 1. First press the keyboard shortcut "Win+R" to open Run. 2. Then enter "services.msc" and press Enter to open the service. 3. Then double-click to open the "windowsupdate" service. 4. After opening, click "Stop" and confirm to save. 5. After saving, we go to the "C:\Windows\SoftwareDistribution" location and delete the "download" folder. 6
 How to Fix Realtek HD Audio Manager Stopped Working Issue
Jan 13, 2024 pm 03:42 PM
When we use the computer, we sometimes encounter a message that the computer's built-in sound card realtek high-definition audio manager has stopped working. For this kind of problem, I think you can use third-party software to troubleshoot and repair the computer driver. realtek high-definition audio manager has stopped working: 1. First, you need to download the driver wizard and install it. 2. Then update the driver. The installation was very quick, and now that it's installed, we start updating the computer's drivers. There is no Realtek High Definition Audio Manager in the control panel. The main sound card driver needs to be updated. Click: Detect Now 3. In the driver installation window that opens, click "Install" of the Realtek HD Audio audio driver. 4. Open
 How to solve the blue screen problem in Windows 10
Dec 23, 2023 pm 01:54 PM
The win10 system is an excellent system that is very smooth to use! The strong stability makes the win10 system generally free of any malfunctions during use! But no matter how good the system is, errors will always occur! Recently, many friends have reported that their win10 systems frequently have blue screens! Today, the editor will bring you the solution to the blue screen after the win10 update. Let’s take a look at it together. Solution to Windows 10 blue screen: Detailed steps: 1. Long press the power button to shut down; 2. Press the power button to turn on; 3. Repeat steps 1~2 three times; 4. Confirm whether the "Repair" interface appears on the screen, if so, click " Advanced Repair Options"; 5. Click "Troubleshoot", click "
 Win10 update failed and cannot enter the system solution
Jan 07, 2024 pm 01:38 PM
When using the win10 system, many users will encounter some strange problems, such as being unable to enter the system after the update fails. So how do these problems need to be solved? Let’s take a look at the solutions to the problem of being unable to enter the system after the win10 update fails. What to do if win10 update fails and cannot enter the system: 1. This reason is caused by an error during system update. 2. Press and hold the power button to force shut down and restart. After about two to three times (try a few more times if you can't get in), you will automatically enter the "System Menu" interface. 3. Then in the interface that opens, click to select "Troubleshooting" and then enter "Advanced Options". 4. In the advanced options, find the "Return to previous version" option button and click it. 5. Then it will
 What to do if your iPhone crashes
Feb 21, 2024 pm 12:39 PM
As a leading smartphone, iPhone’s powerful functions and stable performance are one of the reasons why it is favored by users. However, even the best technology is bound to have problems. When the iPhone freezes, it may cause users to feel troubled and anxious. However, don’t worry, here are several ways to fix iPhone freezing. First of all, the easiest way is to solve it by force restarting. On iPhoneX and later models, press and hold the volume up button and volume down button, then press and hold the side or top button
 Win11 photo crash solution
Jan 07, 2024 pm 03:34 PM
Win11 provides users with a photo application for browsing pictures, but when we use it, we may encounter the problem of a black screen and a crash as soon as we open the photo application. At this time, we can try to solve it by using commands or turning off backup. Solution to win11 photo crash: Method 1: 1. First, right-click the "Start Menu" at the bottom 2. Then open the "Windows Terminal (Administrator)" 3. After opening, enter the following command and press Enter to run: Get -AppxPackage-AllUsers|Foreach{Add-AppxPackage-DisableDevelopmentMode-Register"$($_.Insta
 How to start realtek High Definition Audio Manager
Jan 13, 2024 pm 03:03 PM
realtek high-definition audio manager is a program responsible for computer sound. Almost all sound-related settings require the support of realtek high-definition audio manager. Today, the editor will bring you how to start realtek high-definition audio manager! Let's take a look together. How to open realtek high-definition audio manager: 1. First, enter control panel in the search in the lower left corner of the screen and click to open. 2. Find Hardware and Sound in the control panel that opens and open it. 3. Continue to find the realtek high-definition audio manager as shown in the picture in the opened hardware and sound interface and click to open it. 4. After opening the Realtek High Definition Audio Manager, it should be similar to the picture below. The display will vary depending on the specific system.
 PHP Warning: mysql_query() expects at least solution
Jun 22, 2023 pm 12:20 PM
PHP is a widely used server-side programming language commonly used to develop websites and web applications. During the development process using PHP, you may encounter various errors and problems. Among them, a common problem is the "PHPWarning:mysql_query()expectsatleast" error. This error usually occurs when using the mysql_query() function, which is one of the core functions in PHP for operating the MySQL database. This function is executing


