How to restore win7 system: system recovery steps
When using a computer, some users will accidentally delete files that should not be deleted during the operation of deleting junk files, causing the system to fail to run normally, which will have a negative impact on the user, so what should be done? Woolen cloth? System restore, below, the editor has prepared a method for you to restore the win7 system.
Computers will inevitably have problems during use. Many users of the win7 system will reinstall the system to solve the problem when their computers become motionless. In fact, you can also choose the system restore function, and many system restore software There are hotkeys for one-click restore, so how to restore win7 system? Next, the editor will introduce to you how to restore the win7 system.
How to restore win7 system
Enter the computer’s control panel and find the “Backup and Restore Options” in the control panel

One-click restoration picture-1
Then go in and select to restore system settings and computer.
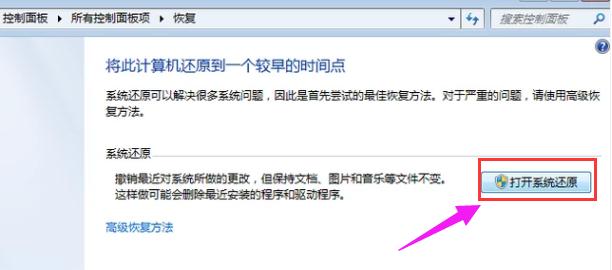
win7 Figure-2
Click on the Start menu in the view column, and then click on "All Programs",
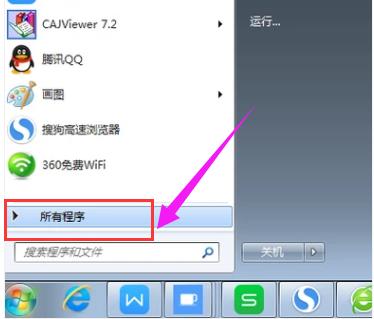
win7Figure-3
Find "Attachments" in all programs and click "Attachments" to open it ,
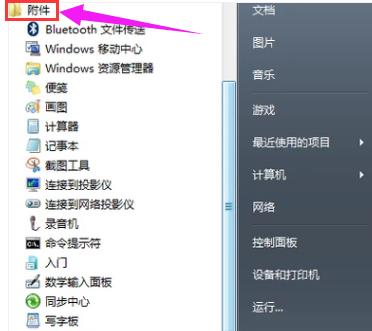
win7 Figure-4
Find the last "System Tools" in the attachment, click to open it, and Select "System Restore" in System Tools.
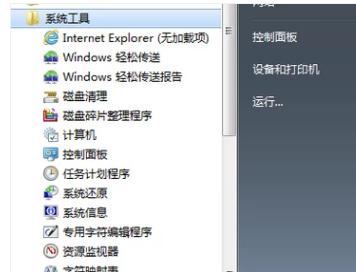
System Restore Picture-5
After opening system restore, a window will appear on the computer, and then follow In the window that appears on your computer,
click "Next"
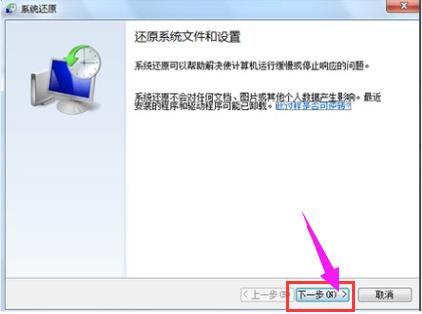
System Restore Diagram-6
According to the prompts, select a restore point you want, and then click "Next"
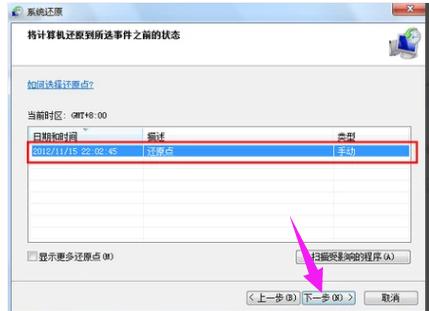
System Diagram-7
Click "Finish" in the window that appears,
Then wait for the system restore, just wait for the system restore to complete.
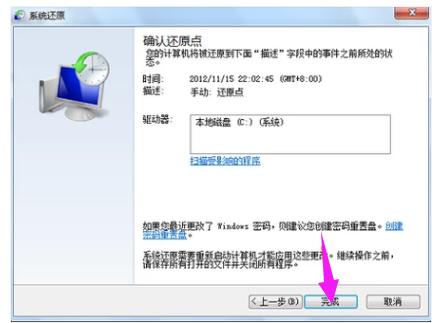
win7 Figure-8
The above is the method to restore the win7 system.
The above is the detailed content of How to restore win7 system: system recovery steps. For more information, please follow other related articles on the PHP Chinese website!

Hot AI Tools

Undresser.AI Undress
AI-powered app for creating realistic nude photos

AI Clothes Remover
Online AI tool for removing clothes from photos.

Undress AI Tool
Undress images for free

Clothoff.io
AI clothes remover

AI Hentai Generator
Generate AI Hentai for free.

Hot Article

Hot Tools

Notepad++7.3.1
Easy-to-use and free code editor

SublimeText3 Chinese version
Chinese version, very easy to use

Zend Studio 13.0.1
Powerful PHP integrated development environment

Dreamweaver CS6
Visual web development tools

SublimeText3 Mac version
God-level code editing software (SublimeText3)

Hot Topics
 1382
1382
 52
52
 What should I do if the Win7 taskbar does not display the icon? How to solve the problem of the computer taskbar icon disappearing
Jun 09, 2024 pm 01:49 PM
Recently, many users using Win7 system have found that the icons in the taskbar suddenly disappeared, which makes the operation very inconvenient and they do not know how to solve the problem. This article will introduce to you how to solve the problem of disappearing taskbar icons in Win7 system. Bar! Cause Analysis When encountering such a situation, there are generally two situations: one is that the taskbar on the computer does not really disappear, but is just hidden, and the other is that the taskbar does disappear. Method 1: 1. There is a situation that you need to confirm first, that is, when the mouse is placed at the bottom of the screen, the taskbar will be displayed. You can directly click the mouse on the taskbar and select "Properties". 2. In the dialog box that opens, click & on the "Hide taskbar" option.
 Huawei's Qiankun ADS3.0 intelligent driving system will be launched in August and will be launched on Xiangjie S9 for the first time
Jul 30, 2024 pm 02:17 PM
On July 29, at the roll-off ceremony of AITO Wenjie's 400,000th new car, Yu Chengdong, Huawei's Managing Director, Chairman of Terminal BG, and Chairman of Smart Car Solutions BU, attended and delivered a speech and announced that Wenjie series models will be launched this year In August, Huawei Qiankun ADS 3.0 version was launched, and it is planned to successively push upgrades from August to September. The Xiangjie S9, which will be released on August 6, will debut Huawei’s ADS3.0 intelligent driving system. With the assistance of lidar, Huawei Qiankun ADS3.0 version will greatly improve its intelligent driving capabilities, have end-to-end integrated capabilities, and adopt a new end-to-end architecture of GOD (general obstacle identification)/PDP (predictive decision-making and control) , providing the NCA function of smart driving from parking space to parking space, and upgrading CAS3.0
 How to clear all desktop background images in Win7? Tips for deleting personalized background images in Win7
Jun 02, 2024 am 09:01 AM
In Win7 system, many users want to delete personalized desktop background images, but do not know how to delete them. This article will show you how to delete personalized background images in Win7 system. 1. First, open the control panel interface of the Win7 system and click to enter the "Appearance and Personalization" settings; 2. Then, in the opened interface, click the "Change Desktop Background" setting; 3. Then, click below "Desktop background" option; 4. Then, select Select all, and then click Clear all. Of course, you can also use it under "Customize", right-click the theme you want to delete, and then click &q on the shortcut menu
 Where is the network discovery in Win7? Tips for enabling the network discovery function in Win7
Jun 04, 2024 am 09:02 AM
Many computer users know that network discovery is a network setting. This setting will affect whether the computer can find other computers and devices on the network and whether it can find the computer when other computers on the network are found. So how to enable network discovery in win7? The following computer System Home U Disk Installation will introduce you to the tutorial on how to enable network discovery in win7 system. 1. First, click the "Start Menu" icon on the desktop taskbar and choose to open the "Control Panel" interface. 2. Then, in the interface that opens, set "View by" to "Category", and then choose to enter "Network and Internet"
 How to delete vbs virus in win7
Mar 26, 2024 pm 09:21 PM
1. Click [Start → Run] and enter gpedit.msc. On the left side of the [Group Policy] window, click the [Computer Configuration → Windows Settings → Security Settings → Software Restriction Policy] item, and then click the [Action → Create New Policy] menu item. As shown in the picture: 2. Select [Other Rules] from the left. Right-click the blank space in the right pane and select the [New Path Rule] item in the menu. In the pop-up window, click the [Browse] button after [Path], select the wscript.exe file in the C: WindowsSystem32 folder, and set the [Security Level] to [Not Allowed]. Change C: System32, Dllcache and I386 under Windows
 Introduction to how to change the startup sound of Windows 7 computer
Mar 26, 2024 pm 09:30 PM
1. First copy the file you want to use as boot music to the corresponding directory of C: WindowsMedia. As shown in the figure: 2. Right-click the desktop on a single machine and select Personalize menu; as shown in the figure: 3. Select the sound option; as shown in the figure: 4. In the [Program Events] box in the [Sound] tab of the sound interface Select [Windows Login], then click [Browse]; as shown in the figure: 5. Select the music file that needs to be replaced, click Open, then click Apply and confirm to save the settings. as the picture shows:
 Always new! Huawei Mate60 series upgrades to HarmonyOS 4.2: AI cloud enhancement, Xiaoyi Dialect is so easy to use
Jun 02, 2024 pm 02:58 PM
On April 11, Huawei officially announced the HarmonyOS 4.2 100-machine upgrade plan for the first time. This time, more than 180 devices will participate in the upgrade, covering mobile phones, tablets, watches, headphones, smart screens and other devices. In the past month, with the steady progress of the HarmonyOS4.2 100-machine upgrade plan, many popular models including Huawei Pocket2, Huawei MateX5 series, nova12 series, Huawei Pura series, etc. have also started to upgrade and adapt, which means that there will be More Huawei model users can enjoy the common and often new experience brought by HarmonyOS. Judging from user feedback, the experience of Huawei Mate60 series models has improved in all aspects after upgrading HarmonyOS4.2. Especially Huawei M
 How to modify boot animation in Windows 7
Mar 26, 2024 pm 08:51 PM
1. Press and hold the [Win+R] keys to open the run dialog box, enter [regedit] in the search box, and then confirm; as shown in the figure: 2. Open HKEY_LOCAL_MACHINESoftwareMicrosoftWindowsCurrentVersionAuthenticationLogonUIBackgroud in the opened registry editor; as shown in the figure Display: 3. Double-click [OEMBackground] and open it, change the default value [0] to [1], and then confirm to exit; as shown in the figure: 4. Rename the image backgroundDefault.jpg, (the image size cannot exceed 256k


