Detailed explanation of three disk partitioning tools on CentOS Linux
With the rapid development of technology, more and more enterprises have higher and higher requirements for the stability of servers. More and more enterprises are beginning to use Linux systems to deploy their own services in order to achieve high efficiency and stability. Of course, Any operating system requires the most basic foundation, which is the hard disk and hard disk partitions. Today I will recommend several partition tools under CentOS Linux and how to view the partition environment. I will also give you some basic knowledge about hard disks
1. Hard disk interface type
Partitioning must be a partition of the hard disk, so let’s first talk about the interface type of the hard disk. The hard disk will be divided now. It is divided into two categories, parallel interface and serial interface. Nowadays, serial interface is commonly used on servers and PCs. OK interface.
Parallel interface is divided into two interfaces: IDE and SCSI. The disadvantage of the parallel interface is that electrical signals will cause interference during transmission.
Interface rate:
IDE:133MB/s
SCIS:640MB/s
Serial interfaces are divided into three interfaces: STAT, SAS, and USB. Our servers and PCs also use SATA interfaces
Serial port:
SATA:6Gbps
SAS: 6Gbps
USB:480MB/s
The current disk partition modes are divided into two types, MBR and GPT.
MBR Mode
MBR: Master Boot Record, 1982, uses 32 bits to represent the number of sectors, and the partition does not exceed 2T
The number of partitions that can be partitioned in MBR mode is: 4 primary partitions; 3 primary partitions 1 extension (N logical partitions)
Of course, when the hard disk is partitioned, it needs some space to store the partition information. This part of the space is in track 0 and sector 0: 512 bytes.
Start 446 bytes to store boot loader
The middle 64 bytes store the partition table, and every 16 bytes: identifies a partition
The last 2 bytes: store 55AA to indicate the hard disk mode type
GPT Mode
GPT: GUID (Globals Unique Identifiers) partition table supports 128 partitions, uses 64 bits, supports 8Z (512Byte/block) 64Z (4096Byte/block)
Use 128-bit UUID (Universally Unique Identifier) to represent the disk and partition. The GPT partition table is automatically backed up in the first and last copies, and has a CRC check digit
UEFI (Unified Extensible Firmware Interface) hardware supports GPT, enabling the operating system to boot
2. Let us see the capabilities of the three partition tools under Linux.
Laodangyizhuang fdisk.
fdisk is a very old partitioning tool in Linux. Although the tool is old, simplicity and convenience are the advantages of fdisk. Of course, gdisk also inherits this advantage. Their functions are very similar, but the fdisk tool is mainly used to To partition a hard disk in MBR mode, the gdisk tool is used to partition a hard disk in GPT mode. Here we will talk about the fdisk tool. fdisk cannot target 2T
fdisk, gdisk tools
fdisk /dev/sdb
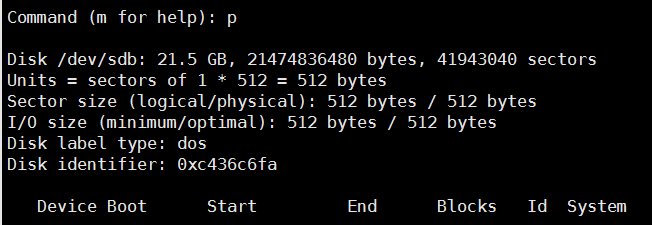
fdisk -l [-u] [device...] View hard disk and partition information
Commonly used subcommands:
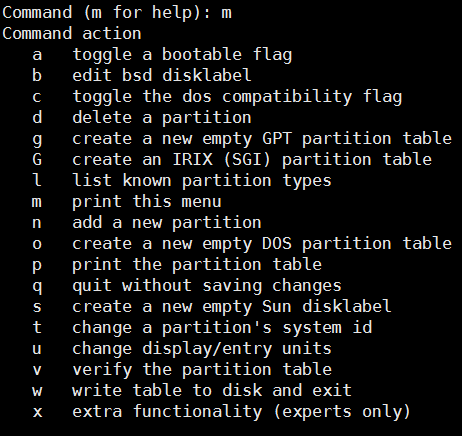
m Help List

p Partition List

l View partition type

t Change partition type

n Create a new partition

d Delete partition

w Save and exit
After fdisk partitioning, the operation is only in the memory and does not actually partition the hard disk. If you really need to partition w, just save it

q Exit without saving
Of course, if you regret it, entering q will not save the previous operation
After introducing the options, let me do an experiment for you. Let everyone know how to use this tool.
[root@TianRandai ~]#fdisk /dev/sdb#对/dev/sdb进行操作
Welcome to fdisk (util-linux 2.23.2).

Changes will remain in memory only, until you decide to write them.
Be careful before using the write command.


Command (m for help): n #建立一个分区
Partition type:
 p primary (0 primary, 0 extended, 4 free)
 e extended
Select (default p): p #分区类型为主分区,p是主分区,e是扩展分区
Partition number (1-4, default 1): 1#指定分区号
First sector (2048-41943039, default 2048):
Using default value 2048
Last sector, +sectors or +size{K,M,G} (2048-41943039, default 41943039): +2G
Partition 1 of type Linux and of size 2 GiB is set

Command (m for help): t #指定分区标记类型
Selected partition 1
Hex code (type L to list all codes): 82
Changed type of partition 'Linux' to 'Linux swap / Solaris'

Command (m for help): w #保存操作
The partition table has been altered!

Calling ioctl() to re-read partition table.
Syncing disks.
Powerful partitioning tool parted
parted
The partitioning of the parted tool is instantaneous, so you must be careful when partitioning, because you may accidentally partition the reused hard disk, so you must be cautious and cautious when using it.
Usage: parted [options]... [device [command [parameters]...]...]
parted /dev/sdb mklabel gpt|msdos specifies the mode for the disk
parted /dev/sdb print Display disk information
parted /dev/sdb mkpart primary/extended/logical 0 200 (default M) Create partition type and size
parted /dev/sdb rm 1 delete partition
parted -l displays information about all disks
选项介绍完,我来给大家做一个实验。让大家了解一下这款工具的使用方式。
[root@TianRandai ~]#parted /dev/sdb mklabel gpt #指定磁盘模式为GPT
Warning: The existing disk label on /dev/sdb will be destroyed and all data on this disk
will be lost. Do you want to continue?
Yes/No? yes
Information: You may need to update /etc/fstab.

[root@TianRandai ~]#parted /dev/sdb mkpart primary 0 2G #创建分区,分区类型为主分区,大小为2G
Warning: The resulting partition is not properly aligned for best performance.
Ignore/Cancel? i
Information: You may need to update /etc/fstab.

[root@TianRandai ~]#parted /dev/sdb print #查看磁盘信息
Model: VMware, VMware Virtual S (scsi)
Disk /dev/sdb: 21.5GB
Sector size (logical/physical): 512B/512B
Partition Table: gpt
Disk Flags:

NumberStart End SizeFile systemName Flags
 117.4kB2000MB2000MB primary

[root@TianRandai ~]#parted /dev/sdb rm 1 #删除分区1
Information: You may need to update /etc/fstab.

[root@TianRandai ~]#parted /dev/sdb print#再次查看磁盘信息
 Model: VMware, VMware Virtual S (scsi)
Disk /dev/sdb: 21.5GB
Sector size (logical/physical): 512B/512B
Partition Table: gpt
Disk Flags:
NumberStartEndSizeFile systemNameFlags
介绍完了分区就要介绍格式化了
格式化的命令可以使用
mkfs.文件系统类型 分区
#mkfs.ext4 /dev/sdb1
格式化后就可以使用挂载了
[root@TianRandai ~]#mkfs #文件系统的各个类型
mkfs mkfs.cramfsmkfs.ext3mkfs.fat mkfs.msdos mkfs.xfs
mkfs.btrfs mkfs.ext2mkfs.ext4mkfs.minix mkfs.vfat
[root@TianRandai ~]#mkfs.ext4 /dev/sdb1#将/dev/sdb1格式化为ext4
[root@TianRandai ~]#mkdir /mnt/disk1#在/mnt/下建一个disk1目录
[root@TianRandai ~]#mount /dev/sdb1 /mnt/disk1#将格式化号的分区挂载到/mnt/disk1撒花姑娘
[root@TianRandai ~]#df -h #查看挂载及使用情况
FilesystemSizeUsed Avail Use% Mounted on
/dev/sda210G4.5G5.5G45% /
devtmpfs898M 0898M 0% /dev
tmpfs 912M 88K912M 1% /dev/shm
tmpfs 912M9.0M903M 1% /run
tmpfs 912M 0912M 0% /sys/fs/cgroup
/dev/sda11014M169M846M17% /boot
tmpfs 183M 20K183M 1% /run/user/0
/dev/sdb1 1.9G5.7M1.7G 1% /mnt/disk1
mkswap 格式化swap类型的分区
格式化后需要swapon来启用格式化后的分区
开机自动挂载需要讲这些配置写到/etc/fstab中
具体的挂载的方法会在后面具体讲解。
[root@TianRandai ~]#free -h#先看一下swap的大小
totalusedfreesharedbuff/cache available
Mem: 1.8G483M429M 10M911M1.1G
Swap:2.0G0B2.0G
[root@TianRandai ~]#mkswap /dev/sdb1 #格式化/dev/sdb1分区
mkswap: /dev/sdb1: warning: wiping old ext4 signature.
Setting up swapspace version 1, size = 1953104 KiB
no label, UUID=5d9a150e-c247-4c7f-a4be-273a72bd3b5a
[root@TianRandai ~]#swapon /dev/sdb1 #启用swap分区
[root@TianRandai ~]#free -h#再次查看swap大小
totalusedfreesharedbuff/cache available
Mem: 1.8G484M427M 10M911M1.1G
Swap:3.9G0B3.9G
The above is the detailed content of Detailed explanation of three disk partitioning tools on CentOS Linux. For more information, please follow other related articles on the PHP Chinese website!

Hot AI Tools

Undresser.AI Undress
AI-powered app for creating realistic nude photos

AI Clothes Remover
Online AI tool for removing clothes from photos.

Undress AI Tool
Undress images for free

Clothoff.io
AI clothes remover

AI Hentai Generator
Generate AI Hentai for free.

Hot Article

Hot Tools

Notepad++7.3.1
Easy-to-use and free code editor

SublimeText3 Chinese version
Chinese version, very easy to use

Zend Studio 13.0.1
Powerful PHP integrated development environment

Dreamweaver CS6
Visual web development tools

SublimeText3 Mac version
God-level code editing software (SublimeText3)

Hot Topics
 1382
1382
 52
52
 Centos shutdown command line
Apr 14, 2025 pm 09:12 PM
The CentOS shutdown command is shutdown, and the syntax is shutdown [Options] Time [Information]. Options include: -h Stop the system immediately; -P Turn off the power after shutdown; -r restart; -t Waiting time. Times can be specified as immediate (now), minutes ( minutes), or a specific time (hh:mm). Added information can be displayed in system messages.
 Difference between centos and ubuntu
Apr 14, 2025 pm 09:09 PM
The key differences between CentOS and Ubuntu are: origin (CentOS originates from Red Hat, for enterprises; Ubuntu originates from Debian, for individuals), package management (CentOS uses yum, focusing on stability; Ubuntu uses apt, for high update frequency), support cycle (CentOS provides 10 years of support, Ubuntu provides 5 years of LTS support), community support (CentOS focuses on stability, Ubuntu provides a wide range of tutorials and documents), uses (CentOS is biased towards servers, Ubuntu is suitable for servers and desktops), other differences include installation simplicity (CentOS is thin)
 How to use docker desktop
Apr 15, 2025 am 11:45 AM
How to use Docker Desktop? Docker Desktop is a tool for running Docker containers on local machines. The steps to use include: 1. Install Docker Desktop; 2. Start Docker Desktop; 3. Create Docker image (using Dockerfile); 4. Build Docker image (using docker build); 5. Run Docker container (using docker run).
 Detailed explanation of docker principle
Apr 14, 2025 pm 11:57 PM
Docker uses Linux kernel features to provide an efficient and isolated application running environment. Its working principle is as follows: 1. The mirror is used as a read-only template, which contains everything you need to run the application; 2. The Union File System (UnionFS) stacks multiple file systems, only storing the differences, saving space and speeding up; 3. The daemon manages the mirrors and containers, and the client uses them for interaction; 4. Namespaces and cgroups implement container isolation and resource limitations; 5. Multiple network modes support container interconnection. Only by understanding these core concepts can you better utilize Docker.
 CentOS: Exploring the Alternatives
Apr 15, 2025 am 12:03 AM
Alternatives to CentOS include UbuntuServer, Debian, Fedora, RockyLinux, and AlmaLinux. 1) UbuntuServer is suitable for basic operations, such as updating software packages and configuring the network. 2) Debian is suitable for advanced usage, such as using LXC to manage containers. 3) RockyLinux can optimize performance by adjusting kernel parameters.
 What computer configuration is required for vscode
Apr 15, 2025 pm 09:48 PM
VS Code system requirements: Operating system: Windows 10 and above, macOS 10.12 and above, Linux distribution processor: minimum 1.6 GHz, recommended 2.0 GHz and above memory: minimum 512 MB, recommended 4 GB and above storage space: minimum 250 MB, recommended 1 GB and above other requirements: stable network connection, Xorg/Wayland (Linux)
 What underlying technologies does Docker use?
Apr 15, 2025 am 07:09 AM
Docker uses container engines, mirror formats, storage drivers, network models, container orchestration tools, operating system virtualization, and container registry to support its containerization capabilities, providing lightweight, portable and automated application deployment and management.
 What to do if the docker image fails
Apr 15, 2025 am 11:21 AM
Troubleshooting steps for failed Docker image build: Check Dockerfile syntax and dependency version. Check if the build context contains the required source code and dependencies. View the build log for error details. Use the --target option to build a hierarchical phase to identify failure points. Make sure to use the latest version of Docker engine. Build the image with --t [image-name]:debug mode to debug the problem. Check disk space and make sure it is sufficient. Disable SELinux to prevent interference with the build process. Ask community platforms for help, provide Dockerfiles and build log descriptions for more specific suggestions.


