

How to solve Linux command line error prompts: Use sudo command

Have you ever gotten a "Permission denied" error message when using the Linux command line? This may be because you are trying to perform an operation that requires root privileges. For example, the screenshot below shows the error that occurred when I tried to copy a binary file to a system directory.
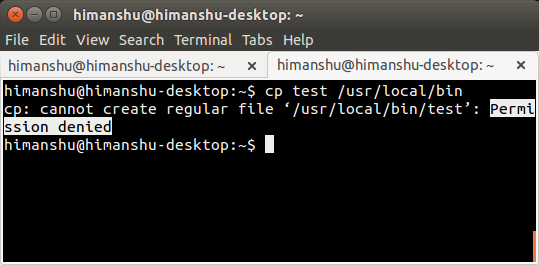
Access Denied for shell
So how to solve this error? It's very simple, use the sudo command.
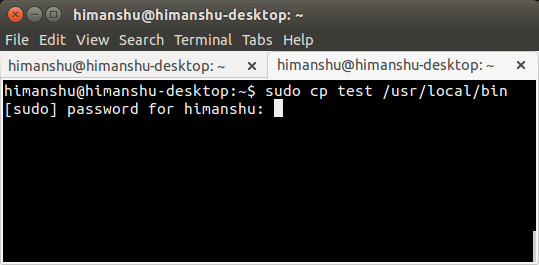
Run the command with sudo
Users will be prompted to enter their (own) login password after running this command. Once the correct password is entered, the operation will be executed successfully.
There is no doubt that sudo is a command that anyone who uses the command line on Linux must know. However, in order to use this command more responsibly and effectively, you still need to know some relevant (and in-depth) details. This is exactly what we will discuss in this article.
Before we continue, it’s worth mentioning that all command instructions mentioned in this article have been tested under Bash version 4.3.11 under Ubuntu 14.04 LTS.
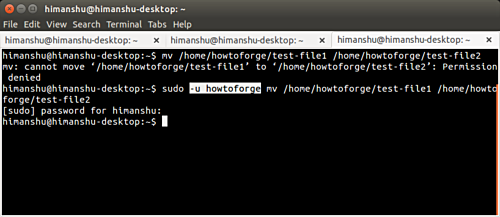
What is sudoAs most of you know, sudo is used to execute commands that require elevated privileges (usually as the root user). One such example has been discussed earlier in this article in the introductory section. However, you can use sudo to run commands as another (non-root) user if you want.
This is achieved by the -u command line option provided by the tool. For example, as shown in the following example, I (himanshu) tried to rename a file in the Home directory of another user (howtoforge), but got an "Access Denied" error. Then I added sudo -u howtoforge and used the same "mv" command, and the command was successfully executed:
What is sudo
Can anyone use sudo?no. For a user to be able to use sudo, there should be a piece of information related to the user in the /etc/sudoers file. The following excerpt from the Ubuntu website can make it clearer:
The/etc/sudoers file controls who can run what commands on which machine as which user, and can also control special situations, such as whether a password is required for a specific command. This file consists of aliases (basic variables) and user specifications (controls who can run what commands).
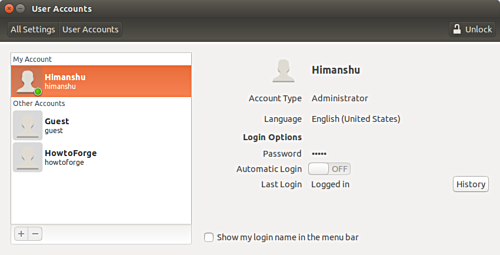
If you are using Ubuntu, enabling a user to run sudo commands is easy: all you need to do is change the account type to administrator. This can be done directly in System Settings -> User Accounts.
sudo user
First unlock the window:
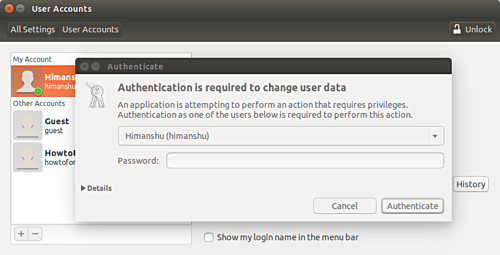
unlocking window
Then select the user you want to change the user type, and then change the type to administrator administrator.
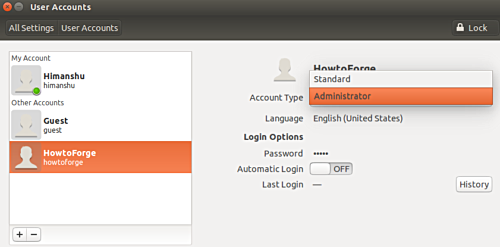
choose sudo accounts
However, if you are not using Ubuntu, or your distribution does not provide this feature, you can manually edit the /etc/sudoers file to implement this change. To add a line like this to the file:
[user] ALL=(ALL:ALL) ALL
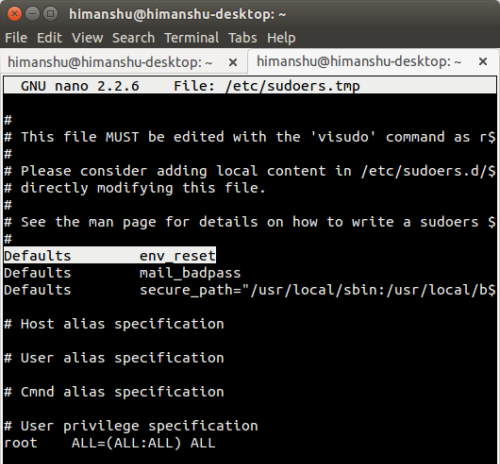
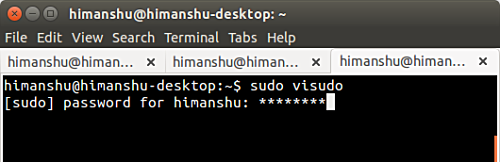
Needless to say, [user] should be replaced with the username of the user you want to increase sudo privileges. One important thing worth mentioning here is that it is officially recommended to edit the file via visudo command - all you need to do is run the following command:
sudo visudo
To explain what is going on, here is an excerpt from the visudo manual:
visudo 以安全的模式编辑 sudoers 文件。visudo 锁定 sudoers 文件以防多个编辑同时进行,提供基本的检查(sanity checks)和语法错误检查。如果 sudoers 文件现在正在被编辑,你将会收到一个信息提示稍后再试。
关于 visudo 的更多信息,前往这里。
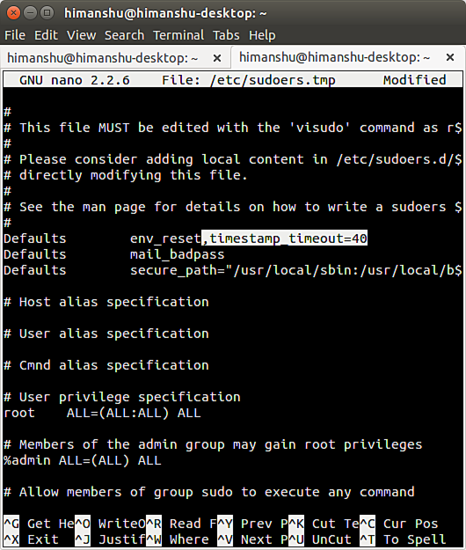
什么是 sudo 会话如果你经常使用 sudo 命令,你肯定注意到过当你成功输入一次密码后,可以不用输入密码再运行几次 sudo 命令。但是一段时间后,sudo 命令会再次要求你的密码。
这种现象跟运行 sudo 命令数目无关,跟时间有关。是的,sudo 默认在输入一次密码后 15 分钟内不会再次要求密码。15 分钟后,你会再次被要求输入密码。
然而,如果你想的话,你能改变这种现象。用以下命令打开 /etc/sudoers 文件:
sudo visudo
找到这一行:
Defaults env_reset
env_reset
然后在这行最后添加以下变量:
Defaults env_reset,timestamp_timeout=[new-value]
[new-value] 为想要 sudo 会话持续的时间数。例如,设数值为 40。
sudo timeout value
如果你希望每次使用 sudo 命令时都要求输入密码,你可以把这个变量赋值为 0 。想要 sudo 会话永远不过时,应赋值为 -1。
注意将 timestamp_timeout 的值赋为 “-1” 是强烈不推荐的。
sudo 密码你可能注意过,当 sudo 要求输入密码然后你开始输入时,不会显示任何东西 —— 甚至连常规的星号都没有。虽然这不是什么大问题,不过一些用户就是希望显示星号。
好消息是那有可能也很容易做到。所有你需要做的就是在 /etc/sudoers 文件里将下述的行:
Defaults env_reset
改成
Defaults env_reset,pwfeedback
然后保存文件。
现在,无论什么时候输入 sudo 密码,星号都会显示。
hide the sudo password
一些重要的 sudo 命令行参数除了 -u 命令行参数(我们已经在这篇教程的开始部分讨论过了),还有其他重要的 sudo 命令行参数值得注意。在这部分,我们将会讨论其中一些。
-k 参数考虑下这种情况:输入密码后你刚刚运行了几个 sudo 驱动的命令。现在,如你所知,sudo 会话默认保持 15 分钟。假设在这会话期间,你需要让某些人访问你的终端,但你不想让他们可以使用 sudo ,你将会怎么做?
还好,有 -k 命令行参数允许用户取消 sudo 权限。这是 sudo 帮助页面(man page)对此的解释:
-k, --reset-timestamp
不带任何命令使用时,撤销用户缓存的凭据。换句话讲,下一次使用 sudo 将会要求输入密码。使用这个参数不需要密码,也可以放到一个 .logout 文件中来撤销 sudo 权限。
当与一个命令,或者一个可能需要密码的操作一起用时,这个参数将会导致 sudo 忽略用户缓存的凭据。结果是 sudo 要求输入密码(如果这是被安全策略所要求的),而且不会更新用户缓存的凭据。
-s 参数有时你的工作要求你运行一堆需要 root 权限的命令,你不想每次都输入密码。你也不想通过改变 /etc/sudoers 文件调整 sudo 会话的过期时限。
这种情况下,你可以用 sudo 的 -s 参数。这是 sudo 帮助页面对此的解释:
-s, --shell
If the SHELL environment variable is set or the shell is specified by calling the user's password database, the shell will be run. If a command is specified, the command will be passed to the shell for execution via the shell's -c parameter. If no command is specified, an interactive shell is executed.
So, basically what this command parameter does is:
Start a new shell - As for which shell, refer to the SHELL environment variable assignment. If $SHELL is empty, the shell defined in /etc/passwd will be used.
If you pass a command name with the -s parameter (such as sudo -s whoami), what is actually executed is sudo /bin/bash -c whoami.
If you try to execute no other commands (that is, you just run sudo -s), you will get an interactive shell with root privileges.
Please remember that the -s command line parameter gives you a shell with root privileges, but it is not a root environment - it is still executing your own .bashrc. For example, in a new shell run with sudo -s, executing the whoami command will still return your username, not root.
-i parametersThe -i parameter is similar to the -s parameter we discussed. However, there is a difference. One important difference is that -i gives you a root environment, meaning your (user's) .bashrc is ignored. This is like becoming root without explicitly logging in as root. Additionally, you don’t have to enter the root user password.
Important: Please note that the su command also allows you to switch users (default to root). This command requires you to enter your root password. To avoid this, you can execute it using sudo (sudo su) so that you only need to enter your login password. However, there are implicit differences between su and sudo su - to learn about them, and how they differ from sudo -i, see here.
SummarizeI hope now you know at least the basics of sudo, and how to adjust sudo's default behavior. Please try adjusting /etc/sudoers as we explained. Also browse the forum discussions to learn more about the sudo command.
The above is the detailed content of How to solve Linux command line error prompts: Use sudo command. For more information, please follow other related articles on the PHP Chinese website!

Hot AI Tools

Undresser.AI Undress
AI-powered app for creating realistic nude photos

AI Clothes Remover
Online AI tool for removing clothes from photos.

Undress AI Tool
Undress images for free

Clothoff.io
AI clothes remover

AI Hentai Generator
Generate AI Hentai for free.

Hot Article
Hot Tools

Notepad++7.3.1
Easy-to-use and free code editor

SublimeText3 Chinese version
Chinese version, very easy to use

Zend Studio 13.0.1
Powerful PHP integrated development environment

Dreamweaver CS6
Visual web development tools

SublimeText3 Mac version
God-level code editing software (SublimeText3)
Hot Topics
 1386
1386
 52
52

 Difference between centos and ubuntu
Apr 14, 2025 pm 09:09 PM
Difference between centos and ubuntu
Apr 14, 2025 pm 09:09 PM
The key differences between CentOS and Ubuntu are: origin (CentOS originates from Red Hat, for enterprises; Ubuntu originates from Debian, for individuals), package management (CentOS uses yum, focusing on stability; Ubuntu uses apt, for high update frequency), support cycle (CentOS provides 10 years of support, Ubuntu provides 5 years of LTS support), community support (CentOS focuses on stability, Ubuntu provides a wide range of tutorials and documents), uses (CentOS is biased towards servers, Ubuntu is suitable for servers and desktops), other differences include installation simplicity (CentOS is thin)
 How to use docker desktop
Apr 15, 2025 am 11:45 AM
How to use docker desktop
Apr 15, 2025 am 11:45 AM
How to use Docker Desktop? Docker Desktop is a tool for running Docker containers on local machines. The steps to use include: 1. Install Docker Desktop; 2. Start Docker Desktop; 3. Create Docker image (using Dockerfile); 4. Build Docker image (using docker build); 5. Run Docker container (using docker run).
 How to install centos
Apr 14, 2025 pm 09:03 PM
How to install centos
Apr 14, 2025 pm 09:03 PM
CentOS installation steps: Download the ISO image and burn bootable media; boot and select the installation source; select the language and keyboard layout; configure the network; partition the hard disk; set the system clock; create the root user; select the software package; start the installation; restart and boot from the hard disk after the installation is completed.
 Centos options after stopping maintenance
Apr 14, 2025 pm 08:51 PM
Centos options after stopping maintenance
Apr 14, 2025 pm 08:51 PM
CentOS has been discontinued, alternatives include: 1. Rocky Linux (best compatibility); 2. AlmaLinux (compatible with CentOS); 3. Ubuntu Server (configuration required); 4. Red Hat Enterprise Linux (commercial version, paid license); 5. Oracle Linux (compatible with CentOS and RHEL). When migrating, considerations are: compatibility, availability, support, cost, and community support.
 How to view the docker process
Apr 15, 2025 am 11:48 AM
How to view the docker process
Apr 15, 2025 am 11:48 AM
Docker process viewing method: 1. Docker CLI command: docker ps; 2. Systemd CLI command: systemctl status docker; 3. Docker Compose CLI command: docker-compose ps; 4. Process Explorer (Windows); 5. /proc directory (Linux).
 Detailed explanation of docker principle
Apr 14, 2025 pm 11:57 PM
Detailed explanation of docker principle
Apr 14, 2025 pm 11:57 PM
Docker uses Linux kernel features to provide an efficient and isolated application running environment. Its working principle is as follows: 1. The mirror is used as a read-only template, which contains everything you need to run the application; 2. The Union File System (UnionFS) stacks multiple file systems, only storing the differences, saving space and speeding up; 3. The daemon manages the mirrors and containers, and the client uses them for interaction; 4. Namespaces and cgroups implement container isolation and resource limitations; 5. Multiple network modes support container interconnection. Only by understanding these core concepts can you better utilize Docker.
 What to do if the docker image fails
Apr 15, 2025 am 11:21 AM
What to do if the docker image fails
Apr 15, 2025 am 11:21 AM
Troubleshooting steps for failed Docker image build: Check Dockerfile syntax and dependency version. Check if the build context contains the required source code and dependencies. View the build log for error details. Use the --target option to build a hierarchical phase to identify failure points. Make sure to use the latest version of Docker engine. Build the image with --t [image-name]:debug mode to debug the problem. Check disk space and make sure it is sufficient. Disable SELinux to prevent interference with the build process. Ask community platforms for help, provide Dockerfiles and build log descriptions for more specific suggestions.
 What computer configuration is required for vscode
Apr 15, 2025 pm 09:48 PM
What computer configuration is required for vscode
Apr 15, 2025 pm 09:48 PM
VS Code system requirements: Operating system: Windows 10 and above, macOS 10.12 and above, Linux distribution processor: minimum 1.6 GHz, recommended 2.0 GHz and above memory: minimum 512 MB, recommended 4 GB and above storage space: minimum 250 MB, recommended 1 GB and above other requirements: stable network connection, Xorg/Wayland (Linux)
