

Learn how to increase virtual memory in win7

Two days ago, a user asked me what virtual memory is, what its function is, etc. Virtual memory means that when the computer’s memory is exhausted, part of the hard disk space is used as memory. Use so that the computer can run more software. Speaking of which, some users have asked how to increase virtual memory in win7. For this reason, the editor has compiled a tutorial on how to increase virtual memory in win7.
We all know that when the system memory is insufficient, the computer will automatically call the hard disk to act as memory to relieve the memory tension. This can prevent us from running out of system memory when running a large program. Causes the system to crash or freeze, so how do we set up win7 virtual memory? Next, the editor will share with you how to increase virtual memory in win7.
How to increase virtual memory in win7
First click the Start menu button and point the mouse to "My Computer". Then right-click the mouse and select "Properties" in the pop-up menu

win7Figure-1
in In the system information window, click "Advanced System Settings" on the left
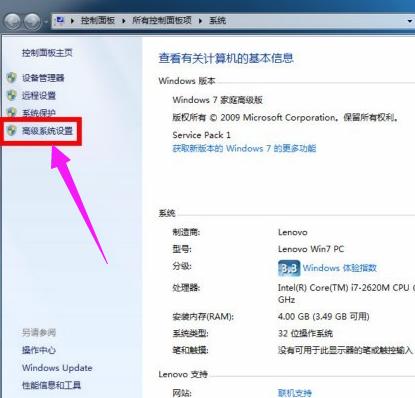
Add Virtual Memory Figure-2
Connect Come down in the system properties window, select the "Advanced" tab, click the "Settings" button under Performance
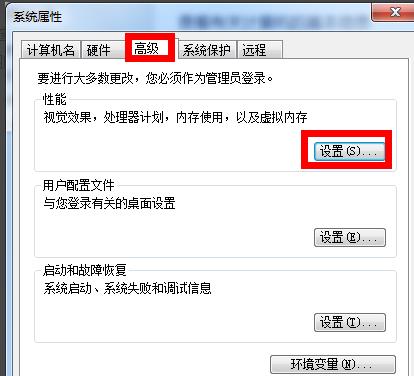
Add virtual memory map -3
Select the "Advanced" tab in the performance properties window, and then click the "Change" button below
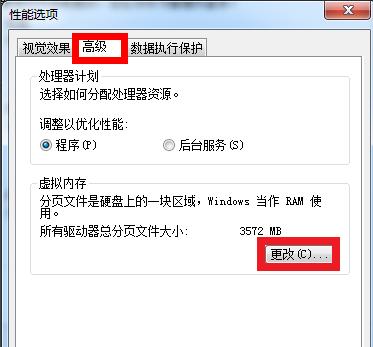
win7Figure-4
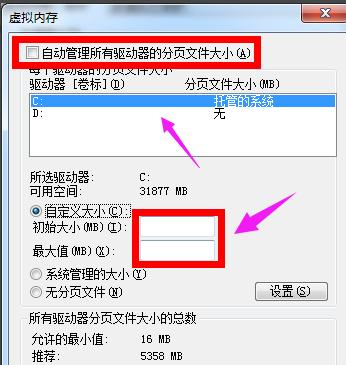
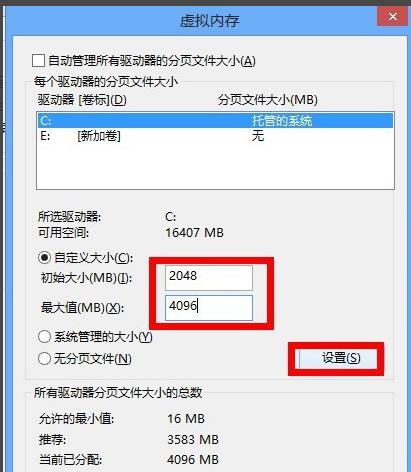
Next, you can set the size of the virtual memory. First uncheck "Automatically manage paging file size for all drives" and then select "Custom size"

Virtual Memory Figure-5
When setting the virtual memory size, bigger is not always better. It should be set according to our actual physical memory, which is generally about 1.5 times the actual physical memory. For example, my computer's memory is 2G. It is recommended to set the virtual memory size between 2048M and 4096M. After completing the input, click the "Settings" button
Virtual Memory Figure-6
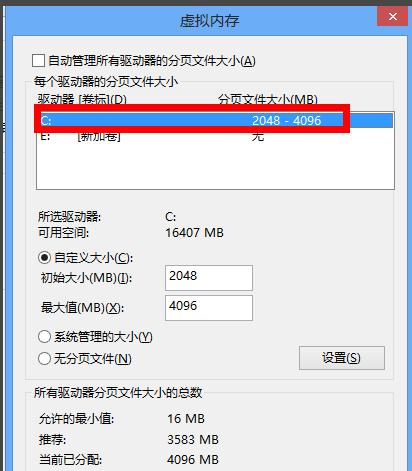
Note: 1G=1024M After the setting is completed, we can see that the virtual memory size on the C drive has been changed to the size we set. Then click the "OK" button below
Add virtual memory Figure-7
Note: We can also add The virtual memory paging file is set on other drives, such as D, E drive, etc. It is recommended to set it on C drive. Next, the system will prompt us that we need to restart the computer for the changes to take effect. Click the "OK" button again
Add virtual memory map- 8
Finally, click the "OK" button, and the system will remind us again that "it must be started immediately to take effect." Select "Restart now or restart later" according to your needs
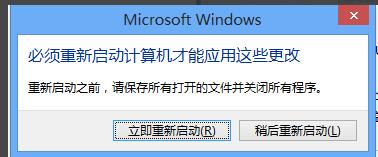
Memory Diagram-9
The above is the operation process for adding virtual memory in win7.
The above is the detailed content of Learn how to increase virtual memory in win7. For more information, please follow other related articles on the PHP Chinese website!

Hot AI Tools

Undresser.AI Undress
AI-powered app for creating realistic nude photos

AI Clothes Remover
Online AI tool for removing clothes from photos.

Undress AI Tool
Undress images for free

Clothoff.io
AI clothes remover

AI Hentai Generator
Generate AI Hentai for free.

Hot Article
Hot Tools

Notepad++7.3.1
Easy-to-use and free code editor

SublimeText3 Chinese version
Chinese version, very easy to use

Zend Studio 13.0.1
Powerful PHP integrated development environment

Dreamweaver CS6
Visual web development tools

SublimeText3 Mac version
God-level code editing software (SublimeText3)
Hot Topics
 1376
1376
 52
52

 Large memory optimization, what should I do if the computer upgrades to 16g/32g memory speed and there is no change?
Jun 18, 2024 pm 06:51 PM
Large memory optimization, what should I do if the computer upgrades to 16g/32g memory speed and there is no change?
Jun 18, 2024 pm 06:51 PM
For mechanical hard drives or SATA solid-state drives, you will feel the increase in software running speed. If it is an NVME hard drive, you may not feel it. 1. Import the registry into the desktop and create a new text document, copy and paste the following content, save it as 1.reg, then right-click to merge and restart the computer. WindowsRegistryEditorVersion5.00[HKEY_LOCAL_MACHINE\SYSTEM\CurrentControlSet\Control\SessionManager\MemoryManagement]"DisablePagingExecutive"=d
 What should I do if the Win7 taskbar does not display the icon? How to solve the problem of the computer taskbar icon disappearing
Jun 09, 2024 pm 01:49 PM
What should I do if the Win7 taskbar does not display the icon? How to solve the problem of the computer taskbar icon disappearing
Jun 09, 2024 pm 01:49 PM
Recently, many users using Win7 system have found that the icons in the taskbar suddenly disappeared, which makes the operation very inconvenient and they do not know how to solve the problem. This article will introduce to you how to solve the problem of disappearing taskbar icons in Win7 system. Bar! Cause Analysis When encountering such a situation, there are generally two situations: one is that the taskbar on the computer does not really disappear, but is just hidden, and the other is that the taskbar does disappear. Method 1: 1. There is a situation that you need to confirm first, that is, when the mouse is placed at the bottom of the screen, the taskbar will be displayed. You can directly click the mouse on the taskbar and select "Properties". 2. In the dialog box that opens, click & on the "Hide taskbar" option.
 How to clear all desktop background images in Win7? Tips for deleting personalized background images in Win7
Jun 02, 2024 am 09:01 AM
How to clear all desktop background images in Win7? Tips for deleting personalized background images in Win7
Jun 02, 2024 am 09:01 AM
In Win7 system, many users want to delete personalized desktop background images, but do not know how to delete them. This article will show you how to delete personalized background images in Win7 system. 1. First, open the control panel interface of the Win7 system and click to enter the "Appearance and Personalization" settings; 2. Then, in the opened interface, click the "Change Desktop Background" setting; 3. Then, click below "Desktop background" option; 4. Then, select Select all, and then click Clear all. Of course, you can also use it under "Customize", right-click the theme you want to delete, and then click &q on the shortcut menu
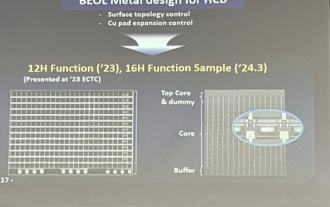 Samsung announced the completion of 16-layer hybrid bonding stacking process technology verification, which is expected to be widely used in HBM4 memory
Apr 07, 2024 pm 09:19 PM
Samsung announced the completion of 16-layer hybrid bonding stacking process technology verification, which is expected to be widely used in HBM4 memory
Apr 07, 2024 pm 09:19 PM
According to the report, Samsung Electronics executive Dae Woo Kim said that at the 2024 Korean Microelectronics and Packaging Society Annual Meeting, Samsung Electronics will complete the verification of the 16-layer hybrid bonding HBM memory technology. It is reported that this technology has passed technical verification. The report also stated that this technical verification will lay the foundation for the development of the memory market in the next few years. DaeWooKim said that Samsung Electronics has successfully manufactured a 16-layer stacked HBM3 memory based on hybrid bonding technology. The memory sample works normally. In the future, the 16-layer stacked hybrid bonding technology will be used for mass production of HBM4 memory. ▲Image source TheElec, same as below. Compared with the existing bonding process, hybrid bonding does not need to add bumps between DRAM memory layers, but directly connects the upper and lower layers copper to copper.
 Where is the network discovery in Win7? Tips for enabling the network discovery function in Win7
Jun 04, 2024 am 09:02 AM
Where is the network discovery in Win7? Tips for enabling the network discovery function in Win7
Jun 04, 2024 am 09:02 AM
Many computer users know that network discovery is a network setting. This setting will affect whether the computer can find other computers and devices on the network and whether it can find the computer when other computers on the network are found. So how to enable network discovery in win7? The following computer System Home U Disk Installation will introduce you to the tutorial on how to enable network discovery in win7 system. 1. First, click the "Start Menu" icon on the desktop taskbar and choose to open the "Control Panel" interface. 2. Then, in the interface that opens, set "View by" to "Category", and then choose to enter "Network and Internet"
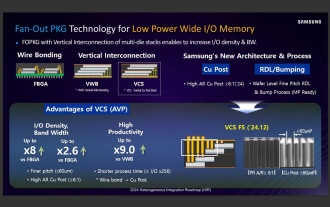 Sources say Samsung Electronics and SK Hynix will commercialize stacked mobile memory after 2026
Sep 03, 2024 pm 02:15 PM
Sources say Samsung Electronics and SK Hynix will commercialize stacked mobile memory after 2026
Sep 03, 2024 pm 02:15 PM
According to news from this website on September 3, Korean media etnews reported yesterday (local time) that Samsung Electronics and SK Hynix’s “HBM-like” stacked structure mobile memory products will be commercialized after 2026. Sources said that the two Korean memory giants regard stacked mobile memory as an important source of future revenue and plan to expand "HBM-like memory" to smartphones, tablets and laptops to provide power for end-side AI. According to previous reports on this site, Samsung Electronics’ product is called LPWide I/O memory, and SK Hynix calls this technology VFO. The two companies have used roughly the same technical route, which is to combine fan-out packaging and vertical channels. Samsung Electronics’ LPWide I/O memory has a bit width of 512
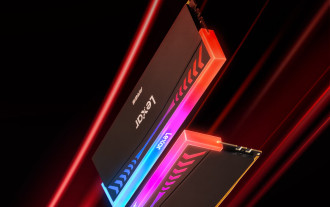 Lexar launches Ares Wings of War DDR5 7600 16GB x2 memory kit: Hynix A-die particles, 1,299 yuan
May 07, 2024 am 08:13 AM
Lexar launches Ares Wings of War DDR5 7600 16GB x2 memory kit: Hynix A-die particles, 1,299 yuan
May 07, 2024 am 08:13 AM
According to news from this website on May 6, Lexar launched the Ares Wings of War series DDR57600CL36 overclocking memory. The 16GBx2 set will be available for pre-sale at 0:00 on May 7 with a deposit of 50 yuan, and the price is 1,299 yuan. Lexar Wings of War memory uses Hynix A-die memory chips, supports Intel XMP3.0, and provides the following two overclocking presets: 7600MT/s: CL36-46-46-961.4V8000MT/s: CL38-48-49 -1001.45V In terms of heat dissipation, this memory set is equipped with a 1.8mm thick all-aluminum heat dissipation vest and is equipped with PMIC's exclusive thermal conductive silicone grease pad. The memory uses 8 high-brightness LED beads and supports 13 RGB lighting modes.
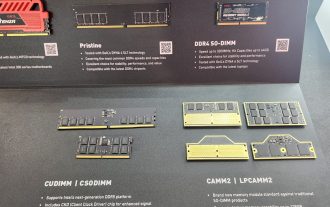 Kingbang launches new DDR5 8600 memory, offering CAMM2, LPCAMM2 and regular models to choose from
Jun 08, 2024 pm 01:35 PM
Kingbang launches new DDR5 8600 memory, offering CAMM2, LPCAMM2 and regular models to choose from
Jun 08, 2024 pm 01:35 PM
According to news from this site on June 7, GEIL launched its latest DDR5 solution at the 2024 Taipei International Computer Show, and provided SO-DIMM, CUDIMM, CSODIMM, CAMM2 and LPCAMM2 versions to choose from. ▲Picture source: Wccftech As shown in the picture, the CAMM2/LPCAMM2 memory exhibited by Jinbang adopts a very compact design, can provide a maximum capacity of 128GB, and a speed of up to 8533MT/s. Some of these products can even be stable on the AMDAM5 platform Overclocked to 9000MT/s without any auxiliary cooling. According to reports, Jinbang’s 2024 Polaris RGBDDR5 series memory can provide up to 8400
