Home > Web Front-end > H5 Tutorial > HTML5 drag and drop operation HTML5 implements drag and drop operation of web page elements_html5 tutorial skills

HTML5 drag and drop operation HTML5 implements drag and drop operation of web page elements_html5 tutorial skills

WBOY
Release: 2016-05-16 15:50:34
Original
1621 people have browsed it

Before HTML5, to implement the drag-and-drop operation of web page elements, you needed to rely on mousedown, mousemove, mouseup and other APIs, which were implemented through a large amount of JS code; HTML5 introduced APIs that directly support drag-and-drop operations, which greatly simplified web page elements It is difficult to program drag-and-drop operations, and these APIs not only support drag-and-drop of elements within the browser, but also support mutual dragging of data between the browser and other applications.

This article uses a simple example to demonstrate the use of drag-and-drop API in HTML5.

Scene:

As shown in the figure below, we want to achieve:

Drag the photo from the "Album" area on the left to the "Trash" area on the right by dragging and dropping; during the dragging process, the "Warm Tips" section should remind you that the drag-and-drop operation is currently in progress;
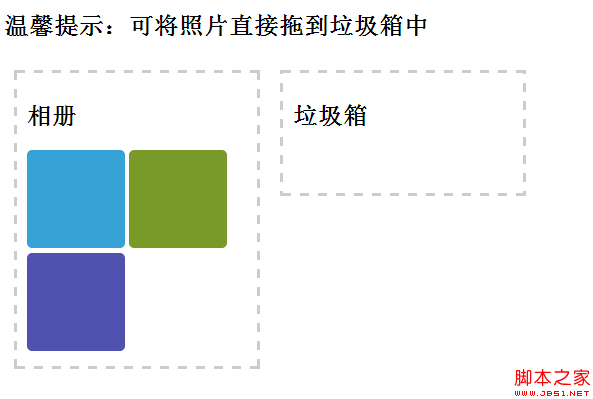

Implementation method:

The HTML code of the above interface is relatively simple, as follows:

Copy the code
The code is as follows:


HTML5 implements drag and drop operation


Warm reminder: You can drag the photo directly to the trash can


Album


Trash


Note: If you want to implement drag and drop operation, You need to add the draggable="true" attribute to the element to be dragged and dropped;

Next, just add the following JS code to the onload event. The comments are quite detailed and will not be explained separately.

Copy code
The code is as follows:

<script><br> function init(){<br> var info = document.getElementById("info");<br> //Get the dragged and dropped element, this example is where the photo album is DIV<br> var src = document.getElementById("album");<br> //Start drag and drop operation<br> src.ondragstart = function (e) {<br> //Get the ID of the dragged and dropped photo <br> var dragImgId = e.target.id;<br> //Get the dragged element<br> var dragImg = document.getElementById(dragImgId);<br> //Drag and drop operation ends<br> dragImg.ondragend = function(e){<br> //Restore reminder information<br> info.innerHTML="<h2>Warm reminder: You can drag the photo directly to the trash can</h2>";<br> }; <br> e.dataTransfer.setData("text",dragImgId);<br> };<br> //During drag and drop process <br> src.ondrag = function(e){ <br> info.innerHTML=" <h2>--The photo is being dragged--</h2>";<br> }<br> //Get the drag and drop target element<br> var target = document.getElementById("trash"); <br> //Turn off default processing; <br> target.ondragenter = function(e){<br> e.preventDefault();<br> }<br> target.ondragover = function(e){<br> e .preventDefault(); <br> }<br> //Something is dragged and dropped on the target element <br> target.ondrop = function (e) {<br> var draggedID = e.dataTransfer.getData("text"); <br> //Get the DOM object in the album <br> var oldElem = document.getElementById(draggedID);<br> //Remove the node of the photo from the album DIV <br> oldElem.parentNode.removeChild(oldElem); <br> //Add the dragged photo DOM node to the trash can DIV; <br> target.appendChild(oldElem);<br> info.innerHTML="<h2>Warm tip: You can drag the photo directly To the trash can</h2>";<br> e.preventDefault();<br> }<br> }<br> </script>

to achieve the effect :

Related labels:
source:php.cn
Statement of this Website
The content of this article is voluntarily contributed by netizens, and the copyright belongs to the original author. This site does not assume corresponding legal responsibility. If you find any content suspected of plagiarism or infringement, please contact admin@php.cn
Popular Tutorials
More>
Latest Downloads
More>
Web Effects
Website Source Code
Website Materials
Front End Template