

Steps to cancel Win7 shared folder
Jan 16, 2024 pm 03:24 PMSome friends have set up some shared folders while using Win7, and then want to cancel the sharing but don’t know how to cancel the shared folders in Win7. The editor below will give you a detailed introduction to how to cancel the shared folders in Win7. If you are interested, you can come and take a look.
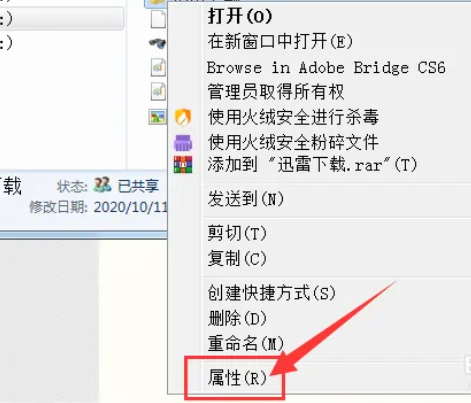
1. Select the file that needs to be unshared, right-click and select "Properties" in the menu option to open it.
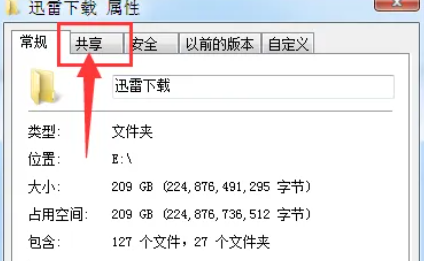
2. In the open window, switch to the "Sharing" tab above.
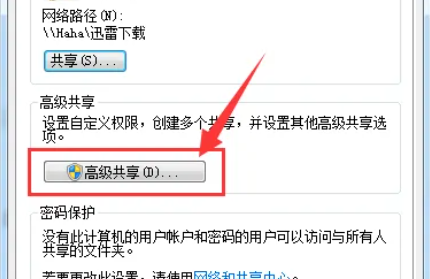
3. Then click the "Advanced Sharing" button.
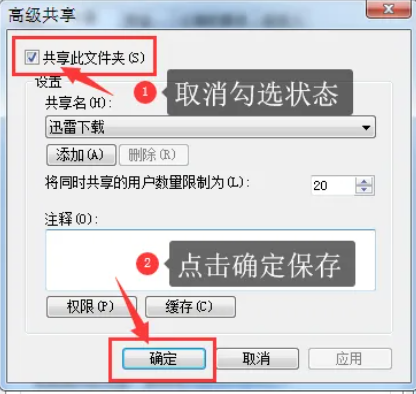
4. Finally, uncheck "Share this folder" and click OK to save.
The above is the detailed content of Steps to cancel Win7 shared folder. For more information, please follow other related articles on the PHP Chinese website!

Hot Article

Hot tools Tags

Hot Article

Hot Article Tags

Notepad++7.3.1
Easy-to-use and free code editor

SublimeText3 Chinese version
Chinese version, very easy to use

Zend Studio 13.0.1
Powerful PHP integrated development environment

Dreamweaver CS6
Visual web development tools

SublimeText3 Mac version
God-level code editing software (SublimeText3)
Hot Topics


 R.E.P.O. Save File Location: Where Is It & How to Protect It?
Mar 06, 2025 pm 10:41 PM
R.E.P.O. Save File Location: Where Is It & How to Protect It?
Mar 06, 2025 pm 10:41 PM
R.E.P.O. Save File Location: Where Is It & How to Protect It?
 Easily Fixed - Monster Hunter Wilds Keeps Compiling Shaders
Mar 04, 2025 pm 08:05 PM
Easily Fixed - Monster Hunter Wilds Keeps Compiling Shaders
Mar 04, 2025 pm 08:05 PM
Easily Fixed - Monster Hunter Wilds Keeps Compiling Shaders
 Monster Hunter Wilds Communication Error on PC, Quick Fix
Mar 03, 2025 pm 08:02 PM
Monster Hunter Wilds Communication Error on PC, Quick Fix
Mar 03, 2025 pm 08:02 PM
Monster Hunter Wilds Communication Error on PC, Quick Fix
 Find Monster Hunter Wilds Save File Location & Back up Data
Mar 03, 2025 pm 08:01 PM
Find Monster Hunter Wilds Save File Location & Back up Data
Mar 03, 2025 pm 08:01 PM
Find Monster Hunter Wilds Save File Location & Back up Data
 How to fix Microsoft Teams error 9hehw in Windows?
Mar 07, 2025 am 12:00 AM
How to fix Microsoft Teams error 9hehw in Windows?
Mar 07, 2025 am 12:00 AM
How to fix Microsoft Teams error 9hehw in Windows?
 Spotlight on KB5053606 Not Installing for Windows 10, Exact Steps
Mar 13, 2025 pm 08:02 PM
Spotlight on KB5053606 Not Installing for Windows 10, Exact Steps
Mar 13, 2025 pm 08:02 PM
Spotlight on KB5053606 Not Installing for Windows 10, Exact Steps
 R.E.P.O. Crashing & Freezing on PC? Result-Driven Fixes
Mar 07, 2025 pm 08:02 PM
R.E.P.O. Crashing & Freezing on PC? Result-Driven Fixes
Mar 07, 2025 pm 08:02 PM
R.E.P.O. Crashing & Freezing on PC? Result-Driven Fixes
 All Fixes for Monster Hunter Wilds Fatal D3D Error on PC
Mar 05, 2025 pm 06:01 PM
All Fixes for Monster Hunter Wilds Fatal D3D Error on PC
Mar 05, 2025 pm 06:01 PM
All Fixes for Monster Hunter Wilds Fatal D3D Error on PC
