How to quickly configure SSH password-free access in a Linux cluster

In daily life, whether in a test environment or a production environment, when installing and configuring multiple servers (clusters), it is often necessary to set up password-free SSH access to servers in the cluster. For example, the installation and configuration of clusters such as Hadoop and HBase, or multiple servers that require SSH password-free configuration to facilitate subsequent operation and maintenance.
Based on the recent process of building a test environment, let’s explain how to quickly configure password-free mutual SSH access to multiple servers. It is mainly divided into several steps: modify the host name, configure the secret key of the aggregation server, aggregate the secret keys of other servers, copy the aggregation key file, generate the know_hosts file, and copy the know_hosts file.
1. Cluster planning
|
Host IP |
Host name |
|
10.141.93.101 |
dmz01 |
|
10.141.93.102 |
dmz02 |
|
10.141.93.103 |
inside01 |
|
10.141.93.104 |
inside02 |
|
10.141.93.105 |
inside03 |
|
10.141.93.106 |
inside04 |
|
10.141.93.107 |
inside05 |
|
10.141.93.108 |
inside06 |
|
10.141.93.109 |
inside07 |
|
10.141.93.110 |
inside08 |
|
10.141.93.111 |
inside09 |
|
10.141.93.112 |
inside10 |
|
10.141.93.113 |
inside11 |
|
10.141.93.114 |
inside12 |
|
10.141.93.115 |
inside13 |
|
10.141.93.116 |
inside14 |
|
10.141.93.117 |
inside15 |
|
10.141.93.118 |
inside16 |
The cluster has a total of 18 servers, divided into 2 servers in the DMZ area and 16 servers in the INSIDE area. Mainly used for web servers and application servers, databases, caches, etc. In order to facilitate the deployment of applications and management of cluster servers, 18 servers are configured for password-free SSH mutual access.
2. Modify the host name
Regardless of the initial installation of the system or cloud host, the host name "localhost" or "VM_75_173_centos" cannot easily distinguish the server function. Therefore, it is easy to install, deploy, and maintain, and the host name will be re-modified.
To modify the host name, use the following command:
hostnamectl set-hostname inside01
Use the above command to modify the host name and log in again via ssh. You will see that the host name has been modified.
3. Configure the aggregation server secret key
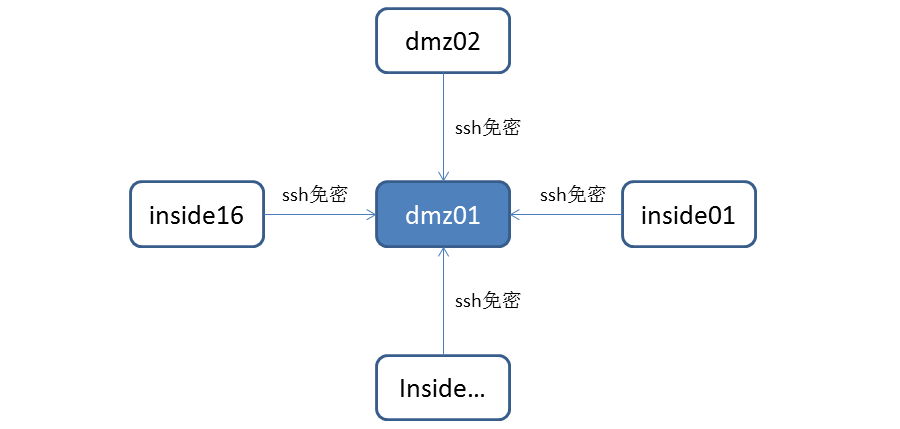
The so-called aggregation server here is a server in the selected cluster, and then other servers perform SSH with it without password trust. This article selects dmz01 (10.141.93.101) as the aggregation server. The relationship diagram is as follows:

Other servers perform password-free trust configuration for SSH login to dmz01. Here dmz01 is the aggregation server.
The command to configure the aggregation server secret key is as follows:
[root@dmz01 ~]#ssh-keygen -t rsa
Generating public/private rsa key pair.
Enter file in which to save the key (/root/.ssh/id_rsa): [Enter key]
Enter passphrase (empty for no passphrase): [Enter key]
Enter same passphrase again: [Enter key]
Your identification has been saved in /root/.ssh/id_rsa.
Your public key has been saved in /root/.ssh/id_rsa.pub.
The key fingerprint is:
43:0d:08:18:ec:9e:d6:1f:ea:5f:04:30:0f:66:26:41 root@dmz01
The key's randomart image is:
--[ RSA 2048]----
| oE O. .. |
| o= =. o |
| . o . . |
| . |
| . o S |
| . .. . |
| . o .. |
| . .. |
| ....
------------------Enter the "/root/.ssh" directory, copy and generate the "authorized_keys" file, use the following command:
cat id_rsa.pub >> authorized_keysThe results are as follows:
[root@inside01 .ssh]# ll
total 12
-rw-r--r-- 1 root root 395 Nov 12 16:25 authorized_keys
-rw------- 1 root root 1675 Nov 12 16:24 id_rsa
-rw-r--r-- 1 root root 395 Nov 12 16:24 id_rsa.pub
4. Copy other server keys
After configuring the aggregation server secret key in Section 3, you need to configure the secret keys of 17 servers including dmz02, inside01,..., inside16. The method is the same as the command in Section 3.
After configuring the secret keys of the other 17 servers, you need to copy the secret keys of the 17 servers to the aggregation server dmz01. The copy command is as follows:
[root@inside01 .ssh]# ssh-copy-id -i dmz01
5. Copy the aggregation key file
Copy the aggregated key files from the aggregation server to the "/root/.ssh" directory of the other 17 servers. The command is as follows:
[root@dmz01 .ssh]# scp authorized_keys dmz02:/root/.ssh/As shown above, perform scp copy of the secret key file "authorized_keys". This process requires entering a password.[root@dmz01 .ssh]# scp authorized_keys inside01:/root/.ssh/
…
[root@dmz01 .ssh]# scp authorized_keys inside16:/root/.ssh/
root@inside16's password:
authorized_keys 100% 7104 6.9KB/s 00:00
Ssh password-free authentication:
[root@dmz01 .ssh]# ssh dmz02The authenticity of host 'dmz02 (10.141.68.179)' can't be established.
ECDSA key fingerprint is 22:49:b2:5c:7c:8f:73:56:89:29:8a:bd:56:49:74:66.
Are you sure you want to continue connecting (yes/no)? yes
Warning: Permanently added 'dmz02,10.141.68.179' (ECDSA) to the list of known hosts.
Last login: Sat Nov 12 17:19:19 2016 from 10.141.93.186
As can be seen from the above, "ssh dmz02", when ssh logs in to the dmz02 server, there is no need to enter a password. But it prompts that dmz02 needs to be added to the "know hosts" list file of dmz01. In this way, the next time you access dmz02 via ssh, you will no longer be prompted to add to the know hosts list.
6. Generate know_hosts file
Ssh the other 17 servers from the aggregation server in sequence, and go through the previous password-free settings. There is no need to enter a password, but there are prompts to join the know hosts list.
Note: In order to add your own dmz01 to the know hosts file, you also need to type "[root@dmz01.ssh]# ssh dmz01".
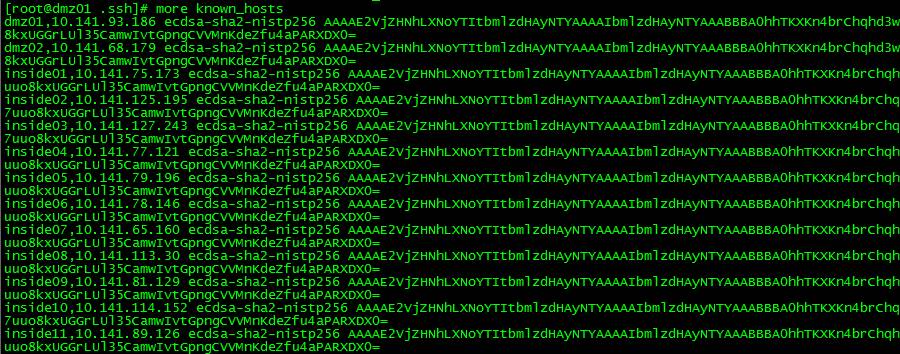
The content of the finally generated know_hosts file is as follows:

View the number of lines in the know_hosts file:
[root@dmz01 .ssh]# wc -l known_hosts
18 known_hosts
You can see one line for each host, indicating that dmz01 knows all 18 servers including itself.
7. Copy the know_hosts file
After Section 6, generate the know host settings of 18 servers for dmz01, and copy the /root/.ssh/know_hosts file scp of dmz01 to the other 17 servers.
SSH password-free login verification:
[root@dmz01 .ssh]# ssh inside10
Last login: Tue Nov 15 15:01:18 2016 from 10.141.93.186
[root@inside10 ~]# ssh inside15
Last login: Sat Nov 12 17:52:29 2016 from 10.141.93.186
[root@inside15 ~]# ssh dmz02
Last login: Sat Nov 12 20:05:59 2016 from 10.141.93.186
[root@dmz02 ~]# ssh dmz01
Last login: Thu Nov 17 23:56:05 2016 from 218.10.89.246
[root@dmz01 ~]# ssh inside15
Last login: Fri Nov 18 00:23:54 2016 from 10.141.114.152
Ssh password-free login sequence: dmz01àinside10àinside15àdmz02àdmz01àinside15.
8. Summary
This article mainly involves the following commands:
hostnamectl set-hostname inside01
ssh-keygen -t rsa
ssh-copy-id -i dmz01
That’s it for this article. I hope you will support this site in the future.
The above is the detailed content of How to quickly configure SSH password-free access in a Linux cluster. For more information, please follow other related articles on the PHP Chinese website!

Hot AI Tools

Undresser.AI Undress
AI-powered app for creating realistic nude photos

AI Clothes Remover
Online AI tool for removing clothes from photos.

Undress AI Tool
Undress images for free

Clothoff.io
AI clothes remover

AI Hentai Generator
Generate AI Hentai for free.

Hot Article

Hot Tools

Notepad++7.3.1
Easy-to-use and free code editor

SublimeText3 Chinese version
Chinese version, very easy to use

Zend Studio 13.0.1
Powerful PHP integrated development environment

Dreamweaver CS6
Visual web development tools

SublimeText3 Mac version
God-level code editing software (SublimeText3)

Hot Topics
 1386
1386
 52
52
 Difference between centos and ubuntu
Apr 14, 2025 pm 09:09 PM
The key differences between CentOS and Ubuntu are: origin (CentOS originates from Red Hat, for enterprises; Ubuntu originates from Debian, for individuals), package management (CentOS uses yum, focusing on stability; Ubuntu uses apt, for high update frequency), support cycle (CentOS provides 10 years of support, Ubuntu provides 5 years of LTS support), community support (CentOS focuses on stability, Ubuntu provides a wide range of tutorials and documents), uses (CentOS is biased towards servers, Ubuntu is suitable for servers and desktops), other differences include installation simplicity (CentOS is thin)
 How to use docker desktop
Apr 15, 2025 am 11:45 AM
How to use Docker Desktop? Docker Desktop is a tool for running Docker containers on local machines. The steps to use include: 1. Install Docker Desktop; 2. Start Docker Desktop; 3. Create Docker image (using Dockerfile); 4. Build Docker image (using docker build); 5. Run Docker container (using docker run).
 How to install centos
Apr 14, 2025 pm 09:03 PM
CentOS installation steps: Download the ISO image and burn bootable media; boot and select the installation source; select the language and keyboard layout; configure the network; partition the hard disk; set the system clock; create the root user; select the software package; start the installation; restart and boot from the hard disk after the installation is completed.
 Centos options after stopping maintenance
Apr 14, 2025 pm 08:51 PM
CentOS has been discontinued, alternatives include: 1. Rocky Linux (best compatibility); 2. AlmaLinux (compatible with CentOS); 3. Ubuntu Server (configuration required); 4. Red Hat Enterprise Linux (commercial version, paid license); 5. Oracle Linux (compatible with CentOS and RHEL). When migrating, considerations are: compatibility, availability, support, cost, and community support.
 How to view the docker process
Apr 15, 2025 am 11:48 AM
Docker process viewing method: 1. Docker CLI command: docker ps; 2. Systemd CLI command: systemctl status docker; 3. Docker Compose CLI command: docker-compose ps; 4. Process Explorer (Windows); 5. /proc directory (Linux).
 Detailed explanation of docker principle
Apr 14, 2025 pm 11:57 PM
Docker uses Linux kernel features to provide an efficient and isolated application running environment. Its working principle is as follows: 1. The mirror is used as a read-only template, which contains everything you need to run the application; 2. The Union File System (UnionFS) stacks multiple file systems, only storing the differences, saving space and speeding up; 3. The daemon manages the mirrors and containers, and the client uses them for interaction; 4. Namespaces and cgroups implement container isolation and resource limitations; 5. Multiple network modes support container interconnection. Only by understanding these core concepts can you better utilize Docker.
 What to do if the docker image fails
Apr 15, 2025 am 11:21 AM
Troubleshooting steps for failed Docker image build: Check Dockerfile syntax and dependency version. Check if the build context contains the required source code and dependencies. View the build log for error details. Use the --target option to build a hierarchical phase to identify failure points. Make sure to use the latest version of Docker engine. Build the image with --t [image-name]:debug mode to debug the problem. Check disk space and make sure it is sufficient. Disable SELinux to prevent interference with the build process. Ask community platforms for help, provide Dockerfiles and build log descriptions for more specific suggestions.
 What computer configuration is required for vscode
Apr 15, 2025 pm 09:48 PM
VS Code system requirements: Operating system: Windows 10 and above, macOS 10.12 and above, Linux distribution processor: minimum 1.6 GHz, recommended 2.0 GHz and above memory: minimum 512 MB, recommended 4 GB and above storage space: minimum 250 MB, recommended 1 GB and above other requirements: stable network connection, Xorg/Wayland (Linux)


