

Logitech driver keeps starting

When downloading and installing the Logitech driver, many users encountered the problem that the interface kept initializing, unable to install normally, and there was no effective solution. But in fact, we can solve this problem by modifying the system area.
The Logitech driver keeps initializing:
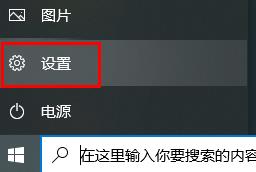
1. First, click Start in the lower left corner and open "Settings".
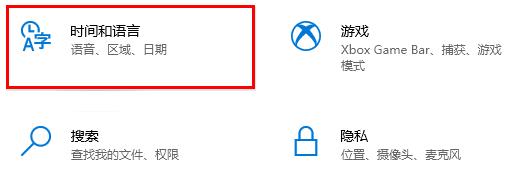
2. Open "Time and Language".
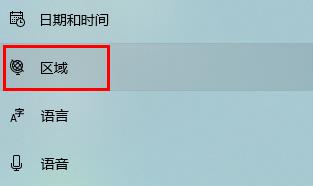
3. Then click "Region".
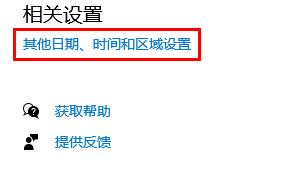
4. Find "Other Date, Time and Regional Settings" under "Related Settings" in the lower right corner.
5. Then click "Change date, time, or number format" under "Region".

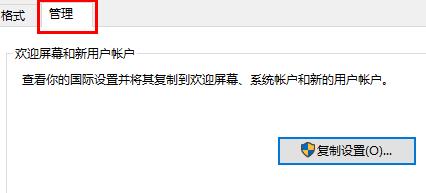
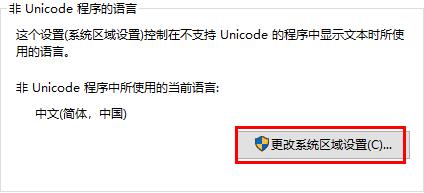
6. Enter the "Management" option and open "Change System Regional Settings".
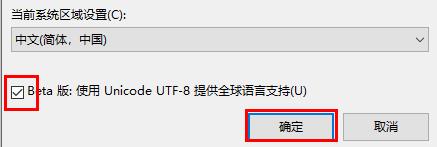
7. Finally, click "Beta Version" and confirm that the section can be installed normally.
The above is the detailed content of Logitech driver keeps starting. For more information, please follow other related articles on the PHP Chinese website!

Hot AI Tools

Undresser.AI Undress
AI-powered app for creating realistic nude photos

AI Clothes Remover
Online AI tool for removing clothes from photos.

Undress AI Tool
Undress images for free

Clothoff.io
AI clothes remover

AI Hentai Generator
Generate AI Hentai for free.

Hot Article
Hot Tools

Notepad++7.3.1
Easy-to-use and free code editor

SublimeText3 Chinese version
Chinese version, very easy to use

Zend Studio 13.0.1
Powerful PHP integrated development environment

Dreamweaver CS6
Visual web development tools

SublimeText3 Mac version
God-level code editing software (SublimeText3)
Hot Topics


 Does Logitech ghub driver not support win7? -Why can Logitech ghub driver only be installed on the c drive?
Mar 18, 2024 pm 05:37 PM
Does Logitech ghub driver not support win7? -Why can Logitech ghub driver only be installed on the c drive?
Mar 18, 2024 pm 05:37 PM
Does Logitech ghub driver not support win7? Not compatible. Since Windows 7 has stopped updating and is no longer Microsoft's main operating system, many new software no longer supports it, such as Logitech ghub. The main interface of the Logitech driver: 1. The main software interface is on the left. The three buttons are lighting, buttons, and sensitivity settings. 2. In the settings of the lighting interface, the general special effects are relatively conventional, and the audio visual effects are the highlight. They can change color according to the sound frequency, and can be set according to the high, middle and bass bands, with different colors and effects. 3. In button settings, users can edit them here according to their special requirements. 4. In the sensitivity settings, many users will have some of their own settings. They can add the DPI speed switching point by themselves, but
 What should I do if Win11 cannot run the Logitech driver? Solution to the problem that the Logitech mouse driver cannot run in Windows 11
Feb 11, 2024 pm 09:20 PM
What should I do if Win11 cannot run the Logitech driver? Solution to the problem that the Logitech mouse driver cannot run in Windows 11
Feb 11, 2024 pm 09:20 PM
Logitech drivers provide users of Logitech gaming peripherals with powerful configuration and personalization options, and users can also set them according to their own preferences. However, there are also some Win11 users who cannot run it when running the Logitech driver. What should they do? Let the editor introduce the solution in detail below. Solution to the Win11 Logitech mouse driver not running 1. Update Windows 11 and press the Windows+I keyboard keys at the same time to launch the "Settings" application. Select the Windows Update tab. Click Check for updates to download and install any available content. Select Advanced options and then select Optional updates in Settings. Then select the checkbox for any optional driver updates and click Download and Install
 Logitech driver import macro file steps
Feb 26, 2024 am 10:58 AM
Logitech driver import macro file steps
Feb 26, 2024 am 10:58 AM
It doesn’t take much time to import game macro files. You can use them directly without writing them yourself. You can easily save them to the corresponding location without any trouble. But if you don’t know how to do it, please read on for the specific steps. Steps to import macro files into Logitech driver: 1. Enter the Logitech driver software and click "Write Script" in the picture. 2. Then click the "Import" button. 3. Then select the appropriate game script with ".lua" as the suffix. file, 4. Then click "Yes" in the pop-up window that appears to continue your import operation. 5. Finally, click the "Save" button in the upper left corner to use it directly.
 Steps to restore Logitech driver to default configuration
Feb 28, 2024 am 11:04 AM
Steps to restore Logitech driver to default configuration
Feb 28, 2024 am 11:04 AM
Facing the Logitech driver that cannot be used normally, it can only be solved by restoring the factory settings. However, many friends do not know how to restore the factory settings. The following will provide you with detailed steps to restore the factory settings. I hope it can help you. Steps to restore the Logitech driver to the default configuration: 1. First download the Logitech dedicated driver software GHub, and open it after the download is complete. 2. Then open the mouse to set up, and click the settings (gear) in the upper right corner. 3. At the bottom, click "Restore default settings" , click directly and reopen the software to restore factory settings. How to connect the Logitech driver to the device 1. Open the back cover of the mouse and take out the wireless mouse socket. 2. Select the mouse socket next to the computer. 3. Set the corresponding parameter information for the mouse. 4. Bluetooth pair the device and long press Bluetooth.
 How to Adjust Logitech Driver DPI Settings
Jan 17, 2024 pm 01:30 PM
How to Adjust Logitech Driver DPI Settings
Jan 17, 2024 pm 01:30 PM
The Logitech driver adjusts the dpi of the mouse according to the needs of different users to provide the same comfortable experience. Because each user's needs are different, dpi needs to be adjusted individually to meet their needs. How to adjust dpi in Logitech driver: 1. First, users need to open the Logitech driver on the official website and bind the device. 2. After the first step is completed, enter the "Settings" interface and select "Sensitivity" to set it. 3. Finally, use the sliding punctuation point to adjust the dpi speed on this interface.
 Logitech headset microphone is silent, please fix it
Jan 18, 2024 am 08:03 AM
Logitech headset microphone is silent, please fix it
Jan 18, 2024 am 08:03 AM
Some users may encounter the problem of no sound from the headset microphone when using Logitech drivers. Check whether the headset microphone cable is plugged in properly or whether the headset is muted. This can be solved by turning it on in the settings. There is no sound from the Logitech-driven headset microphone: 1. Users need to first check whether the headset microphone is plugged into the wrong wire. 2. If it is wrong, just plug it in again. If not, then you need to check whether the headset microphone is broken. 3. Open "Settings" and search for "Control Panel" in "Settings". 4. Select "Hardware and Sound". 5. Click "Manage Audio Devices". 6. After entering the interface, click the "Recording" option and double-click "Microphone". 7. After entering, click "Level" to increase the microphone volume to the maximum. If it is not loud enough, you can strengthen the microphone settings. 8. Last look
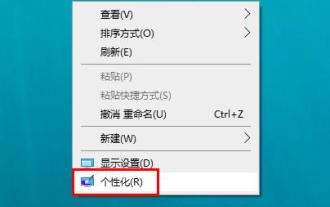 In which folder are the Logitech mouse drivers located? Where are the Logitech driver files?
Mar 13, 2024 pm 08:30 PM
In which folder are the Logitech mouse drivers located? Where are the Logitech driver files?
Mar 13, 2024 pm 08:30 PM
I believe that which folder the Logitech mouse driver is in is a question that many users want to know. Users can right-click to personalize and enter the mouse interface under the device to perform operations to see it. Let the editor carefully introduce the specific operation methods for users. In which folder is the Logitech mouse driver located? 1. First, right-click on the computer and select "Personalize". 2. Then click "Home" on the upper left. 3. After entering the homepage, click "Devices". 4. Then click "Mouse". 5. Find "Other Mouse Options&r" under the relevant settings on the right
 How to adjust the sensitivity setting of Logitech g402
Jan 30, 2024 am 10:24 AM
How to adjust the sensitivity setting of Logitech g402
Jan 30, 2024 am 10:24 AM
For gamers, the sensitivity of the mouse is very important, so how to adjust the sensitivity of the Logitech g402? In fact, as long as you download a ghub Logitech driver, you can freely adjust the sensitivity and dpi gear. How to adjust the sensitivity of Logitech g402: 1. First download and install a ghub Logitech driver. 2. After the installation is completed, open it and click "Settings" in the upper right corner. 3. Then change the language to "Simplified Chinese". 4. After changing, return to the main interface and click the mouse icon to enter the settings. 5. Then click on the icon in the upper left corner to adjust the sensitivity. 6. Slide the indicator bar on the right to modify the dpi of different gears. 7. By pressing the mouse dpi key, you can quickly switch between the set sensitivity levels.
