
 Web Front-end
HTML Tutorial
Demystifying the Canvas API: everything from simple drawing to advanced special effects
Web Front-end
HTML Tutorial
Demystifying the Canvas API: everything from simple drawing to advanced special effects
Demystifying the Canvas API: everything from simple drawing to advanced special effects


Canvas API is a powerful drawing tool provided by HTML5, which can implement various functions from basic drawing to advanced special effects. This article will give you an in-depth understanding of how to use the Canvas API and provide specific code examples.
- Basic Drawing
The most basic of Canvas API is to draw simple graphics, such as rectangles, circles, straight lines, etc. The following is a code example that creates a rectangle and fills it with color:
const canvas = document.getElementById('myCanvas');
const ctx = canvas.getContext('2d');
ctx.fillStyle = 'red';
ctx.fillRect(10, 10, 100, 100);In the above code, we first obtain a canvas element and pass getContext('2d' )Method to obtain the 2D drawing context objectctx. Then we set the fill color to red and use the fillRect method to draw a red rectangle with a width of 100px and a height of 100px.
- Drawing text
The Canvas API can also be used to draw text. The following is a code example for drawing text on Canvas:
const canvas = document.getElementById('myCanvas');
const ctx = canvas.getContext('2d');
ctx.font = '30px Arial';
ctx.fillStyle = 'blue';
ctx.fillText('Hello, Canvas!', 50, 50);In the above code, we first set the font style and font size, and then set the fill color to blue, using fillTextMethod to write text on Canvas.
- Picture drawing
In addition to basic graphics and text drawing, the Canvas API can also be used to draw pictures. The following is a code example for drawing an image:
const canvas = document.getElementById('myCanvas');
const ctx = canvas.getContext('2d');
const img = new Image();
img.src = 'image.jpg';
img.onload = function() {
  ctx.drawImage(img, 0, 0);
};In the above code, we first create an Image object and set its src attribute to the image URL. Then in the onload event, use the drawImage method to draw the image onto the Canvas.
- Animation effects
The Canvas API can also be used to create various animation effects. The following is a code example that uses the Canvas API to create a simple animation effect:
const canvas = document.getElementById('myCanvas');
const ctx = canvas.getContext('2d');
let x = 0;

function draw() {
  ctx.clearRect(0, 0, canvas.width, canvas.height);
  ctx.fillStyle = 'red';
  ctx.fillRect(x, 10, 100, 100);
  x += 1;
  if (x > canvas.width) {
    x = 0;
  }
  requestAnimationFrame(draw);
}

draw();In the above code, we use the requestAnimationFrame method to recursively call draw Function to implement a simple displacement animation effect. In the drawing of each frame, we first use the clearRect method to clear the content on the Canvas, then draw a red rectangle with a width of 100px and a height of 100px, and increment the value of x to realize the rectangle horizontal displacement. When the value of x exceeds the width of the Canvas, reset x to 0 to achieve the effect of loop playback.
The above introduces the basic drawing, text drawing, image drawing and animation effects functions of the Canvas API, and provides specific code examples. I hope this article can help you better understand how to use the Canvas API and unleash its powerful drawing capabilities.
The above is the detailed content of Demystifying the Canvas API: everything from simple drawing to advanced special effects. For more information, please follow other related articles on the PHP Chinese website!

Hot AI Tools

Undresser.AI Undress
AI-powered app for creating realistic nude photos

AI Clothes Remover
Online AI tool for removing clothes from photos.

Undress AI Tool
Undress images for free

Clothoff.io
AI clothes remover

Video Face Swap
Swap faces in any video effortlessly with our completely free AI face swap tool!

Hot Article
Hot Tools

Notepad++7.3.1
Easy-to-use and free code editor

SublimeText3 Chinese version
Chinese version, very easy to use

Zend Studio 13.0.1
Powerful PHP integrated development environment

Dreamweaver CS6
Visual web development tools

SublimeText3 Mac version
God-level code editing software (SublimeText3)
Hot Topics
 1386
1386
 52
52

 How to use Vue to implement pop-up window effects
Sep 22, 2023 am 09:40 AM
How to use Vue to implement pop-up window effects
Sep 22, 2023 am 09:40 AM
How to use Vue to implement pop-up window effects requires specific code examples. In recent years, with the development of web applications, pop-up window effects have become one of the commonly used interaction methods among developers. As a popular JavaScript framework, Vue provides rich functions and ease of use, and is very suitable for implementing pop-up window effects. This article will introduce how to use Vue to implement pop-up window effects and provide specific code examples. First, we need to create a new Vue project using Vue's CLI tool. open end
 How to use Vue to implement full-screen mask effects
Sep 19, 2023 pm 04:14 PM
How to use Vue to implement full-screen mask effects
Sep 19, 2023 pm 04:14 PM
How to use Vue to implement full-screen masking effects. In web development, we often encounter scenarios that require full-screen masking, such as displaying a masking layer when loading data to prevent users from performing other operations, or in some special scenarios. Use a mask layer to highlight an element. Vue is a popular JavaScript framework that provides convenient tools and components to achieve various effects. In this article, I will introduce how to use Vue to achieve the effect of full-screen masking, and provide some specific code examples. At first, we
 A quick guide to learning Python drawing: code example for drawing ice cubes
Jan 13, 2024 pm 02:00 PM
A quick guide to learning Python drawing: code example for drawing ice cubes
Jan 13, 2024 pm 02:00 PM
Quickly get started with Python drawing: code example for drawing Bingdundun Python is an easy-to-learn and powerful programming language. By using Python's drawing library, we can easily realize various drawing needs. In this article, we will use Python's drawing library matplotlib to draw a simple graph of ice. Bingdundun is a cute panda who is very popular among children. First, we need to install the matplotlib library. You can do this by running in the terminal
 How to use Vue to implement sidebar effects
Sep 19, 2023 pm 02:00 PM
How to use Vue to implement sidebar effects
Sep 19, 2023 pm 02:00 PM
How to use Vue to implement sidebar effects Vue is a popular JavaScript framework. Its simplicity, ease of use, and flexibility enable developers to quickly build interactive single-page applications. In this article, we will learn how to use Vue to implement a common sidebar effect, and provide specific code examples to help us understand better. Create a Vue project First, we need to create a Vue project. You can use the VueCLI (command line interface) provided by Vue, which can quickly generate
 Implement card flipping effects in WeChat mini programs
Nov 21, 2023 am 10:55 AM
Implement card flipping effects in WeChat mini programs
Nov 21, 2023 am 10:55 AM
Implementing card flipping effects in WeChat mini programs In WeChat mini programs, implementing card flipping effects is a common animation effect that can improve user experience and the attractiveness of interface interactions. The following will introduce in detail how to implement the special effect of card flipping in the WeChat applet and provide relevant code examples. First, you need to define two card elements in the page layout file of the mini program, one for displaying the front content and one for displaying the back content. The specific sample code is as follows: <!--index.wxml-->&l
 HTML, CSS and jQuery: Techniques for achieving image folding and expanding effects
Oct 24, 2023 am 11:05 AM
HTML, CSS and jQuery: Techniques for achieving image folding and expanding effects
Oct 24, 2023 am 11:05 AM
HTML, CSS and jQuery: An introduction to techniques for implementing image folding and expanding special effects. In web design and development, we often need to implement some dynamic special effects to increase the attractiveness and interactivity of the page. Among them, the image folding and unfolding effect is a common but interesting technique. Through this special effect, we can make the image fold or expand under the user's operation to show more content or details. This article will introduce how to use HTML, CSS and jQuery to achieve this effect, with specific code examples. realize thoughts
 How to use Vue to implement progress bar effects
Sep 19, 2023 am 09:22 AM
How to use Vue to implement progress bar effects
Sep 19, 2023 am 09:22 AM
How to use Vue to implement progress bar effects The progress bar is a common interface element that can be used to display the completion of a task or operation. In the Vue framework, we can implement special effects of the progress bar through some simple code. This article will introduce how to use Vue to implement progress bar effects and provide specific code examples. Create a Vue component First, we need to create a Vue component to implement the progress bar function. In Vue, components are reusable and can be used in multiple places. Create a file called Pro
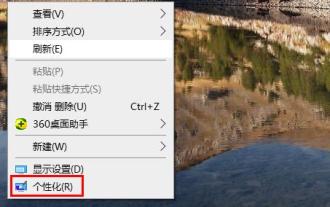 Steps to turn off mouse track effects in Windows 10
Dec 31, 2023 pm 09:53 PM
Steps to turn off mouse track effects in Windows 10
Dec 31, 2023 pm 09:53 PM
When we use the win10 system, we can make many personalized settings, including mouse track special effects. However, many users do not know how to turn off the mouse track special effects in win10. For this reason, we have provided detailed methods. How to turn off the mouse track effects in Windows 10: 1. First, right-click on a blank space on the desktop, and then click "Personalize". 2. Then click "Theme" on the left and select "Mouse Cursor" on the right. 3. After entering the properties, you can see and select "Pointer Options". 4. Then scroll down to see the visibility, and the √ is checked at this time. 5. Uncheck, then click Apply and OK.
