

日均百万PV架构第四弹(分布式监控)_MySQL

应该能更早出的第四弹,被虚拟机错误搅乱,迟迟没有上线,不得已将所有
节点用puppet完成上线,稍后整理第五弹(非你不可自动化)也即将上线 : )

zabbix简介
zabbix是基于Php的开源监控软件
基于多重数据采集 SNMP , Agent , Ping , Port
多重告警通知 Mail , Jabber , SMS
可以完成多种操作平台甚至于设备(route,switch,io)的监控工作
易于定制重用(模板机制,函数),甚至于二次开发
告警及时几乎无延迟
它与cacti最大的不同之处在于它还提供一个分布式企业监控解决方案
zabbix组成
zabbix-server 主要完成监控数据的存储与分析告警
zabbix-proxy 分布式环境重要一环,提server完成的数据存储压力
zabbix-agent 数据采集重要节点
zabbix-web 数据展示与监控配置
这些节点便完成了自动化监控中: 数据采集 , 数据存储 , 数据展示 , 分析告警
zabbix组件关系示意

规划如下
server.king.com 172.16.43.6 192.168.43.6
zabbix-server , zabbix-web , php , httpd , mysql
proxy.king.com 172.16.43.5
zabbix-proxy , mysql
slave1-4.king.com 172.16.43.1-4
配置过程如下
1 配置安装zabbix-server(172.16.43.6)
i)准备如下文件zabbix-2.0.8-3.el6.x86_64.rpmzabbix-get-2.0.8-3.el6.x86_64.rpmzabbix-server-2.0.8-3.el6.x86_64.rpmzabbix-server-mysql-2.0.8-3.el6.x86_64.rpmzabbix-web-2.0.8-3.el6.noarch.rpmzabbix-web-mysql-2.0.8-3.el6.noarch.rpmmariadb-10.0.10-linux-x86_64.tar.gz(安装过程参见)php-5.4.26.tar.bz2(安装过程参见)httpd-2.2(系统自带)##ii)安装配置yum -y install *.rpm# 创建zabbix数据库及账号mysql -e "create database zabbix;"mysql -e "grant all on *.* to 'zabbix'@'172.16.%.%' identified by 'zabbix';"mysql -e "flush privileges;"# 导入zabbix web所需表mysql -h172.16.43.6 -uzabbix -p -D zabbix <p># 查看10051端口是否开启</p><p><img src="/static/imghw/default1.png" data-src="http://img.bitscn.com/upimg/allimg/c140719/1405KI3Y21Z-93U8.jpg" class="lazy" title="2.png" alt="wKiom1N4mbqyEnxKAAopgQpwTYI698.jpg"></p><p># 浏览器访问配置</p><p>http://172.16.43.6/zabbix</p><p><img src="/static/imghw/default1.png" data-src="http://img.bitscn.com/upimg/allimg/c140719/1405KI3940620-103040.jpg" class="lazy" title="3.png" alt="wKiom1N4mdPCpyCnAAxjGdI64ks946.jpg"></p><p>2 代理服务器安装配置(172.16.43.5)</p><pre class="brush:php;toolbar:false">i) 准备如下文件zabbix-2.0.8-3.el6.x86_64.rpmzabbix-proxy-2.0.8-3.el6.x86_64.rpmzabbix-proxy-mysql-2.0.8-3.el6.x86_64.rpmmariadb-10.0.10-linux-x86_64.tar.gz(安装过程参见)##ii) 安装配置yum -y install *.rpm# 创建zabbix数据库及账号mysql -e "create database zabbixproxy;"mysql -e "grant all on *.* to 'zabbixproxy'@'172.16.%.%' identified by 'zabbixproxy';"mysql -e "flush privileges;"# 导入zabbix web所需表mysql -h172.16.43.5 -uroot -p -D zabbixproxy <p># 查看10051端口是否开启</p><p><img src="/static/imghw/default1.png" data-src="http://img.bitscn.com/upimg/allimg/c140719/1405KI3a3440-11YW.jpg" class="lazy" title="4.png" alt="wKioL1N4mffgnlebAAn8w8HKIOM463.jpg"></p><p>3 客户端配置(172.16.43.1 - 172.16.43.4)</p><pre class="brush:php;toolbar:false">i) 准备如下文件zabbix-2.0.8-3.el6.x86_64.rpmzabbix-agent-2.0.8-3.el6.x86_64.rpm zabbix-sender-2.0.8-3.el6.x86_64.rpm##ii) 安装配置yum -y install zabbix-2.0.8-3.el6.x86_64.rpm zabbix-agent-2.0.8-3.el6.x86_64.rpm zabbix-sender-2.0.8-3.el6.x86_64.rpm# 编辑配置文件vim /etc/zabbix/zabbix_agentd.confServer=172.16.43.5 (#86)ServerActive=172.16.43.5 (#127)Hostname=slave4.king.com (#138)# 启动zabbix-agent服务service zabbix-agent start
# 查看10050端口是否开启
4. 配置自动发现规则将客户端添加至监控体系
# 配置代理服务器
Administration -> DM -> Create Proxy (均指在WebGui下菜单栏路径)

# 配置自动发现规则
Configuration -> Discovery -> Create discovery rule ->

# 配置发现后的动作
Configuration -> Actions -> Create action -> Event source(Discovery) ->


# 配置完毕重启zabbix-proxy等待即可


5. 使用基本规则完成对cpu,io,net参数的监控
# zabbix内置了很多模板,我们可以使用来完成第5项的监控
# 改动刚才Actions除了发现主机将主机添加至监控列表外,额外定义link to templates即可
# 可以选择 Template OS Linux
# 这样发现之后的主机便可以完成对cpu,io,net的基本监控

# 最后我们还可以定义自动移除规则
Configuration -> Actions -> Create action -> Event source(Discovery) ->

6. 使用自定义函数完成对 nginx , varnish , mysql等服务的监控
# zabbix已经对mysql的自定义参数做出了范例,我们可以进行访问来完成对更多服务的监控vim /etc/zabbix/zabbix_agentd.d/userparameter_mysql.conf## 监控nginx的连接活动数,访问数,处理个数vim /etc/zabbix/zabbix_agentd.d/nginx.confUserParameter=Nginx.active[*], /usr/bin/curl -s "http://$1:$2/status" | awk '/^Active/ {print $NF}'UserParameter=Nginx.accepted[*], /usr/bin/curl -s "http://$1:$2/status" | awk '/^[ /t]+[0-9]+[ /t]+[0-9]+[ /t]+[0-9]+/ {print $$1}'UserParameter=Nginx.handled[*], /usr/bin/curl -s "http://$1:$2/status" | awk '/^[ /t]+[0-9]+[ /t]+[0-9]+[ /t]+[0-9]+/ {print $$2}'## 监控varnish的连接数,命中数,命中率vim /etc/zabbix/zabbix_agentd.d/varnish.confUserParameter=varnish.conn,/usr/bin/varnishstat -1 | grep "client_conn" | awk '{print $2}' UserParameter=varnish.hit,/usr/bin/varnishstat -1 | grep "cache_hit" | awk '{print $2}'## 定义好后可以将自动key添加到item,


Hot AI Tools

Undresser.AI Undress
AI-powered app for creating realistic nude photos

AI Clothes Remover
Online AI tool for removing clothes from photos.

Undress AI Tool
Undress images for free

Clothoff.io
AI clothes remover

AI Hentai Generator
Generate AI Hentai for free.

Hot Article
Hot Tools

Notepad++7.3.1
Easy-to-use and free code editor

SublimeText3 Chinese version
Chinese version, very easy to use

Zend Studio 13.0.1
Powerful PHP integrated development environment

Dreamweaver CS6
Visual web development tools

SublimeText3 Mac version
God-level code editing software (SublimeText3)
Hot Topics
 1359
1359
 52
52

 Convert VMware to VirtualBox and vice versa
Feb 19, 2024 pm 05:57 PM
Convert VMware to VirtualBox and vice versa
Feb 19, 2024 pm 05:57 PM
Virtual machines are an affordable way to experience and use multiple operating systems on a single computer. VMWare and VirtualBox are the two major brands in the virtual machine industry. You can easily convert a VMware virtual machine to a VirtualBox virtual machine and vice versa, giving you the flexibility to switch machines between them without having to recreate them. Migrating a virtual machine from VMWare to VirtualBox or vice versa is not complicated. Just follow the instructions below and it's easy to do. How to convert VMware to VirtualBoxVMwareVM is stored in .vmx format and then converted to .ovf, this is VirtualBox and VMWare
 How to install, configure and use the 'Windows Sandbox' feature
Feb 19, 2024 pm 01:00 PM
How to install, configure and use the 'Windows Sandbox' feature
Feb 19, 2024 pm 01:00 PM
Windows Sandbox is a feature built into the Windows 11 and Windows 10 operating systems that allows users to install and test unverified applications or visit websites in a lightweight virtual environment while protecting the main system from potential threats. Overall, this system provides a safe and isolated testing environment, similar to a virtual machine, but easier to use. Next, this article will introduce the detailed steps to install, configure and use the Windows Sandbox feature on Windows 11. Introduction to Windows Sandbox Features Windows Sandbox (also known as Windows Sandbox) is essentially a lightweight virtualization solution focused on providing efficient and secure virtual environments. compared to traditional
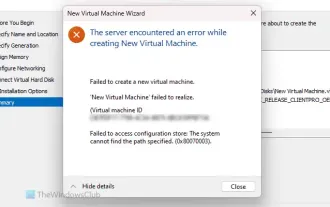 The server encountered an error, 0x80070003, while creating a new virtual machine.
Feb 19, 2024 pm 02:30 PM
The server encountered an error, 0x80070003, while creating a new virtual machine.
Feb 19, 2024 pm 02:30 PM
If you encounter error code 0x80070003 when using Hyper-V to create or start a virtual machine, it may be caused by permission issues, file corruption, or configuration errors. Solutions include checking file permissions, repairing damaged files, ensuring correct configuration, and more. This problem can be solved by ruling out the different possibilities one by one. The entire error message looks like this: The server encountered an error while creating [virtual machine name]. Unable to create new virtual machine. Unable to access configuration store: The system cannot find the path specified. (0x80070003). Some possible causes of this error include: The virtual machine file is corrupted. This can happen due to malware, virus or adware attacks. Although the likelihood of this happening is low, you can't completely
 How to solve the problem that win11 virtual machine cannot connect to the network
Jan 04, 2024 pm 07:00 PM
How to solve the problem that win11 virtual machine cannot connect to the network
Jan 04, 2024 pm 07:00 PM
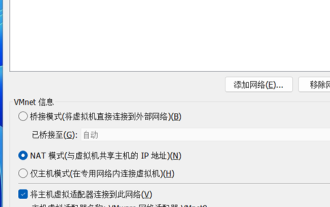
Many users have installed virtual machines on the win11 system after updating it, but many of them will be unable to connect to the network. So today I will bring you the solution to the problem that the win11 virtual machine cannot connect to the network. Come and see how to solve it. . What to do if the win11 virtual machine cannot connect to the network 1. First open the virtual machine and click "Edit - Virtual Network Editor - Restore Default Settings" in order. After doing this, it can be used. 2. In fact, in many cases it is due to changes in the network driver that the network cannot operate normally. You only need to reinstall the network module once! 3. If you encounter the problem that the network is suddenly cut off during use, even if the adapter has been configured correctly, the network will still be displayed.
 How to convert a virtual machine to a physical machine?
Feb 19, 2024 am 11:40 AM
How to convert a virtual machine to a physical machine?
Feb 19, 2024 am 11:40 AM
Converting a virtual machine (VM) to a physical machine is the process of migrating a virtual instance and associated application software to a physical hardware platform. This conversion helps optimize operating system performance and hardware resource utilization. This article aims to provide an in-depth look at how to make this conversion. How to implement migration from virtual machine to physical machine? Typically, the conversion process between a virtual machine and a physical machine is performed outside the virtual machine by third-party software. This process consists of multiple stages involving the configuration of virtual machines and the transfer of resources. Prepare the physical machine: The first step is to ensure that the physical machine meets the hardware requirements for Windows. We need to back up the data on a physical machine as the conversion process will overwrite the existing data. *Username and password for an administrator account with administrator rights to create system images. will be virtual
 Detailed introduction to the location of the win11 virtual machine?
Jan 16, 2024 pm 08:00 PM
Detailed introduction to the location of the win11 virtual machine?
Jan 16, 2024 pm 08:00 PM
In win11, many friends want to use other operating systems through virtual machines, but they don’t know where the win11 virtual machine is. In fact, we only need to download a virtual machine software. Where is the win11 virtual machine: 1. Virtual machine platform 1. If we want to enable the virtual machine platform function, just click on the "Start Menu" first 2. Then search above and open "Turn on or off Windows features" 3. After turning it on, check Select "Hyper-V" and click "OK" to save. 2. Virtual machine 1. If we want to use a virtual machine similar to an emulator. 2. Then just download a "VMware" virtual machine software. If we want to use VMware, we also need to enable the above virtual machine
 What are the virtualization software?
Feb 23, 2024 pm 02:42 PM
What are the virtualization software?
Feb 23, 2024 pm 02:42 PM
What are the virtualization software? With the continuous development of technology, virtualization technology has become an important concept in the field of modern computer science. The goal of virtualization is to logically divide physical resources such as CPU, memory and storage to form multiple virtual environments so that multiple operating systems and applications can run on the same physical computer at the same time. As a key tool to achieve this goal, virtualization software has received increasing attention and application. This article will introduce some common virtualization software. VMwarevSphere: VMw
 Are virtual machines harmful to computers?
Sep 08, 2023 pm 05:29 PM
Are virtual machines harmful to computers?
Sep 08, 2023 pm 05:29 PM
Virtual machines do little harm to the computer. The reason is that virtual machines generally do not cause direct harm to computers. A virtual machine is a software tool that allows the creation and running of multiple virtual operating system environments on a physical computer. It does this by simulating hardware and resources on the host operating system. If the virtual machine is not properly configured or the resources are allocated unreasonably, , may cause performance degradation or instability on the host computer. In addition, the virtual machine may also occupy more storage space on the host computer. Therefore, when using a virtual machine, it is recommended to properly configure the resources of the virtual machine.
