
 Computer Tutorials
System Installation
Super simple USB disk system installation guide: concise and easy-to-understand tutorial
Computer Tutorials
System Installation
Super simple USB disk system installation guide: concise and easy-to-understand tutorial
Super simple USB disk system installation guide: concise and easy-to-understand tutorial

In modern society, computers have become an indispensable part of people's lives. However, sometimes we need to reinstall the operating system to improve the performance of the computer or solve some problems. Using a USB flash drive to install the system is a simple and easy-to-understand method. This article will introduce you to the detailed steps of installing the system from a USB flash drive to help you complete the installation easily.

Computer model: Lenovo ThinkPad X1 Carbon
Operating system version: Windows 10
Software Version: Rufus 3.11
Text:
1. Prepare U disk and system image file
1. First, we need to prepare a U disk with sufficient capacity. It is recommended that at least 16GB or more. Make sure there is no important data on the USB flash drive, because the data on the USB flash drive will be cleared during the system installation process.
2. Next, we need to download the required system image file. You can download the latest operating system image file from the official website or other reliable sources.
2. Use Rufus to make a boot disk
1. Open the Rufus software and insert the USB disk into the computer.
2. In the Rufus interface, select the correct U disk and make sure you do not select the wrong device.
3. In "Boot Selection", select "Compatibility Mode" to ensure compatibility.
4. In "File System", select "FAT32".
5. In "Creation Method", select "Write Image Mode".
6. Click the "Start" button and wait for Rufus to write the system image file to the USB flash drive.
3. Set the computer startup sequence
1. Insert the prepared U disk into the computer where the system needs to be installed.
2. Restart the computer and press the corresponding key (usually F2, F12 or Delete key) when booting to enter the BIOS settings.
3. In the BIOS settings, find the "Boot Order" or "Boot Order" option, and set the U disk as the first boot item.
4. Save settings and exit BIOS.
4. Install the system
1. Restart the computer and the system will boot from the USB disk.
2. Follow the prompts on the system installation interface to select settings such as language and time zone.
3. Select the "Custom Installation" option and select the installation disk.
4. Wait for the system installation to be completed. You may need to restart the computer during this period.
5. Follow the system prompts to complete some basic settings, such as creating user accounts, setting passwords, etc.
Summary:
Through this article’s simple and easy-to-understand U disk installation system tutorial, we can easily complete the installation of the operating system. Using a USB flash drive to install the system is not only convenient and fast, but also can solve some computer problems and improve computer performance. I hope this article will be helpful to everyone and enable everyone to use their computers better.
The above is the detailed content of Super simple USB disk system installation guide: concise and easy-to-understand tutorial. For more information, please follow other related articles on the PHP Chinese website!

Hot AI Tools

Undresser.AI Undress
AI-powered app for creating realistic nude photos

AI Clothes Remover
Online AI tool for removing clothes from photos.

Undress AI Tool
Undress images for free

Clothoff.io
AI clothes remover

AI Hentai Generator
Generate AI Hentai for free.

Hot Article
Hot Tools

Notepad++7.3.1
Easy-to-use and free code editor

SublimeText3 Chinese version
Chinese version, very easy to use

Zend Studio 13.0.1
Powerful PHP integrated development environment

Dreamweaver CS6
Visual web development tools

SublimeText3 Mac version
God-level code editing software (SublimeText3)
Hot Topics


 msi old motherboard sets u disk boot
Feb 14, 2024 pm 01:40 PM
msi old motherboard sets u disk boot
Feb 14, 2024 pm 01:40 PM
Hi, everyone, my name is Xiaoyu. In the eyes of many people, installing a system on a computer is a technical job that most people simply cannot learn. The method of installing systems has gone through two evolutions and is now in its third generation. The earliest installation of the Windows system was carried out through the original CD, which required a CD-ROM drive and a CD, as well as a certain amount of computer technical knowledge. However, installation is very slow. Once the installation is completed, the system is blank and drivers and commonly used software need to be installed one by one. Therefore, a complete system installation takes approximately more than an hour. The core of the second generation system installation is Ghost technology, including the earliest "Ghost one-click installation DOS version" and the later WinPE system. Ghost technology has completely changed the limitations of using CD-ROM installation systems.
 Frozen U disk boot official website - easily realize one-click boot system
Mar 27, 2024 pm 12:40 PM
Frozen U disk boot official website - easily realize one-click boot system
Mar 27, 2024 pm 12:40 PM
Introduction: In this digital age, we are increasingly dependent on electronic devices such as computers and mobile phones. However, when a system problem occurs, reinstalling the system becomes a headache. The traditional method of reinstalling the system requires preparing the system disk and tedious settings. But now, with the frozen USB disk boot official website, everything has become simple. This article will introduce in detail how to use the frozen USB disk to start the official website to easily start the system with one click. Tool materials: System version: Windows1020H2 Brand model: Lenovo Xiaoxin Pro13 2021 software version: Frozen U Disk Launcher v5.0 1. Understanding Frozen U Disk Launcher Frozen U Disk Launcher is a powerful boot disk production Tool, it can help us quickly create bootable USB disks for various systems.
 U disk installation system tutorial: easily learn how to use a U disk to install the operating system for your computer
Apr 04, 2024 pm 12:49 PM
U disk installation system tutorial: easily learn how to use a U disk to install the operating system for your computer
Apr 04, 2024 pm 12:49 PM
In today's technological development, operating system installation has become an essential skill in computer use. Using a USB flash drive to install the operating system has become a popular way. This article aims to introduce to technology enthusiasts and novice computer and mobile phone users how to use a USB flash drive to install an operating system on a computer, helping them master this skill more easily. Tool materials: System version: Windows 10 Brand model: HP Z66 Software version: Rufus3.11 1. Preparation 1. First, prepare a computer running the Windows 10 operating system, a USB flash drive (recommended capacity is not less than 8GB), and the latest version of the operating system image file. 2. Download and install Rufus software for making a USB boot disk. two
 How to use USB flash drive to install computer system?
Apr 04, 2024 pm 12:50 PM
How to use USB flash drive to install computer system?
Apr 04, 2024 pm 12:50 PM
A USB flash drive is a portable storage device that can be used to install a computer system, making it easy to install and reinstall the system on different computers. The following will introduce how to use a USB flash drive to install the computer system. Tool materials: System version: Windows 10 Brand model: ASUS laptop X550Z Software version: The latest version of Windows 10 installation image file 1. Prepare the U disk and image file 1. First, you need a computer with the system installed to prepare the U disk and download system image files. 2. Use a USB flash drive with a capacity of 8GB or above and back up the data in it, because the USB flash drive will be formatted. 2. Create a startup disk 1. Download the Windows 10 system image file from the Microsoft official website or other reliable channels.
 Illustrated illustration of the entire process of reinstalling the system using a USB flash drive. Professional skills will help you get twice the result with half the effort.
Jun 12, 2024 am 10:44 AM
Illustrated illustration of the entire process of reinstalling the system using a USB flash drive. Professional skills will help you get twice the result with half the effort.
Jun 12, 2024 am 10:44 AM
With the popularity of computers, reinstalling the system has become a skill that many users must master. Whether the system is malfunctioning, infected, or you want to upgrade the system, reinstalling is the most effective solution. This article will explain in detail the entire process of reinstalling the system from a USB flash drive through pictures and texts, and share some professional tips to help you get twice the result with half the effort. Tool materials: System version: Windows1020H2 Brand model: Lenovo Xiaoxin Air14 Software version: Magic Pig Installation Master v2.0 1. Make a U disk boot disk 1. Prepare a U disk of more than 8G, insert it into the computer, and format it in FAT32 format. 2. Download the Magic Pig Installation Master software, install and open the software, and select the "U disk boot disk creation" function. 3. Choose to
 Computer system reinstallation tutorial: Complete guide to installing Windows operating system from USB flash drive
Mar 26, 2024 am 09:40 AM
Computer system reinstallation tutorial: Complete guide to installing Windows operating system from USB flash drive
Mar 26, 2024 am 09:40 AM
Reinstalling the operating system is a problem that every computer user may encounter. Whether the system is malfunctioning, infected, or you want to replace it with a new operating system, reinstalling is a good choice. However, for many users, reinstalling the system seems to be a very complicated process that requires professional technical knowledge. In fact, as long as you master the correct method and use a USB flash drive to install the Windows operating system, anyone can easily complete system reinstallation. This article will provide you with a detailed and complete guide to installing the Windows operating system on a USB flash drive, so that you no longer have to worry about reinstalling the system. Tool materials: System version: Windows1020H2 Brand model: Lenovo Xiaoxin Air142021 Software version: Micro PE toolbox v2.1 1.
 Super simple USB disk system installation guide: concise and easy-to-understand tutorial
Jan 17, 2024 pm 04:06 PM
Super simple USB disk system installation guide: concise and easy-to-understand tutorial
Jan 17, 2024 pm 04:06 PM
In modern society, computers have become an indispensable part of people's lives. However, sometimes we need to reinstall the operating system to improve the performance of the computer or solve some problems. Using a USB flash drive to install the system is a simple and easy-to-understand method. This article will introduce you to the detailed steps of installing the system from a USB flash drive to help you complete the installation easily. Tool materials: Computer model: LenovoThinkPad Make sure that the USB flash drive does not contain important data, because during the system installation process, the data on the USB flash drive will
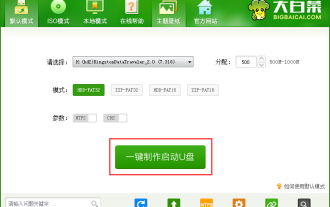 How to install the system on a USB flash drive in Chinese cabbage - Tutorial on installing the system on a USB flash drive in Chinese cabbage
Mar 04, 2024 pm 03:07 PM
How to install the system on a USB flash drive in Chinese cabbage - Tutorial on installing the system on a USB flash drive in Chinese cabbage
Mar 04, 2024 pm 03:07 PM
Many friends still don’t know how to install the system on the USB disk of Dabaicai, so the editor below will explain the tutorial on installing the system on the USB disk of Dabaicai. Take a look at it. I believe it will be helpful to everyone. 1. First download the Dabaicai U disk boot disk creation tool, and then make the U disk boot disk. After completion, insert the U disk into the computer (as shown in the picture). 2. Then we restart the computer. When the startup screen appears, press the USB boot hotkey corresponding to the computer motherboard, such as F8, F11, F12, ESC, etc., and then select the USB boot option (as shown in the picture). 3. After selecting the U disk startup option, we will enter the menu interface of Chinese cabbage. At this time, we select the second item: run Chinese cabbage Win8PE anti-blue screen version (new computer) (as shown in the picture). 4. Then you will enter
