

Steps to install pip3 on Ubuntu

Ubuntu is a widely used open source operating system, and Python is one of the most popular programming languages today. PIP is a Python package manager that allows developers to easily install and manage Python packages. This article will introduce how to install PIP3 under the Ubuntu operating system, as well as some problems and solutions that may be encountered when installing PIP3.
- Installing Python3
Before you start installing PIP3, you must first install Python3 on your system. If Python3 is not available on your system, you need to install it through the following command:
sudo apt-get update
sudo apt-get install python3
- Install PIP3
After installing Python3, you can then install PIP3. PIP3 is easy to install, just run the following command:
sudo apt-get install python3-pip
After the installation is complete, you can use the following command to verify whether the installation is successful:
pip3 --version
If the installation is successful, the command line will output the following information :
pip 9.0.1 from /usr/lib/python3/dist-packages (python3.5)
- Update PIP3
If you have installed PIP3, but the version is out of date, you can use the following command to update it to the latest version:
sudo -H pip3 install --upgrade pip
If the update is successful, the command line will output the following information:
Collecting pip
  Downloading https://files.pythonhosted.org/packages/bd/4d/4a659aa8b2dd3c125919c1bb410284047f6f10a8d882c71c1e4a962ce7b8/pip-20.1-py2.py3-none-any.whl (1.5MB)
     |████████████████████████████████| 1.5MB ...
Installing collected packages: pip
  Found existing installation: pip 9.0.1
    Not uninstalling pip at /usr/lib/python3/dist-packages, outside environment /usr
Successfully installed pip-20.1- Solving PIP3 installation errors
Sometimes, you may encounter various errors when installing PIP3. Here are some solutions:
- If you encounter the error "Unable to obtain lock file", use the following command:
sudo rm /var/lib/dpkg/lock
sudo dpkg --configure -a
- If you encounter "Module Not found" error, please use the following command:
sudo apt-get update
sudo apt-get install python3-<missing-module>
- If you encounter the "Installation package cannot be downloaded" error, please use the following command:
sudo apt-get update
sudo apt-get install -y python3-pip
- Summary
With the above steps, you should have successfully installed PIP3 on your Ubuntu system. Of course, this article only provides the most basic installation process, and you can perform more configuration and optimization according to your needs. At the same time, if you encounter an error during the installation of PIP3, please do not panic. You can try some simple solutions first. If it still cannot be solved, please check the error message carefully and perform necessary debugging.
The above is the detailed content of Steps to install pip3 on Ubuntu. For more information, please follow other related articles on the PHP Chinese website!

Hot AI Tools

Undresser.AI Undress
AI-powered app for creating realistic nude photos

AI Clothes Remover
Online AI tool for removing clothes from photos.

Undress AI Tool
Undress images for free

Clothoff.io
AI clothes remover

AI Hentai Generator
Generate AI Hentai for free.

Hot Article
Hot Tools

Notepad++7.3.1
Easy-to-use and free code editor

SublimeText3 Chinese version
Chinese version, very easy to use

Zend Studio 13.0.1
Powerful PHP integrated development environment

Dreamweaver CS6
Visual web development tools

SublimeText3 Mac version
God-level code editing software (SublimeText3)
Hot Topics


 Solution to the problem that Win11 system cannot install Chinese language pack
Mar 09, 2024 am 09:48 AM
Solution to the problem that Win11 system cannot install Chinese language pack
Mar 09, 2024 am 09:48 AM
Solution to the problem that Win11 system cannot install Chinese language pack With the launch of Windows 11 system, many users began to upgrade their operating system to experience new functions and interfaces. However, some users found that they were unable to install the Chinese language pack after upgrading, which troubled their experience. In this article, we will discuss the reasons why Win11 system cannot install the Chinese language pack and provide some solutions to help users solve this problem. Cause Analysis First, let us analyze the inability of Win11 system to
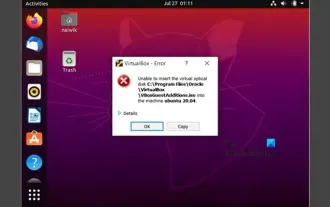 Unable to install guest additions in VirtualBox
Mar 10, 2024 am 09:34 AM
Unable to install guest additions in VirtualBox
Mar 10, 2024 am 09:34 AM
You may not be able to install guest additions to a virtual machine in OracleVirtualBox. When we click on Devices>InstallGuestAdditionsCDImage, it just throws an error as shown below: VirtualBox - Error: Unable to insert virtual disc C: Programming FilesOracleVirtualBoxVBoxGuestAdditions.iso into ubuntu machine In this post we will understand what happens when you What to do when you can't install guest additions in VirtualBox. Unable to install guest additions in VirtualBox If you can't install it in Virtua
 Log in to Ubuntu as superuser
Mar 20, 2024 am 10:55 AM
Log in to Ubuntu as superuser
Mar 20, 2024 am 10:55 AM
In Ubuntu systems, the root user is usually disabled. To activate the root user, you can use the passwd command to set a password and then use the su- command to log in as root. The root user is a user with unrestricted system administrative rights. He has permissions to access and modify files, user management, software installation and removal, and system configuration changes. There are obvious differences between the root user and ordinary users. The root user has the highest authority and broader control rights in the system. The root user can execute important system commands and edit system files, which ordinary users cannot do. In this guide, I'll explore the Ubuntu root user, how to log in as root, and how it differs from a normal user. Notice
 What should I do if Baidu Netdisk is downloaded successfully but cannot be installed?
Mar 13, 2024 pm 10:22 PM
What should I do if Baidu Netdisk is downloaded successfully but cannot be installed?
Mar 13, 2024 pm 10:22 PM
If you have successfully downloaded the installation file of Baidu Netdisk, but cannot install it normally, it may be that there is an error in the integrity of the software file or there is a problem with the residual files and registry entries. Let this site take care of it for users. Let’s introduce the analysis of the problem that Baidu Netdisk is successfully downloaded but cannot be installed. Analysis of the problem that Baidu Netdisk downloaded successfully but could not be installed 1. Check the integrity of the installation file: Make sure that the downloaded installation file is complete and not damaged. You can download it again, or try to download the installation file from another trusted source. 2. Turn off anti-virus software and firewall: Some anti-virus software or firewall programs may prevent the installation program from running properly. Try disabling or exiting the anti-virus software and firewall, then re-run the installation
 How to install Android apps on Linux?
Mar 19, 2024 am 11:15 AM
How to install Android apps on Linux?
Mar 19, 2024 am 11:15 AM
Installing Android applications on Linux has always been a concern for many users. Especially for Linux users who like to use Android applications, it is very important to master how to install Android applications on Linux systems. Although running Android applications directly on Linux is not as simple as on the Android platform, by using emulators or third-party tools, we can still happily enjoy Android applications on Linux. The following will introduce how to install Android applications on Linux systems.
 How to install Angular on Ubuntu 24.04
Mar 23, 2024 pm 12:20 PM
How to install Angular on Ubuntu 24.04
Mar 23, 2024 pm 12:20 PM
Angular.js is a freely accessible JavaScript platform for creating dynamic applications. It allows you to express various aspects of your application quickly and clearly by extending the syntax of HTML as a template language. Angular.js provides a range of tools to help you write, update and test your code. Additionally, it provides many features such as routing and form management. This guide will discuss how to install Angular on Ubuntu24. First, you need to install Node.js. Node.js is a JavaScript running environment based on the ChromeV8 engine that allows you to run JavaScript code on the server side. To be in Ub
 Android TV Box gets unofficial Ubuntu 24.04 upgrade
Sep 05, 2024 am 06:33 AM
Android TV Box gets unofficial Ubuntu 24.04 upgrade
Sep 05, 2024 am 06:33 AM
For many users, hacking an Android TV box sounds daunting. However, developer Murray R. Van Luyn faced the challenge of looking for suitable alternatives to the Raspberry Pi during the Broadcom chip shortage. His collaborative efforts with the Armbia
 How to take screenshots in Ubuntu
Mar 21, 2024 am 11:30 AM
How to take screenshots in Ubuntu
Mar 21, 2024 am 11:30 AM
Screenshot is a tool used to capture important data or information on your phone or computer screen. Capable of recording exactly what you see in an instant, it's a convenient way to record, share or save visual information. The Ubuntu operating system provides a variety of screenshot methods. Users can choose to capture the entire desktop, a specific window, or a customized area. These features allow Ubuntu users to easily capture key information on the screen, improving work efficiency and the convenience of sharing information. In this article, we'll look at how to take screenshots using the desktop app and keyboard shortcuts. Method 1: Use Shortcut Keys to Take Screenshots Manual snapshots are usually the default and commonly used method because they are relatively easy to get started. For the average user, no complex photos or videos are required
