

How to set startup items at startup

Methods to set startup items: 1. Use Task Manager settings; 2. Use system configuration settings; 3. Use third-party software settings; 4. Use shortcut settings; 5. Manually edit the registry. Detailed introduction: 1. Use Task Manager settings, right-click on a blank space on the taskbar, select "Task Manager", in Task Manager, switch to the "Startup" tab, and in the startup list, find the task that needs to be set to start at startup. program or service, select it and click the "Enable" button in the lower right corner. If you need to prevent a certain program from starting at startup, etc.

Startup items refer to programs or services that run automatically along with the operating system when the computer starts. Setting startup items can facilitate users to quickly start commonly used applications or services and improve usage efficiency. The following are several ways to set startup items:
1. Use the Task Manager to set:
- Right-click on a blank space on the taskbar and select "Task Manager".
- In Task Manager, switch to the "Startup" tab.
- In the startup list, find the program or service that needs to be set to start at startup, select it and click the "Enable" button in the lower right corner. If you need to prevent a program from starting automatically at boot, you can click the "Disable" button in the lower right corner.
2. Use system configuration settings:
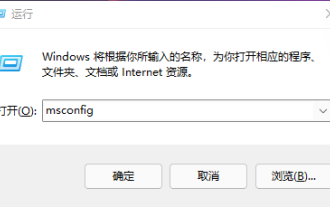
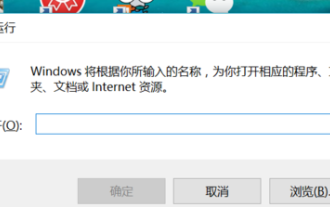
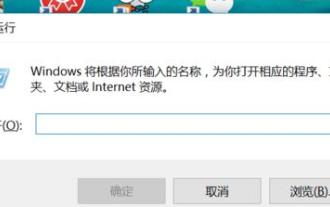
- Press the Win key and R key to open the run window, enter the "msconfig" command and click " Sure".
- In the system configuration window, select the "Startup" tab.
- In the startup list, find the program or service that needs to be set to start at startup, check the previous check box and click the "Apply" button. If you want to prevent a program from starting automatically at boot, just uncheck it.
3. Use third-party software settings:
- You can use some third-party system optimization software, such as 360 Security Guard and Tencent Computer Manager Wait to set the startup items.
- Open these software, find "Optimization Acceleration" or similar functions, and after entering, select "Startup Items" or similar options.
- In the startup item list, find the program or service that needs to be set to start at startup, select it and click the corresponding button to set it.
4. Use shortcut settings:
- For some commonly used applications, you can create shortcuts and add them to the taskbar or in the start menu. In this way, the next time you start the computer, you can directly click the shortcut to quickly launch the application.
- Right-click the program or service that needs to create a shortcut and select "Create Shortcut".
- Move the created shortcut to the taskbar or start menu.
5. Manually edit the registry:
- Press the Win key and R key to open the run window, enter the "regedit" command and click " Sure".
- After opening the Registry Editor, navigate to "HKEY_CURRENT_USER\Software\Microsoft\Windows\CurrentVersion\Run".
- In the right pane, right-click on the blank space and select "New"->"String Value", and then name the new string value as the path of the program or service that needs to be set to start at startup. and name.
- Restart the computer to take effect. Please note that editing the registry requires caution. If you are not familiar with the relevant operations, it is recommended not to modify it at will.
The above are several methods for setting startup items. You can choose the appropriate method according to your own habits and preferences. At the same time, be careful not to arbitrarily prohibit certain necessary programs from starting at startup, so as not to affect the normal operation of the computer.
The above is the detailed content of How to set startup items at startup. For more information, please follow other related articles on the PHP Chinese website!

Hot AI Tools

Undresser.AI Undress
AI-powered app for creating realistic nude photos

AI Clothes Remover
Online AI tool for removing clothes from photos.

Undress AI Tool
Undress images for free

Clothoff.io
AI clothes remover

Video Face Swap
Swap faces in any video effortlessly with our completely free AI face swap tool!

Hot Article
Hot Tools

Notepad++7.3.1
Easy-to-use and free code editor

SublimeText3 Chinese version
Chinese version, very easy to use

Zend Studio 13.0.1
Powerful PHP integrated development environment

Dreamweaver CS6
Visual web development tools

SublimeText3 Mac version
God-level code editing software (SublimeText3)
Hot Topics
 1389
1389
 52
52

 How to modify the startup item configuration of Win11? Win11 startup item configuration modification guide
Jan 29, 2024 pm 04:00 PM
How to modify the startup item configuration of Win11? Win11 startup item configuration modification guide
Jan 29, 2024 pm 04:00 PM
When we use computers, there are some applications that we often use, which makes many users set these commonly used applications as startup items. So how to adjust the win11 startup items? Users can directly open the run window and enter the system settings interface to perform operations. Let this site carefully introduce to users how to adjust the win11 startup items. How to adjust the win11 startup items 1. You can first press Win+R on the win11 system to open the run window and enter msconfig to open the system startup items. 3. Find the startup tab and open it. There is a faster way, press WIN+X keys to bring up the shortcut menu, find the task manager and open it, you can start it directly
 How to manage startup items in Windows 10
Feb 07, 2021 am 11:22 AM
How to manage startup items in Windows 10
Feb 07, 2021 am 11:22 AM
Method: 1. Press "win+R" to open the "Run" window, enter the "msconfig" command, and click "Confirm"; 2. In the msconfig setting interface, click the "Startup" tab and click "Open Task Manager"; 3. In the Task Manager interface, click the "Startup" tab; 4. Find and select the unwanted startup item, right-click the mouse, and select "Disable" in the pop-up menu.
 Teach you how to set win10 startup items
Dec 27, 2023 pm 10:06 PM
Teach you how to set win10 startup items
Dec 27, 2023 pm 10:06 PM
Recently, many users have asked me how to set the startup items at startup. In fact, it is very simple to set up. Just set it to automatic startup and it will run automatically at startup. Let’s take a look at the detailed tutorial below. Win10 startup item setting tutorial Click the shortcut key "win+r" to open the run window dialog box. Enter "msconfig" in the box and click, and the system configuration dialog box will pop up. Click Startup Options at the top of the System Configuration dialog box to open the Task Manager option in the frame. All startup items will be displayed, and the status bar of each item will show whether it is enabled. Boot Figure-5 For example, if the Baidu Netdisk in the picture is prohibited from starting up, then you only need to right-click the Baidu Netdisk option, and the option bar that pops up will have Enable and
 How to set startup items at startup How to set up computer startup items
Jan 12, 2024 pm 02:06 PM
How to set startup items at startup How to set up computer startup items
Jan 12, 2024 pm 02:06 PM
I believe everyone knows that some programs will automatically start when you turn on the computer. If there are too many programs started, the boot speed will be very slow. Many users don’t know how to cancel the startup items. Many of the startup items are programs that do not need to start automatically. How to set the startup items? Below, the editor will share with you my experience in setting startup items. Most software hopes to be able to start on its own, so when we install the software, the general security software will prompt that the software being installed is modifying the startup items. Do you want to pass these? If you feel that your computer starts up very slowly. , then you can consider setting the computer's startup items. Below, the editor will introduce to you the steps to set the startup items. How to set the startup item and click the shortcut key "
 How to set startup items in Win11 system
Feb 07, 2024 pm 04:15 PM
How to set startup items in Win11 system
Feb 07, 2024 pm 04:15 PM
How to set startup items in Win11 system (tutorial on how to set startup items) In the process of using the computer, we often encounter some software or applications that need to be automatically started when the computer is turned on. This saves us the trouble of opening them manually and improves work efficiency. This article will introduce how to set startup items in Win11 system to help you easily achieve self-starting. Method 1: Use Task Manager to set startup items 1. First, press the Win+X key combination and select "Task Manager" to open the Task Manager. 2. In the Task Manager window, click the "Startup" tab. 3. In the Startup tab, you can see a list of applications that have been set to start at startup. If you want to add a new startup item, click
 Teach you how to set startup items in win7
Jul 10, 2023 am 09:29 AM
Teach you how to set startup items in win7
Jul 10, 2023 am 09:29 AM
Some software installed on the computer may set the function of auto-starting at startup. Sometimes too many startup items will cause the computer to start slowly. Therefore, some netizens want to set the startup items of win7 to disable or enable some startup items. So how to set the startup items in win7? The editor below will teach you how to set the startup items in win7. The specific steps are as follows: 1. Open the "Start" menu, enter "msconfig" in the search box and press the Enter key. 2. In the pop-up "System General", check "Selective Startup". 3. Click "Start" above to see the auto-start items. 4. Check or cancel the application according to your needs, and restart it to take effect. 5. In addition, there is another
 Why is there no signal on the monitor after turning on the computer?
Jun 30, 2023 am 11:17 AM
Why is there no signal on the monitor after turning on the computer?
Jun 30, 2023 am 11:17 AM
Reasons why there is no signal on the monitor after the computer is turned on: 1. The host connection of the monitor data cable is loose or has poor contact; 2. The memory module is loose or there is too much dust; 3. The display screen is faulty. It is recommended to find a professional maintenance personnel for repair; 4. If the motherboard is faulty, it is recommended to contact professional maintenance personnel for repair.
 How to set startup items for win10 home version
Jan 13, 2024 pm 01:45 PM
How to set startup items for win10 home version
Jan 13, 2024 pm 01:45 PM
Sometimes for the sake of convenience, we will set up some software to automatically start when the computer starts up. However, some users are not very familiar with these settings. They set up the startup but find that it does not take effect. Then there may be problems with Win10 Home Edition from the following aspects. Why can't the startup items be set? 1. Press win+R, open and run and enter "gpedit.msc" 2. Expand Computer Configuration - Windows Settings - Security Settings - Local Policy - Security Options 3. Find User Account Control: as administrator Approval mode runs for all administrators, set to disabled