

A preliminary understanding of the NFS service under Linux

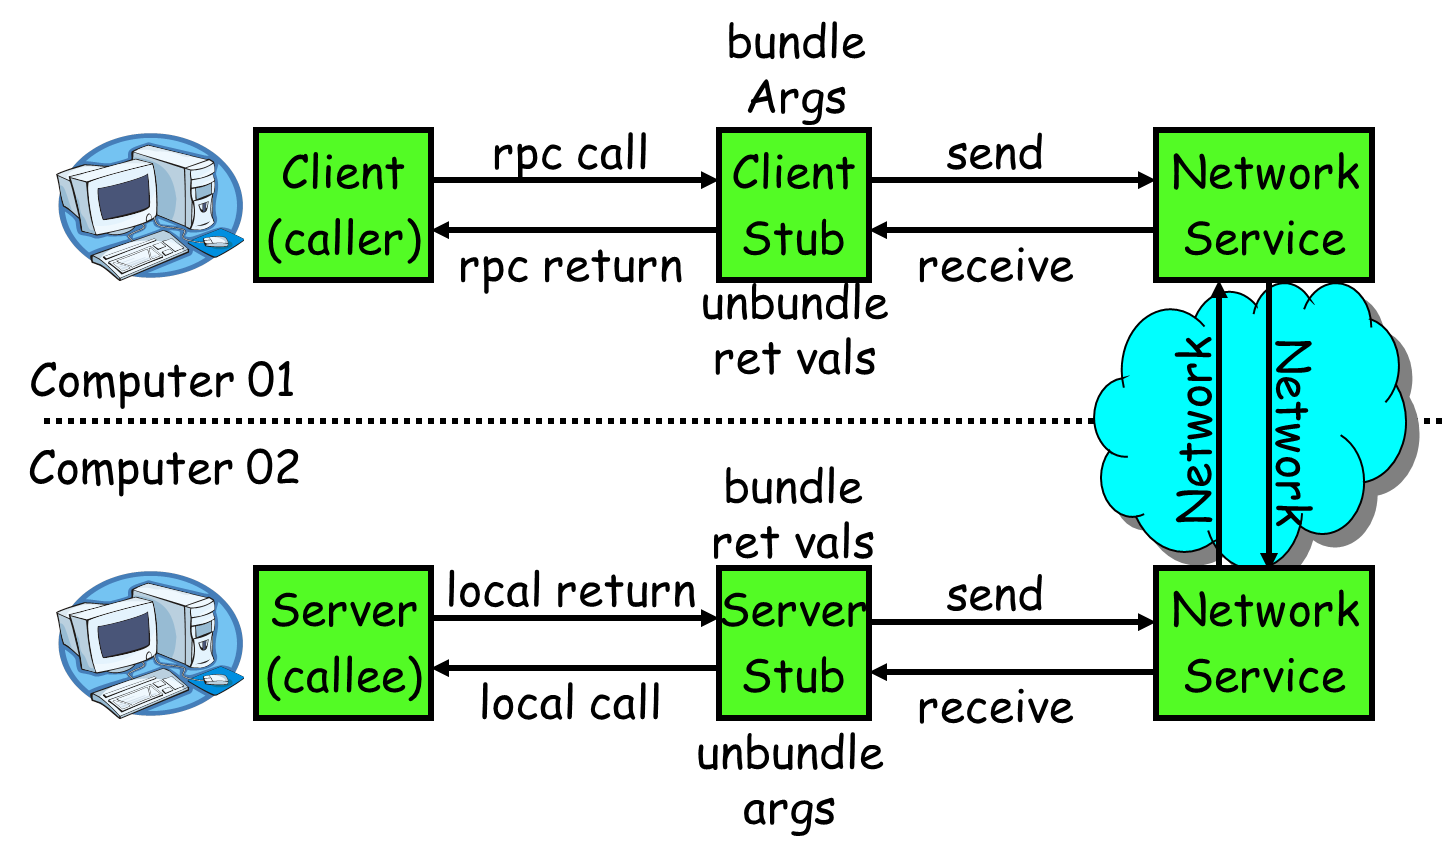
1) The service consumer (client) calls the service through local calling;
2) After receiving the call, the client stub is responsible for assembling methods, parameters, etc. into a message body that can be transmitted over the network;
3) The client stub finds the service address and sends the message to the server;
4) The server stub decodes the message after receiving it;
5) The server stub calls local services based on the decoding results;
6) The local service is executed and the results are returned to the server stub;
7) The server stub packages the return result into a message and sends it to the consumer;
8) The client stub receives the message and decodes it;
9) The service consumer gets the final result.
NFS IntroductionNFS (Network File System) is one of the file systems supported by FreeBSD. It allows computers on the network to share resources through the TCP/IP network. In NFS applications, local NFS client applications can transparently read and write files located on the remote NFS server, just like accessing local files.
Currently, NFS mainly has two versions (NFSv2, NFSv3). In addition to version 3 of NFSv2 and NFSv3, which supports more new features, the main difference should be that NFSv2 uses the UDP protocol for transmission, so the connection of NFSv2 It may not be so reliable in complex network environments, and NFSv3 supports both UDP and TCP protocols.
I just took a look and found that Centos7 already supports the NFSv4 protocol. I won’t post NFSv4 here. Let’s take a look at v4 when you have time.
When the client wants to mount an NFS shared volume, it will send an RPC request to the server, and the NFS server will send a random cookie to the client after user authentication so that the client can use this cookie for authentication. Those shared volumes to be accessed.
NFS authentication supports built-in IP/host permission allocation and is also restricted by tcp wrappers.
NFS service on RedhatNFS support is enabled by default in the Redhat kernel, and the startup of the NFS server is controlled through the NFS Daemon, which is responsible for binding network sockets and RPC calls. It also requires an rpcbind service (named in redhat5 portmap), if you cannot find the nfs service in the system, it is because the nfs-utils package is not installed. This package provides some tools and service scripts.
The entire NFS service probably includes the following (copied from Red Hat official documentation, but it seems a bit old):
- nfs — Start the corresponding RPC process to respond to NFS
- nfslock — This is an optional service used to respond to client requests for file locking.
- rpcbind(portmap) — This is the daemon process of the rpc service, used to establish connections and respond to rpc requests.
NFS service provides these RPC calls (functions):
- rpc.mountd — This function is used to respond to the client's mount request and verify whether the requested file system is authorized to be used. This process is started by the nfs service.
- rpc.nfsd — The main process (function) of nfs service.
- rpc.lockd — The main call (function) of the nfslock service above is mainly used to respond to the customer’s file locking request.
- rpc.statd - This call (function) is mainly used to notify the client when the nfs server restarts or shuts down abnormally, and is enabled by the nfslock service.
- rpc.rquotad — The nfs service is used to support quota calls (functions).
NFS configuration file is in /etc/exports
The default is an empty file. You only need to configure it in the following format, one shared volume per line
host:Limited host (domain name)
1.Single host or IP
2. Wildcard * (matches any character) or ? (matches any single character), used in domain names or host names
3.IP/MASK, for example 192.168.110.0/24
options: Mounting options, used to limit the mounting permissions of the previous host.
Common options:
- ro,rw: read-only or read-write
- sync: Synchronization, when the client's write request is completed, the data in the memory is immediately written to the disk. This is safe.
- async: Asynchronous, when the client's write request is completed, the server does not write the data to the disk immediately, but writes it to the disk at a certain opportunity (idle or... who knows), which causes data loss. possibility.
- wdelay(write delay): Write delay, this is an optimization option that allows the server to delay writing data to disk, so that if the second client write request comes, the two data will be written using one write system call to disk.
- nowdelay: Contrary to the above, only available in sync mode.
- root_squash: "squash" root, because when the client writes files to the server, the uid of the user written by the client is directly mapped to the user with the same uid of the server, so that the root user stores the file on the nfs share volume. On the server side, the owner and group are still root, which has certain security risks, so you can use this option to flatten root into the nfsnobody user.
- all_squash: Squash all users, you can use anonuid=, anongid= to specify which user to squash.
The above is the detailed content of A preliminary understanding of the NFS service under Linux. For more information, please follow other related articles on the PHP Chinese website!

Hot AI Tools

Undresser.AI Undress
AI-powered app for creating realistic nude photos

AI Clothes Remover
Online AI tool for removing clothes from photos.

Undress AI Tool
Undress images for free

Clothoff.io
AI clothes remover

Video Face Swap
Swap faces in any video effortlessly with our completely free AI face swap tool!

Hot Article
Hot Tools

Notepad++7.3.1
Easy-to-use and free code editor

SublimeText3 Chinese version
Chinese version, very easy to use

Zend Studio 13.0.1
Powerful PHP integrated development environment

Dreamweaver CS6
Visual web development tools

SublimeText3 Mac version
God-level code editing software (SublimeText3)
Hot Topics
 1387
1387
 52
52

 How to use docker desktop
Apr 15, 2025 am 11:45 AM
How to use docker desktop
Apr 15, 2025 am 11:45 AM
How to use Docker Desktop? Docker Desktop is a tool for running Docker containers on local machines. The steps to use include: 1. Install Docker Desktop; 2. Start Docker Desktop; 3. Create Docker image (using Dockerfile); 4. Build Docker image (using docker build); 5. Run Docker container (using docker run).
 How to view the docker process
Apr 15, 2025 am 11:48 AM
How to view the docker process
Apr 15, 2025 am 11:48 AM
Docker process viewing method: 1. Docker CLI command: docker ps; 2. Systemd CLI command: systemctl status docker; 3. Docker Compose CLI command: docker-compose ps; 4. Process Explorer (Windows); 5. /proc directory (Linux).
 What to do if the docker image fails
Apr 15, 2025 am 11:21 AM
What to do if the docker image fails
Apr 15, 2025 am 11:21 AM
Troubleshooting steps for failed Docker image build: Check Dockerfile syntax and dependency version. Check if the build context contains the required source code and dependencies. View the build log for error details. Use the --target option to build a hierarchical phase to identify failure points. Make sure to use the latest version of Docker engine. Build the image with --t [image-name]:debug mode to debug the problem. Check disk space and make sure it is sufficient. Disable SELinux to prevent interference with the build process. Ask community platforms for help, provide Dockerfiles and build log descriptions for more specific suggestions.
 What computer configuration is required for vscode
Apr 15, 2025 pm 09:48 PM
What computer configuration is required for vscode
Apr 15, 2025 pm 09:48 PM
VS Code system requirements: Operating system: Windows 10 and above, macOS 10.12 and above, Linux distribution processor: minimum 1.6 GHz, recommended 2.0 GHz and above memory: minimum 512 MB, recommended 4 GB and above storage space: minimum 250 MB, recommended 1 GB and above other requirements: stable network connection, Xorg/Wayland (Linux)
 vscode cannot install extension
Apr 15, 2025 pm 07:18 PM
vscode cannot install extension
Apr 15, 2025 pm 07:18 PM
The reasons for the installation of VS Code extensions may be: network instability, insufficient permissions, system compatibility issues, VS Code version is too old, antivirus software or firewall interference. By checking network connections, permissions, log files, updating VS Code, disabling security software, and restarting VS Code or computers, you can gradually troubleshoot and resolve issues.
 Can vscode be used for mac
Apr 15, 2025 pm 07:36 PM
Can vscode be used for mac
Apr 15, 2025 pm 07:36 PM
VS Code is available on Mac. It has powerful extensions, Git integration, terminal and debugger, and also offers a wealth of setup options. However, for particularly large projects or highly professional development, VS Code may have performance or functional limitations.
 What is vscode What is vscode for?
Apr 15, 2025 pm 06:45 PM
What is vscode What is vscode for?
Apr 15, 2025 pm 06:45 PM
VS Code is the full name Visual Studio Code, which is a free and open source cross-platform code editor and development environment developed by Microsoft. It supports a wide range of programming languages and provides syntax highlighting, code automatic completion, code snippets and smart prompts to improve development efficiency. Through a rich extension ecosystem, users can add extensions to specific needs and languages, such as debuggers, code formatting tools, and Git integrations. VS Code also includes an intuitive debugger that helps quickly find and resolve bugs in your code.
 How to back up vscode settings and extensions
Apr 15, 2025 pm 05:18 PM
How to back up vscode settings and extensions
Apr 15, 2025 pm 05:18 PM
How to back up VS Code configurations and extensions? Manually backup the settings file: Copy the key JSON files (settings.json, keybindings.json, extensions.json) to a safe location. Take advantage of VS Code synchronization: enable synchronization with your GitHub account to automatically back up all relevant settings and extensions. Use third-party tools: Back up configurations with reliable tools and provide richer features such as version control and incremental backups.
