Home > Backend Development > Python Tutorial > Python examples of random forest algorithm principles and practical applications (with complete code)

Python examples of random forest algorithm principles and practical applications (with complete code)

王林
Release: 2024-01-23 18:09:06
forward
1157 people have browsed it

The random forest algorithm is an ensemble technique capable of performing regression and classification tasks using multiple decision trees and a technique called Bootstrap and aggregation. The basic idea behind this is to combine multiple decision trees to determine the final output, rather than relying on a single decision tree.

Random Forest in Machine Learning

Random forest produces a large number of classification trees. Place the input vector under each tree in the forest to classify new objects based on the input vector. Each tree is assigned a class, which we can call a "vote", and the class with the highest number of votes is ultimately chosen.

The following stages will help us understand how the random forest algorithm works.

Step 1: First select a random sample from the data set.

Step 2: For each sample, the algorithm will create a decision tree. Then the prediction results of each decision tree will be obtained.

Step 3: Each expected outcome in this step will be voted on.

Step 4: Finally, select the prediction result with the most votes as the final prediction result.

The random forest method has the following advantages

  • It solves the problem of overfitting by averaging or integrating the outputs of different decision trees question.
  • Random forests perform better than individual decision trees for a wide range of data items.
  • The random forest algorithm maintains high accuracy even in the absence of large amounts of data.

Characteristics of random forest

The following are the main characteristics of the random forest algorithm:

  1. Yes The most accurate algorithm currently available.
  2. Suitable for huge databases.
  3. Can handle tens of thousands of input variables without deleting any of them.
  4. As the forest grows, it generates an internal unbiased estimate of the generalization error.
  5. Maintains its accuracy even in the event of massive data loss.
  6. It includes methods for balancing the inaccuracies of uneven data sets in class populations.
  7. The forest created can be saved and used for other data in the future.
  8. Create prototypes to show relationships between variables and categories.
  9. It calculates the distance between pairs of examples, which is useful for clustering, detecting outliers, or providing an engaging view of the data (to scale).
  10. Unlabeled data can be used to create unsupervised clustering, data visualization, and outlier identification using the features described above.

Random forest has multiple decision trees as the basic learning model. We randomly perform row sampling and feature sampling from the dataset to form a sample dataset for each model. This part is called the bootstrap.

How to use the random forest regression technique

  1. Design a specific question or data and obtain the source to determine the required data.
  2. Make sure the data is in an accessible format, otherwise convert it to the required format.
  3. Specify any obvious anomalies and missing data points that may be needed to obtain the required data.
  4. Create a machine learning model.
  5. Set the baseline model you want to achieve
  6. Training data machine learning model.
  7. Use test data to provide insights into the model
  8. Now compare the performance metrics of the test data and model predicted data.
  9. If it cannot be satisfied, you can try to improve the model accordingly or use other data modeling techniques.
  10. In this stage, the data obtained are interpreted and reported accordingly.

Python implementation process of random forest algorithm

Step 1: Import the required libraries.

import numpy as np
import matplotlib.pyplot as plt
import pandas as pd
Copy after login

Step 2: Import and print the dataset

ata=pd.read_csv('Salaries.csv')
print(data)
Copy after login

Step 3: Select all rows and column 1 from the dataset as x, select all rows and column 2 as y

x=df.iloc[:,:-1]#":" means all rows will be selected, ":-1" means the last column will be ignored

y=df.iloc[: ,-1:]#":" means it will select all rows, "-1:" means it will ignore all columns except the last one

#The "iloc()" function enables us to select A specific cell of a data set, that is, it helps us select the value belonging to a specific row or column from a set of values ​​in the data frame or data set.

Step 4: Fit a random forest regressor to the data set

from sklearn.ensemble import RandomForestRegressor
regressor=RandomForestRegressor(n_estimators=100,random_state=0)
regressor.fit(x,y)
Copy after login

Step 5: Predict new results

Y_pred=regressor.predict(np.array([6.5]).reshape(1,1))
Copy after login

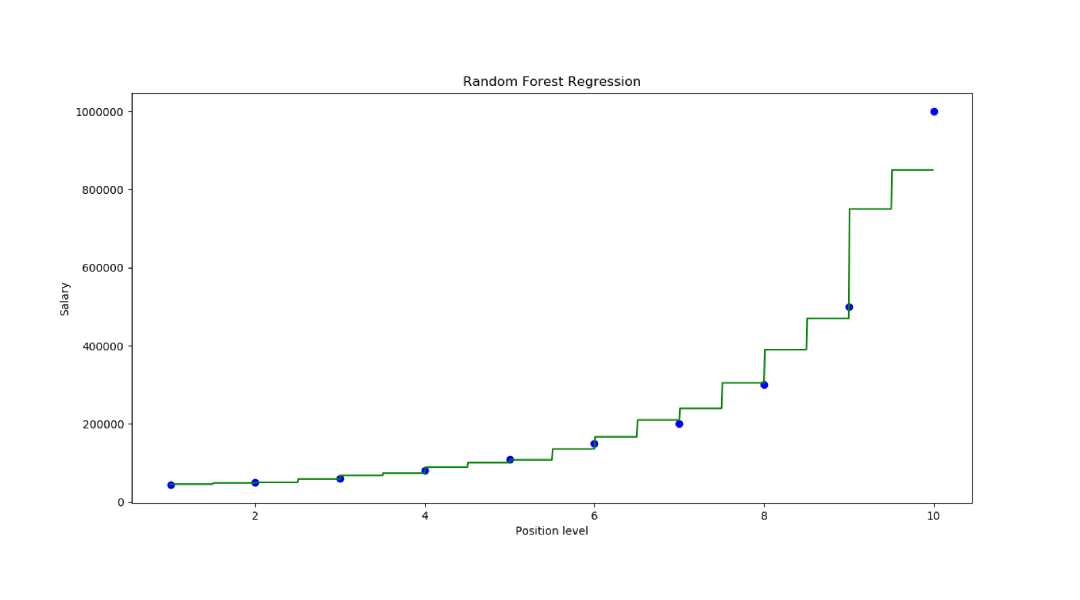
Step 6: Visualize the results

随机森林算法原理 随机森林python实例流程(附完整代码)

X_grid=np.arrange(min(x),max(x),0.01)
X_grid=X_grid.reshape((len(X_grid),1))
plt.scatter(x,y,color='blue')
plt.plot(X_grid,regressor.predict(X_grid),
color='green')
plt.title('Random Forest Regression')
plt.xlabel('Position level')
plt.ylabel('Salary')
plt.show()
Copy after login

The above is the detailed content of Python examples of random forest algorithm principles and practical applications (with complete code). For more information, please follow other related articles on the PHP Chinese website!

Related labels:
source:163.com
Statement of this Website
The content of this article is voluntarily contributed by netizens, and the copyright belongs to the original author. This site does not assume corresponding legal responsibility. If you find any content suspected of plagiarism or infringement, please contact admin@php.cn
Popular Tutorials
More>
Latest Downloads
More>
Web Effects
Website Source Code
Website Materials
Front End Template