 Computer Tutorials
 Computer Knowledge
 Dear heroes, I would like to know how to segment photos using PS CS3. What are the specific steps?
Dear heroes, I would like to know how to segment photos using PS CS3. What are the specific steps?
Heroes, how do I use PS CS3 to split the photos into the following photos? The specific method is
Wait a moment, I will write you the detailed method:
First, set the foreground color to "black" and the background color to "white"
1. Open the picture (background), unlock and add "Layer Mask"
2. Select: Path Tool>Shape Tool>Ellipse Tool, attribute "Shape Layer" and draw an elliptical shape filled layer
3. Hold down shift ctrl alt, move the mouse in parallel, copy the path, and make the intersection the part you need
4. Select the "Intersection Area" of the path attribute, and now you will see the shape you need
5. Right-click "Shape Layer" in the layer window and select Rasterize Layer
6.ctrl t "Free Transform" adjust the shape to the appropriate size and confirm
7.ctrl j "Quick Copy" layer, ctrl t again to bring up "Free Transform", hold down shift and translate the copied layer to make it suitable and confirm
8. Press shift ctrl alt t to continue copying until you are satisfied
9. Merge shape layers: Click on the top shape layer, hold down the shift key, and then click on the bottom shape layer to select all shape layers, ctrl e to merge
10. Hide the shape layer (the selection has been made at this time)
11. Use the selection tool, hold down the ctrl key, and click the shape layer to make it a selection
12. Select the background layer and activate "Layer Mask", ctrl del to fill the background color "white", press shift ctrl i to invert the selection, alt del to fill the foreground color "black"
13. At this time, the effect has come out, and the background can be added at will
ok, I believe you have mastered the method
You can use it flexibly on this basis
How to create such a font with pscs3
Hello, host!
Because your picture is too small, I can’t see clearly what font it is
Let’s take the thick font as an example
1. Create a new layer, enter the words "Xiao Xu Visual Field NXB Chief Designer" on it, and fill it with white
2. Create a stroke effect for these words,
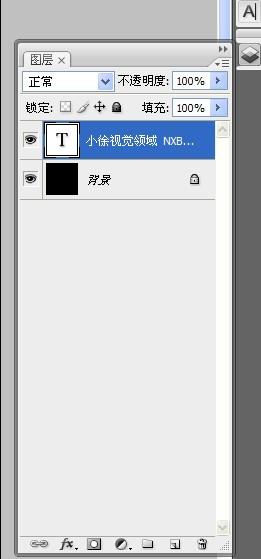 There is a stroke item in "fx" on this panel,
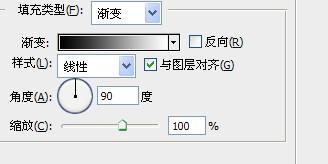 Usually we use color strokes, now we select "Gradient" and adjust the gradient color ourselves! like this
3. Then make the "pentagonal star". There is a "pentagonal star" pattern in the custom shape tool. After you select it, create a new layer and fill it with color. (If you don’t understand, ask me again)
Four, the last thing left is your "X"!
First write the word "righteousness" on the screen, preferably in regular italics  , like this.
Then delete the text, use the pen tool to remove the point above the word, and it will look like this
5. Now that all the content is out, you can adjust these contents to the same size and put them together and it's OK!  The effect I made is like this. It seems that the one that looks like "X" doesn't look like it!
Think for yourself whether the symbol looks like the one under the word "Jiao". Just change the fourth step to the word "Jiao"!
I hope I can help you!
The above is the detailed content of Dear heroes, I would like to know how to segment photos using PS CS3. What are the specific steps?. For more information, please follow other related articles on the PHP Chinese website!

Hot AI Tools

Undresser.AI Undress
AI-powered app for creating realistic nude photos

AI Clothes Remover
Online AI tool for removing clothes from photos.

Undress AI Tool
Undress images for free

Clothoff.io
AI clothes remover

AI Hentai Generator
Generate AI Hentai for free.

Hot Article

Hot Tools

Notepad++7.3.1
Easy-to-use and free code editor

SublimeText3 Chinese version
Chinese version, very easy to use

Zend Studio 13.0.1
Powerful PHP integrated development environment

Dreamweaver CS6
Visual web development tools

SublimeText3 Mac version
God-level code editing software (SublimeText3)

Hot Topics
 1385
1385
 52
52
 Discover How to Fix Drive Health Warning in Windows Settings
Mar 19, 2025 am 11:10 AM
What does the drive health warning in Windows Settings mean and what should you do when you receive the disk warning? Read this php.cn tutorial to get step-by-step instructions to cope with this situation.
 How do I edit the Registry? (Warning: Use with caution!)
Mar 21, 2025 pm 07:46 PM
Article discusses editing Windows Registry, precautions, backup methods, and potential issues from incorrect edits. Main issue: risks of system instability and data loss from improper changes.
 How do I manage services in Windows?
Mar 21, 2025 pm 07:52 PM
Article discusses managing Windows services for system health, including starting, stopping, restarting services, and best practices for stability.
 How to Fix the Steam Cloud Error? Try These Methods
Apr 04, 2025 am 01:51 AM
The Steam Cloud error can be caused by many reasons. To play a game smoothly, you need to take some measures to remove this error before you launch the game. php.cn Software introduces some best ways as well as more useful information in this post.
 Windows Metadata and Internet Services Problem: How to Fix It?
Apr 02, 2025 pm 03:57 PM
You may see the “A connection to the Windows Metadata and Internet Services (WMIS) could not be established.” error on Event Viewer. This post from php.cn introduces how to remove the Windows Metadata and Internet Services problem.
 How do I change the default app for a file type?
Mar 21, 2025 pm 07:48 PM
Article discusses changing default apps for file types on Windows, including reverting and bulk changes. Main issue: no built-in bulk change option.
 How to Resolve the KB5035942 Update Issues – Crashing System
Apr 02, 2025 pm 04:16 PM
KB5035942 update issues - crashing system commonly happens to users. Inflicted people hope to find a way out of the kind of trouble, such as crashing system, installation, or sound issues. Targeting these situations, this post published by php.cn wil
 How do I use the Group Policy Editor (gpedit.msc)?
Mar 21, 2025 pm 07:48 PM
The article explains how to use the Group Policy Editor (gpedit.msc) in Windows for managing system settings, highlighting common configurations and troubleshooting methods. It notes that gpedit.msc is unavailable in Windows Home editions, suggesting


