
 System Tutorial
LINUX
Introduction to the installation steps and required tools of the CentOS7.9 mirror system in the virtual machine
System Tutorial
LINUX
Introduction to the installation steps and required tools of the CentOS7.9 mirror system in the virtual machine
Introduction to the installation steps and required tools of the CentOS7.9 mirror system in the virtual machine

Table of contents
1. Install CentOS7.9 design tools
1. CentOS7.9 mirror system
2. Installed virtual machine software
3. Notebook
2. Operating system installation steps
1. Start the virtual machine
2. Click to create a new virtual machine
3. Select the customized red hat linux download and click Next
4. This step is selected by default, click Next
5. Select to install the operating system later and click Next
6. Because you are installing a linux operating system, select linux, select CentOS 764-bit version, and then click Next.
7. Select the virtual machine installation path according to your requirements and preferences, choose to mount the D drive there, and then click Next
8. Change the processor and core side to 2, and then click Next
9. The virtual machine’s video memory is given 8G
10. Use NET network
11. Default selection, click Next
12. Default selection, click Next
13. Default selection, click Next

14. Give 300G of disk space, choose to split the virtual machine’s c drive into multiple files, and then click Next
15. Default selection, click Next
16. Select custom hardware
17. Select the processor and tick virtualization
18. Select New CD, DCD, select ISO image file on both sides, browse the installed image system, select and click Close.
19. Click to complete
20. After installation, you can jump to the following interface and click to start this virtual machine
21. Use the up and down keys to select the first one (install CentOS7), click Enter, and then wait for the installation
22. After entering, you can select the language interface. English is recommended there. If you want to use English, you can scroll down to find English. Then click Continue.
23. In this step, you can set the regional time and other settings. We will not set it up yet. First, partition the c drive and double-click the icon below to enter.
24. First select the 300G space, then click Iwillconfigurepartitioning (I will configure the partition), and then click done
25. We first select manual partitioning and then click Start Partitioning, which will make partitioning faster.
26. The following is the result of manual partitioning
27. However, manual partitioning allocates the /home directory to too many areas. Linux standard tutorial. There is no need for so many /home directories. We need to allocate all the directory space to the root directory. (Click the sign below to reduce the partition, click the - sign to delete the partition). After the partition is completed, linux operating system installation download, click done.
28. Confirm the partition information again and click AcceptChanges.
29. After the partitioning is completed, return to the initial interface and click BeginInstallation to install the system

30. While installing the system, you can set a password for it and double-click this key to enter the settings
31. After entering the password twice, click done
32. After installation, click Reboot and wait to enter the system by yourself
33. The following is what it looks like after entering the system (linux system)
3. Network connection steps
The previous steps have already completed the installation of the CentOS7.9 version system in Linux, and it is difficult to access the intranet after logging in, and there is a network on our real computer laptop.
1. First enter the systemLinux operating system installation download, then ping and find that there is no connection, then you need to set up the network
2. Use vi to step into the configuration file
Command: vi/etc/sysconfig/network-scripts/ifcfg-ens33
3. Start changing the configuration file content

First we need to enter the input mode to change the file. The initial state we enter the configuration file is in the editing mode. The conversion methods of the three modes are as follows
Step one: Change BOOTPROTO=dhcp to static, that is, change it to: BOOTPROTO=static
Step 2: Change ONBOOT=no to yes, that is, change it to: ONBOOT=yes
Step 3: Insert the final content
IPADDR=20.0.0.51
NETMASK=255.255.255.0
GATEWAY=20.0.0.2
DNS1=8.8.8.8
4. First press ESC to exit the insert mode just now, then press shift plus: enter the last line mode, enter uppercase wq, which means save or exit. After inputting, click the Enter key.
5. Restart the network card, which is to make the configuration file take effect and load the configuration file information into the video memory to run
Command: systemctlrestartnetwork
6. Ping successfully again and communication can be normal. Complete the network configuration.
The above is the detailed content of Introduction to the installation steps and required tools of the CentOS7.9 mirror system in the virtual machine. For more information, please follow other related articles on the PHP Chinese website!

Hot AI Tools

Undresser.AI Undress
AI-powered app for creating realistic nude photos

AI Clothes Remover
Online AI tool for removing clothes from photos.

Undress AI Tool
Undress images for free

Clothoff.io
AI clothes remover

Video Face Swap
Swap faces in any video effortlessly with our completely free AI face swap tool!

Hot Article
Hot Tools

Notepad++7.3.1
Easy-to-use and free code editor

SublimeText3 Chinese version
Chinese version, very easy to use

Zend Studio 13.0.1
Powerful PHP integrated development environment

Dreamweaver CS6
Visual web development tools

SublimeText3 Mac version
God-level code editing software (SublimeText3)
Hot Topics
 1386
1386
 52
52

 How To Count Files And Directories In Linux: A Beginner's Guide
Mar 19, 2025 am 10:48 AM
How To Count Files And Directories In Linux: A Beginner's Guide
Mar 19, 2025 am 10:48 AM
Efficiently Counting Files and Folders in Linux: A Comprehensive Guide Knowing how to quickly count files and directories in Linux is crucial for system administrators and anyone managing large datasets. This guide demonstrates using simple command-l
 How To Easily Configure Flatpak Apps Permissions With Flatseal
Mar 22, 2025 am 09:21 AM
How To Easily Configure Flatpak Apps Permissions With Flatseal
Mar 22, 2025 am 09:21 AM
Flatpak application permission management tool: Flatseal User Guide Flatpak is a tool designed to simplify Linux software distribution and use. It safely encapsulates applications in a virtual sandbox, allowing users to run applications without root permissions without affecting system security. Because Flatpak applications are located in this sandbox environment, they must request permissions to access other parts of the operating system, hardware devices (such as Bluetooth, network, etc.) and sockets (such as pulseaudio, ssh-auth, cups, etc.). This guide will guide you on how to easily configure Flatpak with Flatseal on Linux
 How To List Or Check All Installed Linux Kernels From Commandline
Mar 23, 2025 am 10:43 AM
How To List Or Check All Installed Linux Kernels From Commandline
Mar 23, 2025 am 10:43 AM
Linux Kernel is the core component of a GNU/Linux operating system. Developed by Linus Torvalds in 1991, it is a free, open-source, monolithic, modular, and multitasking Unix-like kernel. In Linux, it is possible to install multiple kernels on a sing
 How To Type Indian Rupee Symbol In Ubuntu Linux
Mar 22, 2025 am 10:39 AM
How To Type Indian Rupee Symbol In Ubuntu Linux
Mar 22, 2025 am 10:39 AM
This brief guide explains how to type Indian Rupee symbol in Linux operating systems. The other day, I wanted to type "Indian Rupee Symbol (₹)" in a word document. My keyboard has a rupee symbol on it, but I don't know how to type it. After
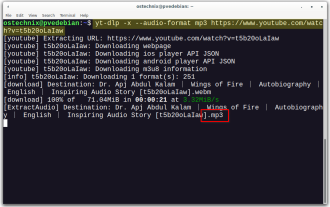 Yt-dlp Commands: The Complete Tutorial For Beginners (2025)
Mar 21, 2025 am 11:00 AM
Yt-dlp Commands: The Complete Tutorial For Beginners (2025)
Mar 21, 2025 am 11:00 AM
Have you ever wanted to save your favorite videos from the internet? Whether it's a funny cat video or a tutorial you want to watch later, Yt-dlp is here to help! In this comprehensive yt-dlp tutorial, we will explain what yt-dlp is, how to install i
 What is the Linux best used for?
Apr 03, 2025 am 12:11 AM
What is the Linux best used for?
Apr 03, 2025 am 12:11 AM
Linux is best used as server management, embedded systems and desktop environments. 1) In server management, Linux is used to host websites, databases, and applications, providing stability and reliability. 2) In embedded systems, Linux is widely used in smart home and automotive electronic systems because of its flexibility and stability. 3) In the desktop environment, Linux provides rich applications and efficient performance.
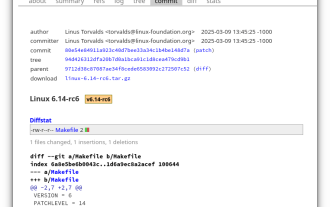 Linux Kernel 6.14 RC6 Released
Mar 24, 2025 am 10:21 AM
Linux Kernel 6.14 RC6 Released
Mar 24, 2025 am 10:21 AM
Linus Torvalds has released Linux Kernel 6.14 Release Candidate 6 (RC6), reporting no significant issues and keeping the release on track. The most notable change in this update addresses an AMD microcode signing issue, while the rest of the updates
 How To Enable Bucklespring Keyboard Sound In Linux
Mar 22, 2025 am 09:07 AM
How To Enable Bucklespring Keyboard Sound In Linux
Mar 22, 2025 am 09:07 AM
Experience the satisfying click of a vintage IBM Model M keyboard, even without owning one! This tutorial shows you how to enable the authentic sound of a bucklespring keyboard on your Linux system using the Bucklespring utility. Table of Contents -
